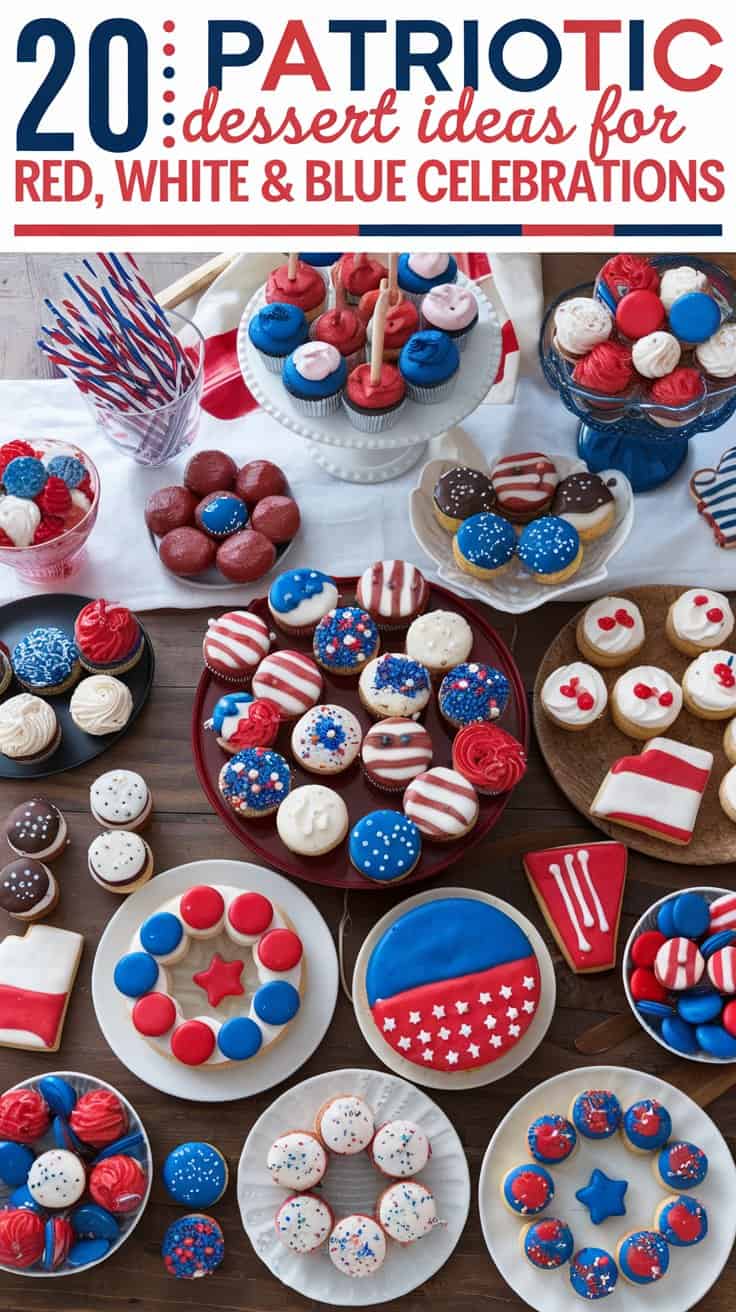
Looking for some fun and festive ways to celebrate with sweets? Dive into our collection of patriotic dessert ideas that showcase vibrant red, white, and blue treats. Whether you’re hosting a backyard BBQ or just want to add a splash of color to your summer events, these simple recipes are sure to delight and impress everyone at the table.
Red, White, And Blue Cupcakes

These delightful red, white, and blue cupcakes are a festive treat that perfectly captures the spirit of celebration. They’re light, fluffy, and topped with colorful swirls of frosting that are as tasty as they are eye-catching. Making these cupcakes is straightforward, making them an ideal choice for everyone from novice bakers to seasoned pros.
Each bite is a burst of sweetness, with a vanilla base that pairs beautifully with the rich buttercream frosting. These cupcakes are perfect for any patriotic occasion, whether you’re hosting a barbecue, attending a picnic, or just wanting a fun and cheerful dessert to share. Get ready to impress your friends and family with this simple yet delightful recipe!
Ingredients
- 1 ½ cups all-purpose flour
- 1 tsp baking powder
- ½ tsp salt
- ½ cup unsalted butter, softened
- 1 cup granulated sugar
- 2 large eggs
- 2 tsp vanilla extract
- ½ cup milk
- Red and blue food coloring
- 3 cups buttercream frosting
- Star sprinkles (optional)
Instructions
- Preheat the oven to 350°F (175°C) and line a cupcake pan with liners.
- In a bowl, whisk together flour, baking powder, and salt. Set aside.
- In a separate bowl, cream the softened butter and sugar until light and fluffy. Add eggs one at a time, followed by vanilla extract.
- Gradually mix in the dry ingredients, alternating with milk, until just combined.
- Divide the batter equally into three bowls. Color one bowl with red food coloring, one with blue, and leave one plain.
- In each cupcake liner, add a spoonful of each colored batter, creating layers.
- Bake for about 18-20 minutes or until a toothpick inserted in the center comes out clean. Allow to cool completely.
- Once cooled, decorate with buttercream frosting using piping bags to create red, white, and blue swirls. Add star sprinkles for a festive touch.
Berry Flag Fruit Tart
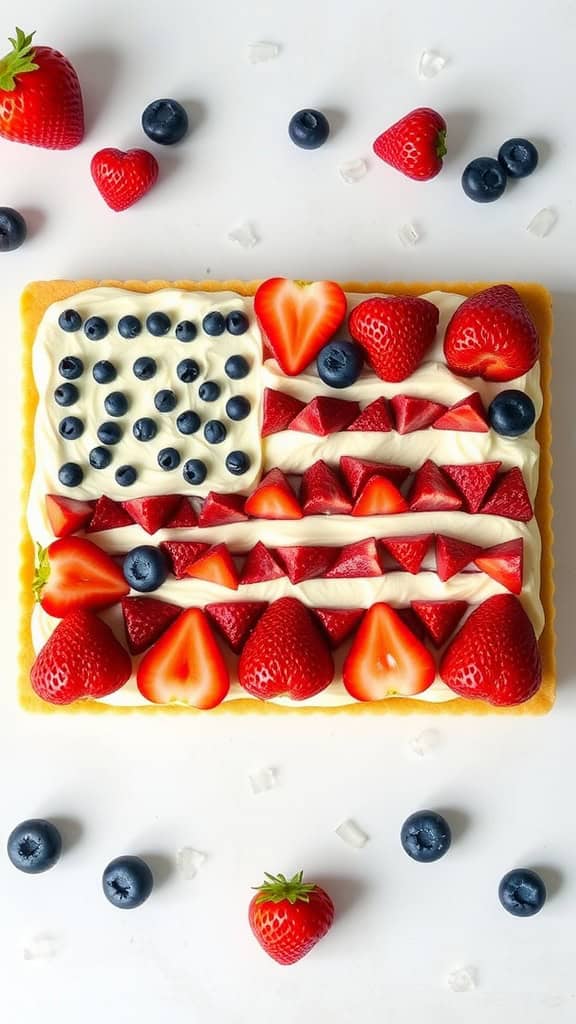
This Berry Flag Fruit Tart is a delightful and festive dessert that celebrates the flavors of summer. With its creamy base, fresh berries, and vibrant colors, it brings a touch of joy to any gathering or holiday celebration. The combination of sweet strawberries and tart blueberries creates a refreshing taste that everyone will love.
Making this tart is simple and fun, perfect for bakers of all skill levels. Whether you’re preparing for a Fourth of July barbecue or a casual summer get-together, this dessert will surely impress your guests without requiring hours in the kitchen.
Ingredients
- 1 pre-made tart crust
- 1 cup heavy cream
- 1/2 cup powdered sugar
- 1 teaspoon vanilla extract
- 2 cups strawberries, hulled and sliced
- 1 cup blueberries
Instructions
- Prepare the Cream: In a mixing bowl, whip the heavy cream with powdered sugar and vanilla extract until soft peaks form.
- Assemble the Tart: Spread the whipped cream evenly over the pre-made tart crust.
- Decorate with Berries: Arrange the strawberries and blueberries on top, creating stripes and a star pattern to resemble the American flag.
- Chill: Place the tart in the refrigerator for at least 30 minutes before serving to let it set.
- Serve & Enjoy: Slice and serve chilled for a refreshing dessert that will delight everyone!
Patriotic Layered Jello Cups
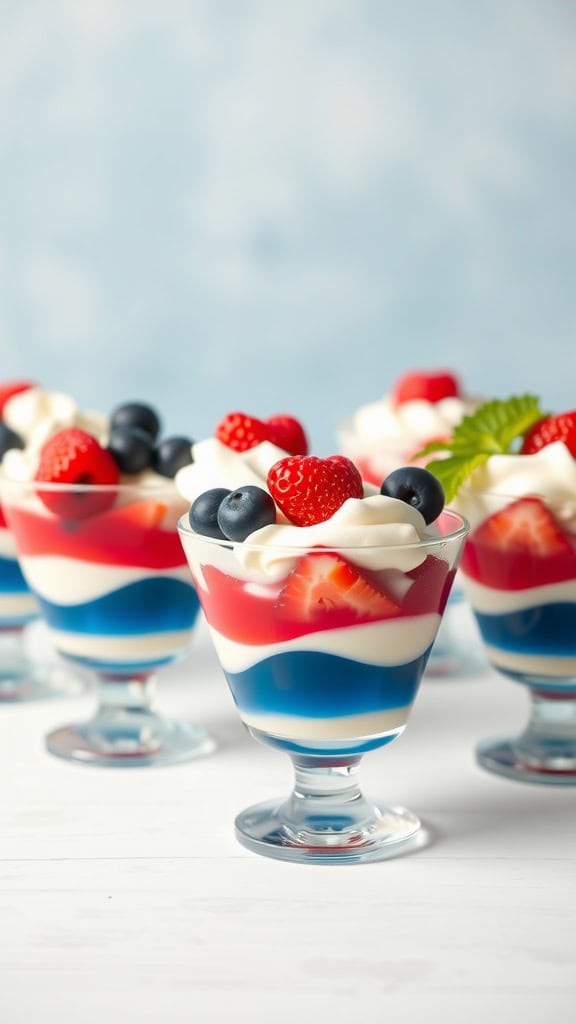
These layered Jello cups are a delightful way to celebrate any patriotic occasion, whether it’s the Fourth of July or Memorial Day. They combine the sweet and fruity flavors of strawberries and blueberries with the fun, wobbly texture of Jello, creating a treat that’s both appealing and easy to enjoy. The vibrant red, white, and blue colors make them a real showstopper at any gathering.
What’s more, making these cups is a straightforward process that even kids can help with! Layering the Jello and the creamy filling is a fun activity that results in a dessert that looks as good as it tastes. Get ready to impress your friends and family with these colorful treats!
Ingredients
- 1 package (3 oz) strawberry Jello
- 1 package (3 oz) blue raspberry Jello
- 1 cup boiling water
- 1 cup cold water
- 1 1/2 cups whipped topping
- 1 cup yogurt (vanilla or plain)
- Fresh strawberries and blueberries for garnish
Instructions
- Prepare the Jello: In a bowl, dissolve the strawberry Jello in 1 cup of boiling water and stir until fully dissolved. Add 1 cup of cold water and mix well. Pour the mixture into cups and refrigerate for about 1-2 hours until set.
- Make the Cream Layer: In a separate bowl, mix the whipped topping and yogurt until well combined. Once the strawberry layer is set, add a layer of the whipped topping mixture on top of the Jello.
- Prepare the Blue Layer: Repeat the same process with the blue raspberry Jello: dissolve it in boiling water, add cold water, and pour over the cream layer. Return to the fridge and let it set for another hour.
- Garnish and Serve: Once the final layer is set, top the cups with fresh strawberries and blueberries before serving. Enjoy your festive, layered Jello cups!
Star-Spangled Rice Krispie Treats
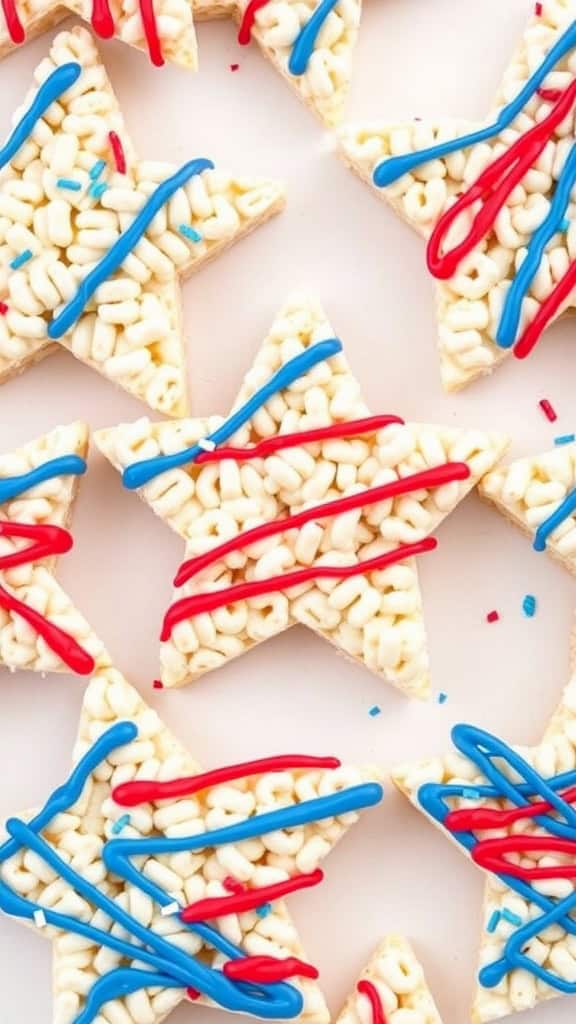
Star-Spangled Rice Krispie Treats are a fun and festive way to celebrate any patriotic occasion. These sweet treats are easy to make and are sure to be a hit with kids and adults alike. With a delightful crunch and a gooey marshmallow center, they offer a delightful blend of textures that everyone loves.
Incorporating red, white, and blue colors, these treats are as cheerful as they are tasty. Whether it’s for a Fourth of July gathering or a Memorial Day picnic, they add a splash of color to your dessert table. Plus, they can be whipped up in no time, making them a convenient option for last-minute celebrations!
Ingredients
- 6 cups Rice Krispies cereal
- 4 cups mini marshmallows
- 3 tablespoons unsalted butter
- 1/2 teaspoon vanilla extract
- Red and blue candy melts
- Red, white, and blue sprinkles
Instructions
- Prepare the Pan: Grease a 9×13-inch baking dish with butter or cooking spray.
- Melt the Butter: In a large saucepan over low heat, melt the butter. Add the mini marshmallows and stir until completely melted and smooth. Stir in the vanilla extract.
- Add the Cereal: Remove the saucepan from heat and add the Rice Krispies cereal. Stir until the cereal is fully coated with the marshmallow mixture.
- Transfer to Dish: Pour the mixture into the prepared baking dish. Press it down evenly using a spatula or your hands (dampening your hands can help prevent sticking).
- Cool and Cut: Let the mixture cool completely before cutting it into star shapes using a cookie cutter.
- Decorate: Melt the red and blue candy melts separately according to package instructions. Drizzle them over the star-shaped treats and top with sprinkles for a festive touch.
Red Velvet Cheesecake Bars
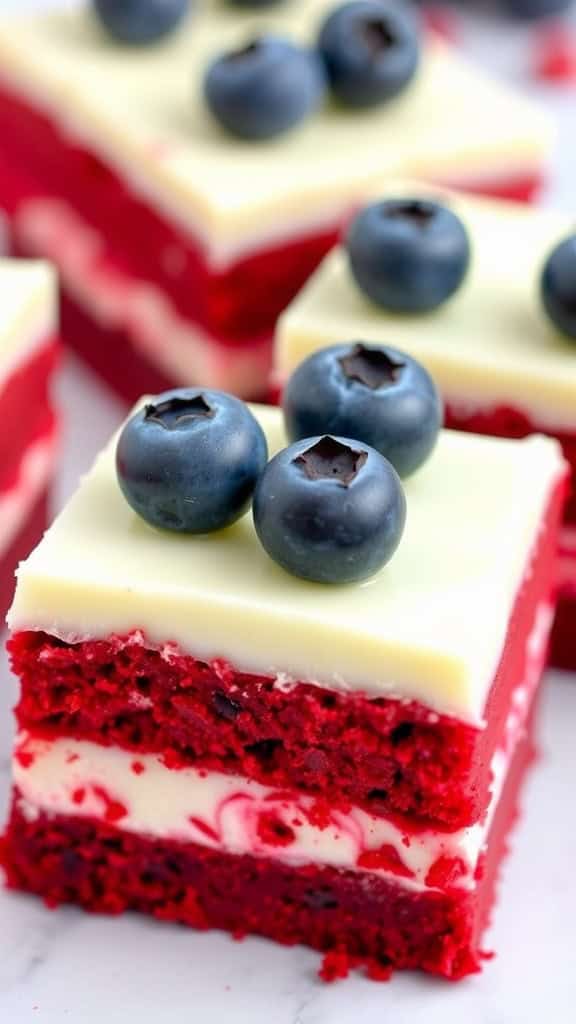
Red Velvet Cheesecake Bars are a delightful twist on a classic dessert, combining the rich flavor of red velvet with creamy cheesecake. This treat offers a perfect balance of sweetness and tang, making every bite a satisfying experience. Plus, they are surprisingly simple to make, which means you don’t have to be a baking pro to impress your friends and family with these festive bars.
These bars have a beautiful red hue that stands out, especially when topped with a smooth layer of white chocolate and fresh blueberries. They not only taste great but also look lovely, making them ideal for gatherings, especially during patriotic celebrations. Serve them chilled or at room temperature, and get ready to enjoy a treat that will have everyone asking for the recipe!
Ingredients
- 1 ½ cups all-purpose flour
- 1 cup granulated sugar
- ½ cup unsweetened cocoa powder
- 1 teaspoon baking powder
- ½ teaspoon baking soda
- ¼ teaspoon salt
- ½ cup unsalted butter, melted
- 1 large egg
- 1 tablespoon red food coloring
- 1 teaspoon vanilla extract
- 8 oz cream cheese, softened
- 1 cup powdered sugar
- 1 teaspoon vanilla extract (for cheesecake layer)
- ½ cup white chocolate, melted
- Fresh blueberries (for topping)
Instructions
- Preheat your oven to 350°F (175°C). Grease a 9×9 inch baking pan and line it with parchment paper for easy removal.
- In a mixing bowl, whisk together flour, sugar, cocoa powder, baking powder, baking soda, and salt.
- In another bowl, combine melted butter, egg, red food coloring, and vanilla extract. Mix well, then gradually add the dry ingredients, stirring until just combined.
- Spread the red velvet mixture evenly in the prepared pan.
- In a separate bowl, beat together softened cream cheese, powdered sugar, and vanilla extract until smooth. Pour this cheesecake mixture over the red velvet layer.
- Use a knife to gently swirl the two mixtures together for a marbled effect.
- Bake for 25-30 minutes or until the edges are set. Allow to cool completely in the pan.
- Once cooled, drizzle melted white chocolate over the top and sprinkle with fresh blueberries. Cut into bars and serve.
Blueberry Lemonade Popsicles
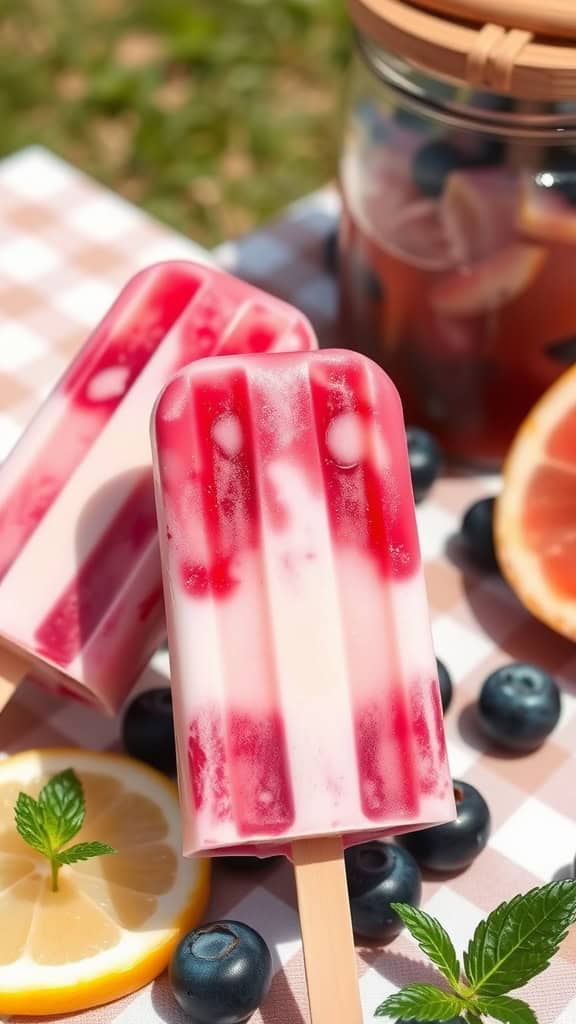
Blueberry Lemonade Popsicles are a refreshing and delightful treat that perfectly capture the essence of summertime. With a bright burst of sweet blueberries balanced by tangy lemonade, these popsicles are not only delicious but also incredibly easy to make. Whether you’re cooling off on a hot day or looking for a fun dessert to impress your friends, these popsicles fit the bill.
The blend of flavors is simple yet satisfying, making them a great option for all ages. Plus, you can customize the sweetness to your liking, making this recipe a great choice for gatherings or family fun. Get ready to enjoy a taste of summer with these colorful and tasty popsicles!
Ingredients
- 2 cups fresh blueberries
- 1 cup lemonade (store-bought or homemade)
- 1/2 cup Greek yogurt (plain or vanilla)
- 1/4 cup honey or agave syrup (adjust to taste)
- 2 tablespoons lemon juice
Instructions
- Blend Blueberries: In a blender, combine the fresh blueberries and a tablespoon of honey. Blend until smooth.
- Mix Lemonade: In a bowl, mix the lemonade, Greek yogurt, lemon juice, and remaining honey until well combined.
- Layer Mixtures: Pour a layer of the blueberry mixture into popsicle molds, followed by a layer of the lemonade mixture. Alternate layers until you fill the molds.
- Add Sticks: Insert popsicle sticks into the molds and freeze for at least 4-6 hours, or until completely solid.
- Serve: To remove the popsicles, run warm water over the outside of the molds for a few seconds. Enjoy your refreshing Blueberry Lemonade Popsicles!
Strawberry Shortcake Trifles
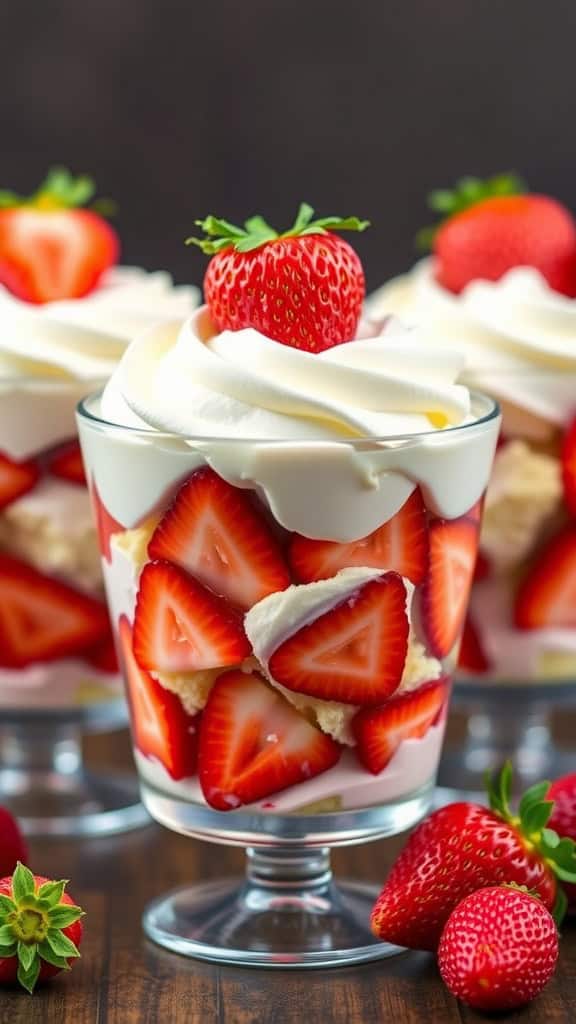
Strawberry Shortcake Trifles are a delightful mix of sweet strawberries, fluffy cake, and creamy whipped topping. This dessert is not just a treat for the taste buds but also a visual feast, stacked beautifully in clear cups or bowls, making them perfect for any gathering.
Not only are these trifles tasty, but they’re also quite simple to whip up. With layers of flavor and texture, they provide a refreshing way to enjoy strawberries during the warmer months. Plus, they can be made ahead of time, allowing you to enjoy your company without the stress of last-minute preparations.
Ingredients
- 2 cups fresh strawberries, hulled and sliced
- 1 cup whipped cream or cool whip
- 1 pound of sponge cake or vanilla cake, cut into cubes
- 1/4 cup sugar (for macerating strawberries)
- 1 teaspoon vanilla extract
Instructions
- Macerate the strawberries by combining them with sugar in a bowl. Let them sit for about 15 minutes, allowing the juices to release.
- In a trifle dish or individual cups, layer a portion of the cake cubes at the bottom.
- Add a layer of the macerated strawberries, followed by a layer of whipped cream.
- Repeat the layers until you reach the top of the dish, finishing with whipped cream.
- Garnish with a few whole strawberries or mint leaves for a pop of color.
- Chill in the refrigerator for at least an hour before serving to let the flavors meld.
American Flag Brownies
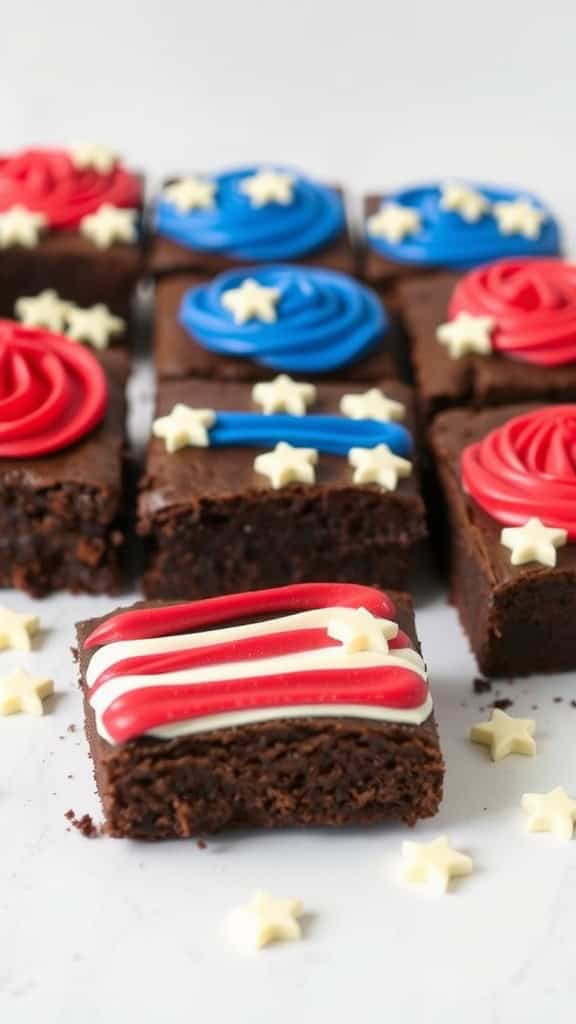
American Flag Brownies are a delightful dessert that combines rich chocolatey goodness with festive colors. These brownies are not only delicious but also visually striking, making them perfect for any patriotic celebration. The soft, fudgy texture pairs wonderfully with the creamy frosting and adds a fun twist to the traditional brownie.
This recipe is quite simple and can be made even by novice bakers. With just a few ingredients and some creative decorating, you can whip up a batch that will impress your friends and family at gatherings like Independence Day or Memorial Day!
Ingredients
- 1 cup unsalted butter
- 2 cups granulated sugar
- 4 large eggs
- 1 teaspoon vanilla extract
- 1 cup all-purpose flour
- 1 cup unsweetened cocoa powder
- 1 teaspoon baking powder
- 1/2 teaspoon salt
- Red and blue frosting (store-bought or homemade)
- White chocolate stars (for decoration)
Instructions
- Preheat the oven to 350°F (175°C) and grease a 9×13-inch baking pan.
- In a large bowl, melt the butter and stir in the sugar until well combined. Add the eggs one at a time, mixing well after each addition. Stir in the vanilla.
- In another bowl, whisk together the flour, cocoa powder, baking powder, and salt. Gradually add the dry ingredients to the wet mixture, stirring until just combined.
- Pour the brownie batter into the prepared baking pan and spread evenly. Bake for 25-30 minutes, or until a toothpick inserted in the center comes out clean.
- Allow the brownies to cool completely before decorating. Once cooled, use the red and blue frosting to create stripes and stars, ensuring to mimic the American flag design. Top with white chocolate stars for a festive touch.
Patriotic Cookie Decorating Kit

Creating a festive cookie decorating kit is a delightful way to celebrate any patriotic occasion. These cookies are not only fun to make but also deliciously sweet, featuring a buttery base and vibrant royal icing in red, white, and blue. The process is simple, making it a great activity for families or friends who want to get creative together.
With a variety of cookie shapes, like stars and flags, you can let your imagination run wild. The best part is that everyone can personalize their cookies, adding their unique touches. Let’s dive into how to make these patriotic treats!
Ingredients
- 2 3/4 cups all-purpose flour
- 1 teaspoon baking powder
- 1/2 teaspoon salt
- 1 cup unsalted butter, softened
- 1 1/2 cups granulated sugar
- 1 large egg
- 1 teaspoon vanilla extract
- Red, white, and blue royal icing
- Sprinkles (optional)
Instructions
- Prepare the Cookie Dough: In a bowl, whisk together flour, baking powder, and salt. In a separate large bowl, cream together butter and sugar until light and fluffy. Add the egg and vanilla, mixing well. Gradually add the flour mixture until a soft dough forms.
- Chill the Dough: Wrap the dough in plastic wrap and refrigerate for at least 1 hour to make it easier to roll out.
- Roll and Cut: Preheat your oven to 350°F (175°C). Roll out the chilled dough on a lightly floured surface to about 1/4 inch thick. Use cookie cutters to cut out shapes and place them on a baking sheet lined with parchment paper.
- Bake: Bake in the preheated oven for 8-10 minutes, or until the edges are lightly golden. Allow the cookies to cool completely on a wire rack.
- Decorate: Once cool, use your royal icing to decorate the cookies in festive colors. Add sprinkles for an extra fun touch!
Red, White, And Blue Parfaits
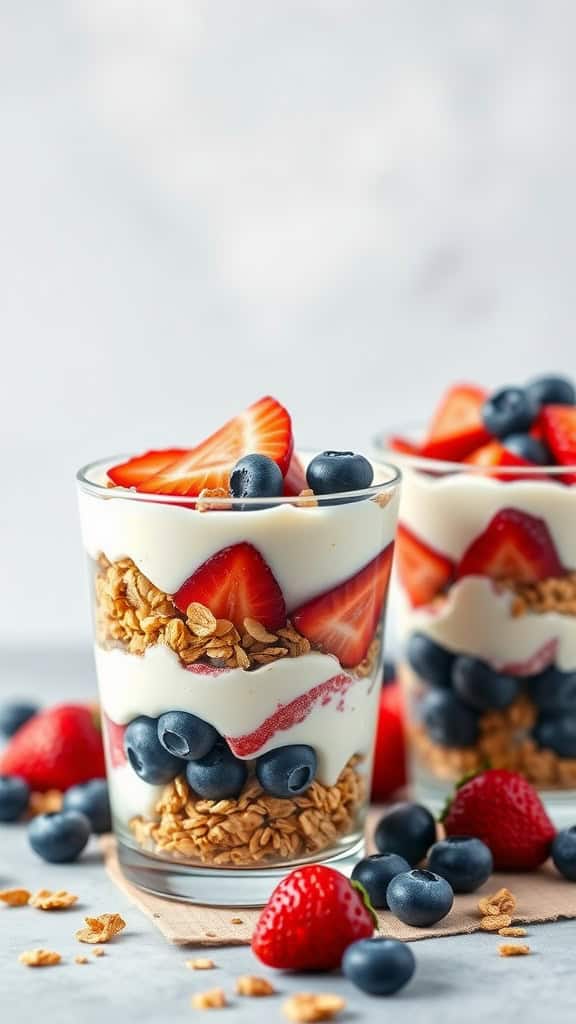
Red, white, and blue parfaits are a delightful way to celebrate any festive occasion. They blend the sweetness of strawberries and blueberries with creamy yogurt and crunchy granola, creating a treat that’s as pleasing to the eye as it is to the palate. This dessert is not only delicious but also super easy to prepare, making it a great choice for all skill levels in the kitchen.
The layers of fresh fruit and yogurt provide a refreshing balance, while the granola adds a satisfying crunch. Perfect for summer gatherings, barbecues, or patriotic holidays, these parfaits can be made ahead of time and stored in the fridge, making them a convenient dessert option.
Ingredients
- 2 cups vanilla yogurt
- 1 cup granola
- 1 cup strawberries, sliced
- 1 cup blueberries
Instructions
- In a clear glass or jar, start by adding a layer of granola at the bottom.
- Add a layer of yogurt on top of the granola.
- Next, layer in some sliced strawberries, followed by a layer of blueberries.
- Repeat the layering process until you reach the top of the glass, finishing with yogurt and a sprinkle of granola.
- Top with a few extra berries for decoration. Serve immediately or refrigerate until ready to enjoy.
Star-Shaped Fruit Kebabs
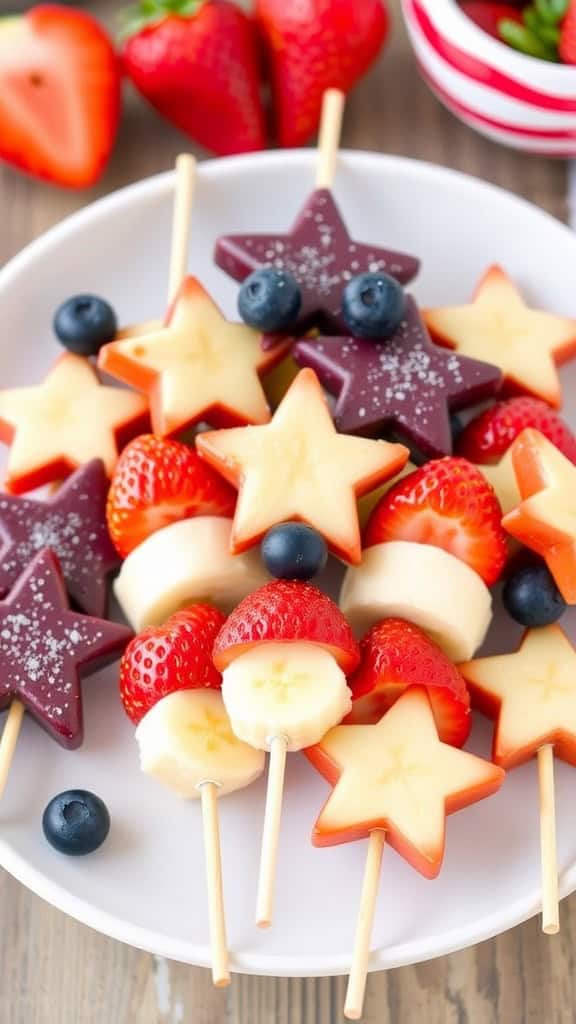
Star-shaped fruit kebabs are a delightful way to celebrate any occasion while adding a fun twist to your fruit platter. They’re not only visually appealing but also refreshing and tasty, making them a hit among both kids and adults. With just a few minutes of prep time, you can whip up these festive treats that burst with flavors of sweet strawberries, juicy blueberries, and tropical pineapple.
This recipe is simple and encourages creativity. You can mix and match your favorite fruits, making these kebabs adaptable for any preference. Whether it’s for a holiday barbecue or a casual summer picnic, these vibrant fruit skewers are sure to bring smiles to your gathering.
Ingredients
- 1 cup strawberries, hulled and sliced
- 1 cup pineapple, cut into star shapes
- 1 cup blueberries
- Wooden skewers
- Optional: melon or other fruits for variety
Instructions
- Prepare the fruit: Slice the strawberries and cut the pineapple into star shapes using a cookie cutter.
- Assemble the kebabs: Take a wooden skewer and thread a star-shaped pineapple piece, followed by a blueberry, then a slice of strawberry. Repeat until the skewer is filled, leaving some space at the end for handling.
- Repeat the process: Continue preparing more kebabs until all the fruit is used up.
- Serve chilled: Arrange the fruit kebabs on a serving platter and enjoy immediately or refrigerate until ready to serve.
Patriotic Cake Pops
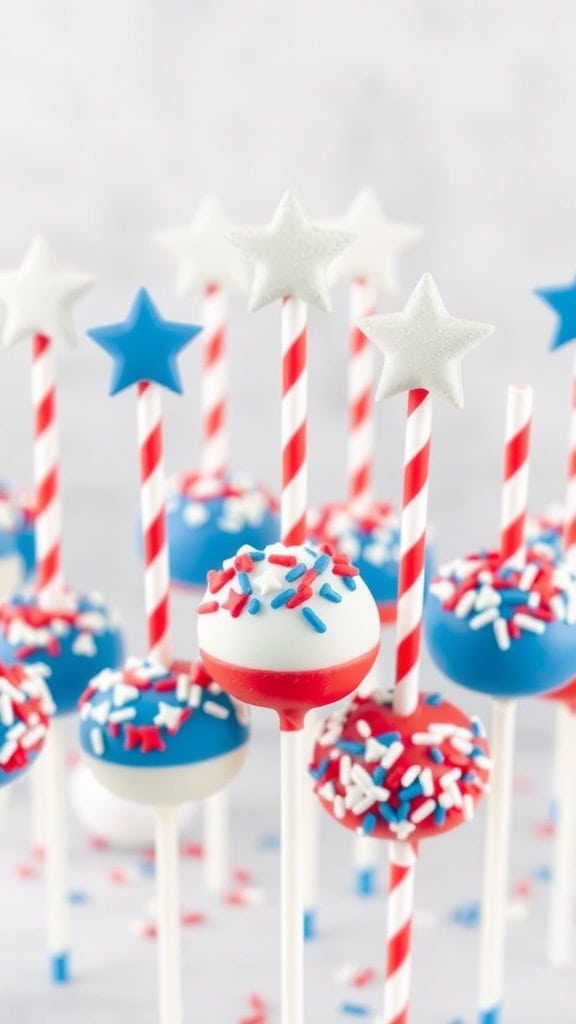
Indulge in these festive cake pops that celebrate all things red, white, and blue! These treats are not only a delight to the eyes but also offer a perfect blend of sweetness and flavor. With a soft, moist cake center coated in colorful chocolate, they are both fun to eat and easy to make, making them a great project for both beginner and experienced bakers.
These cake pops are perfect for any patriotic gathering, from Fourth of July barbecues to Memorial Day parties. The vibrant colors and fun toppings will surely impress your guests and add a festive touch to your dessert table. Let’s dive into the recipe!
Ingredients
- 1 box of cake mix (any flavor)
- 1 cup frosting (store-bought or homemade)
- 16 oz. white chocolate or candy melts
- Red and blue sprinkles
- Lollipop sticks
- Food coloring (optional, for extra vibrant colors)
Instructions
- Bake the Cake: Prepare the cake mix according to package instructions and bake in a 9×13 inch pan. Let it cool completely.
- Mix with Frosting: Crumble the cooled cake into a large bowl and mix in the frosting until well combined. The mixture should hold together when formed into a ball.
- Form the Pops: Scoop out small portions of the mixture and roll into balls, placing them on a baking sheet lined with parchment paper. Chill in the refrigerator for at least 30 minutes.
- Melt the Chocolate: In a microwave-safe bowl, melt the white chocolate or candy melts according to package instructions. If desired, add food coloring to create vibrant shades of red and blue.
- Dip and Decorate: Dip the tip of each lollipop stick into the melted chocolate, then insert it into the chilled cake ball. Once set, dip the entire cake pop into the chocolate, allowing excess to drip off, and quickly sprinkle with red and blue sprinkles before the chocolate hardens.
- Let Set: Place the decorated cake pops upright in a styrofoam block or a cake pop stand to set completely. Enjoy your festive treats!
Blueberry Muffins With Red Glaze
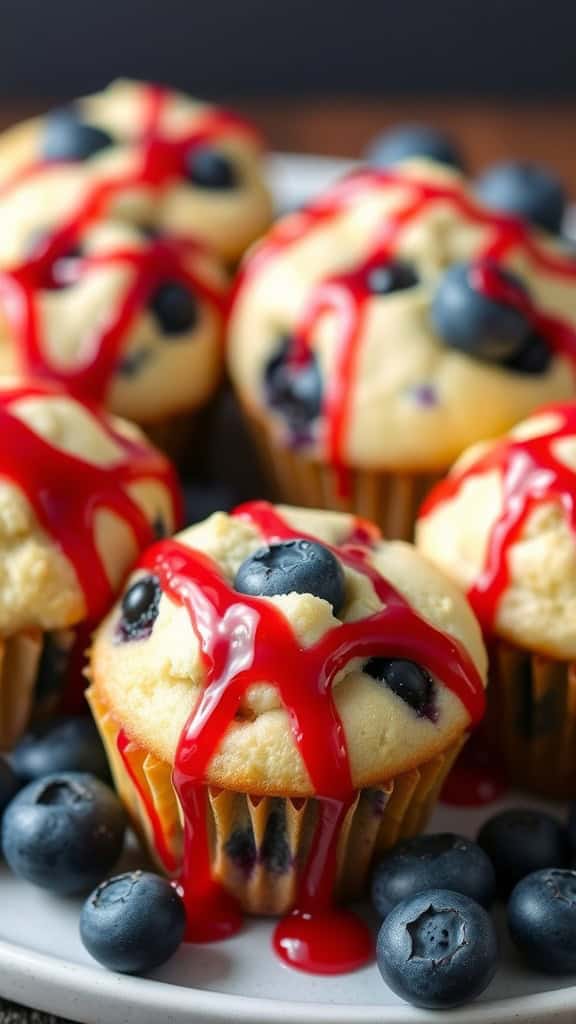
These blueberry muffins are a delightful treat that perfectly captures the spirit of celebration. With juicy blueberries bursting in each bite and a sweet red glaze drizzled on top, they offer a tasty balance of flavors. Easy to whip up, they’re perfect for any gathering or just a fun breakfast idea.
The combination of the soft muffin texture and the tartness of blueberries makes these muffins irresistible. The red glaze not only adds a festive touch but also a hint of sweetness that complements the muffins beautifully. Whether you’re planning a patriotic party or simply want a vibrant snack, these muffins will surely be a hit!
Ingredients
- 2 cups all-purpose flour
- 1 cup granulated sugar
- 2 teaspoons baking powder
- 1/2 teaspoon baking soda
- 1/2 teaspoon salt
- 1/2 cup unsalted butter, melted
- 1 cup buttermilk
- 2 large eggs
- 1 teaspoon vanilla extract
- 1 cup blueberries (fresh or frozen)
- 1/4 cup red food coloring
- 1 cup powdered sugar
- 1-2 tablespoons milk (for glaze)
Instructions
- Preheat the oven to 375°F (190°C) and line a muffin tin with paper liners.
- In a large bowl, whisk together flour, sugar, baking powder, baking soda, and salt.
- In a separate bowl, mix melted butter, buttermilk, eggs, and vanilla extract until well combined. Pour the wet ingredients into the dry ingredients and stir until just combined. Gently fold in the blueberries.
- Divide the batter evenly among the muffin cups, filling each about 2/3 full.
- Bake for 18-20 minutes or until the tops are golden and a toothpick comes out clean.
- While the muffins cool, prepare the red glaze by mixing powdered sugar, red food coloring, and milk until smooth. Drizzle the glaze over the cooled muffins before serving.
Red, White, And Blue Ice Cream Sundaes
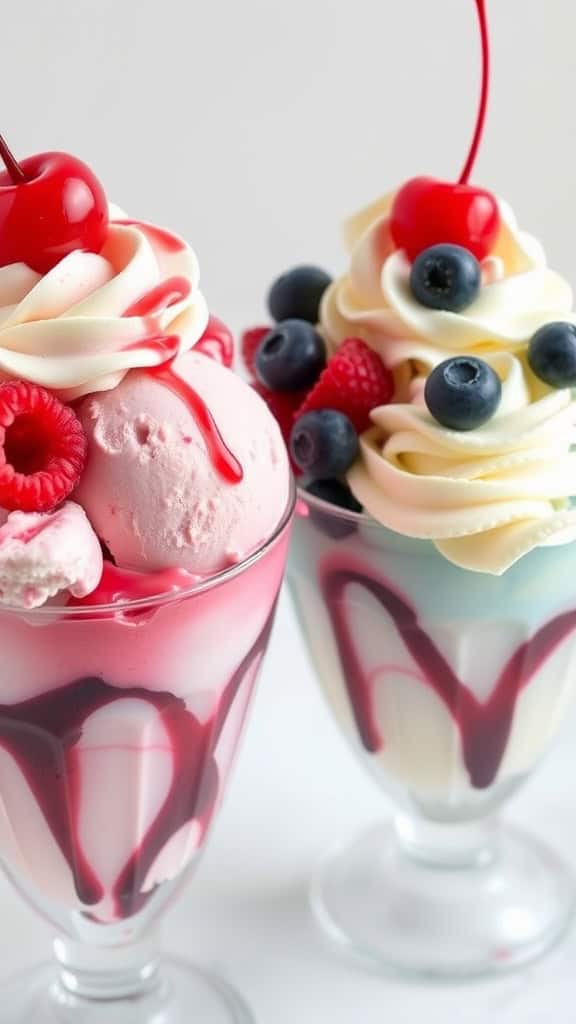
Red, white, and blue ice cream sundaes are the perfect treat for any festive occasion, especially during summer celebrations. Combining creamy textures with fresh fruity flavors, these sundaes are not only visually striking but also packed with delicious taste. They are simple to make, making them a great choice for family gatherings or parties.
This dessert features layers of strawberry, vanilla, and blueberry ice cream, drizzled with colorful syrups and topped with whipped cream and fresh berries. Each bite is a delightful mix of sweetness and creaminess that will make your taste buds sing!
Ingredients
- 2 cups strawberry ice cream
- 2 cups vanilla ice cream
- 2 cups blueberry ice cream
- 1/2 cup strawberry syrup
- 1/2 cup blueberry syrup
- 1 cup whipped cream
- Fresh strawberries, for garnish
- Fresh blueberries, for garnish
- Maraschino cherries, for topping
Instructions
- Begin by scooping the strawberry ice cream into the bottom of a tall glass or sundae dish.
- Next, add a layer of vanilla ice cream on top, followed by a layer of blueberry ice cream.
- Drizzle strawberry syrup around the inside of the glass for a colorful presentation.
- Top the sundaes with whipped cream and decorate with fresh berries and a maraschino cherry.
- Finish with a final drizzle of blueberry syrup over the whipped cream for an extra touch of sweetness.
- Serve immediately and enjoy your festive treat!
Star-Spangled Pancakes
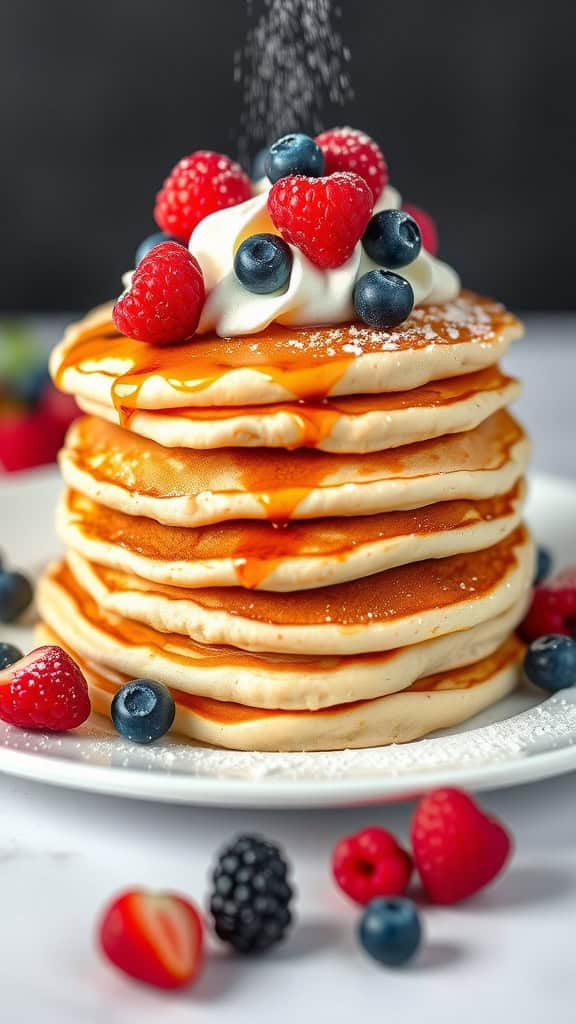
Star-Spangled Pancakes are a delightful way to celebrate any occasion with a burst of color and flavor. These fluffy pancakes are layered high and topped with a medley of fresh berries, making them as pleasing to the eye as they are to the palate. The sweetness of the pancakes pairs beautifully with the tartness of the berries, creating a balanced treat that’s sure to impress your family and friends.
Not only are these pancakes visually striking, but they’re also super easy to whip up. Whether it’s a holiday breakfast or a weekend brunch, this recipe can be prepared in no time. Let’s get to it and make your next meal a festive celebration!
Ingredients
- 1 cup all-purpose flour
- 2 tablespoons granulated sugar
- 1 tablespoon baking powder
- 1/2 teaspoon salt
- 1 cup milk
- 1 large egg
- 2 tablespoons melted butter
- 1 teaspoon vanilla extract
- Fresh berries (strawberries, blueberries, raspberries)
- Whipped cream (optional)
- Maple syrup for drizzling
Instructions
- Mix Dry Ingredients: In a bowl, whisk together flour, sugar, baking powder, and salt.
- Combine Wet Ingredients: In another bowl, mix milk, egg, melted butter, and vanilla extract until well combined.
- Combine Mixtures: Pour the wet ingredients into the dry ingredients. Stir gently until just combined; a few lumps are okay.
- Cook the Pancakes: Heat a non-stick skillet over medium heat. Pour about 1/4 cup of batter for each pancake. Cook until bubbles form on the surface, then flip and cook until golden brown on the other side.
- Stack and Serve: Layer the pancakes on a plate, top with the fresh berries, whipped cream, and drizzle with maple syrup. Enjoy your festive Star-Spangled Pancakes!
Red, White, And Blue Chocolate Bark
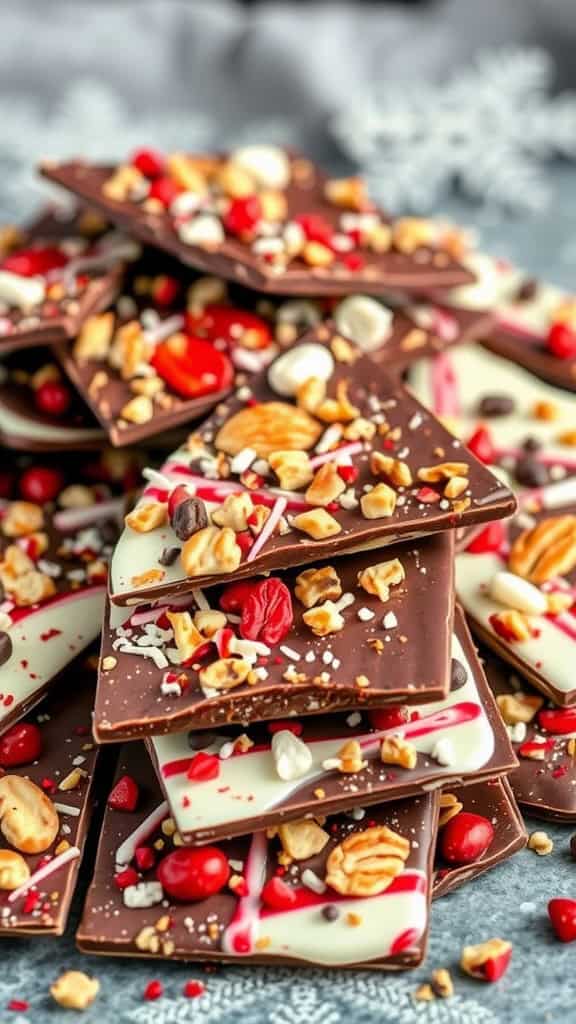
Red, white, and blue chocolate bark is a delightful treat that captures the spirit of celebration in every bite. This recipe combines sweet chocolate with vibrant colors and textures, making it a fun and easy dessert to whip up for any occasion. It’s not only visually appealing but also offers a satisfying crunch with hints of sweetness from various toppings.
Creating this chocolate bark is incredibly simple, which makes it a great project for both kids and adults. Just melt, mix, and assemble, and you’ll have a colorful dessert ready to impress your guests. With the combination of rich dark and creamy white chocolate, plus festive toppings, this dessert is sure to be a hit!
Ingredients
- 2 cups dark chocolate chips
- 2 cups white chocolate chips
- 1/2 cup red candy melts or sprinkles
- 1/2 cup blue candy melts or sprinkles
- 1/2 cup chopped nuts (optional)
- 1/2 cup mini marshmallows (optional)
- 1 teaspoon sea salt (for garnish)
Instructions
- Melt the Chocolates: In separate bowls, melt the dark chocolate chips and white chocolate chips in the microwave or using a double boiler. Stir until smooth.
- Spread the Base: On a parchment-lined baking sheet, spread the melted dark chocolate evenly to form a rectangular layer.
- Add White Chocolate: Drizzle the melted white chocolate over the dark chocolate and use a knife or a skewer to create swirls for a marbled effect.
- Add Toppings: Immediately sprinkle the red and blue candy melts, chopped nuts, and mini marshmallows over the chocolate. Be as generous as you like!
- Chill: Place the baking sheet in the refrigerator for about 30 minutes or until the chocolate is set.
- Break and Serve: Once set, break the chocolate bark into pieces and sprinkle with sea salt before serving. Enjoy your festive treat!
Fourth Of July Sugar Cookies
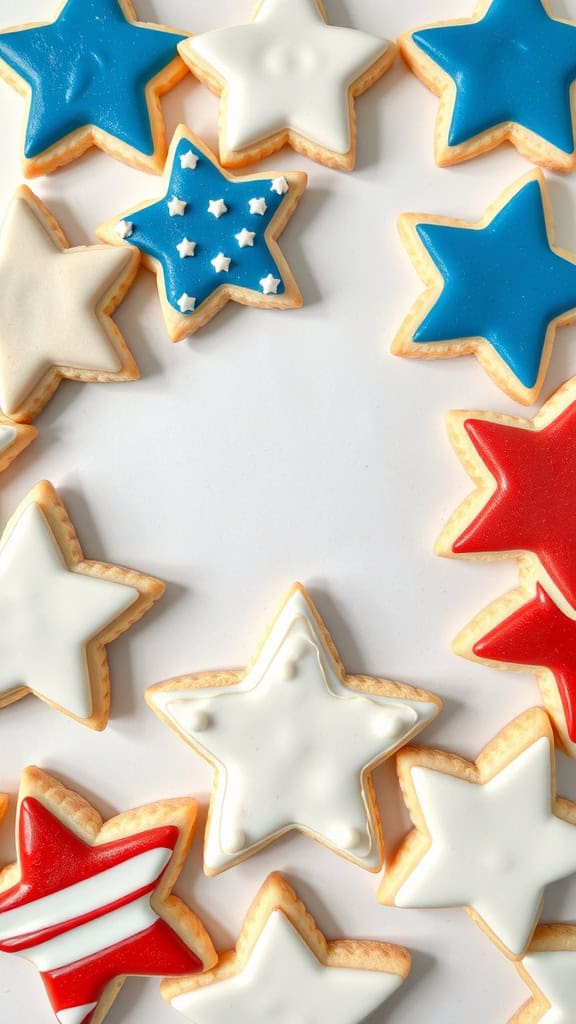
These Fourth of July sugar cookies are a festive way to celebrate the holiday! With their bright red, white, and blue colors, they’re as fun to make as they are to eat. The cookies are soft and buttery with a delightful sweetness that pairs perfectly with a variety of toppings.
The best part? They’re simple to whip up, making them a great choice for baking with kids or for a last-minute treat. Whether you’re hosting a barbecue or attending a picnic, these cookies will surely be a hit!
Ingredients
- 2 3/4 cups all-purpose flour
- 1 teaspoon baking soda
- 1/2 teaspoon baking powder
- 1 cup unsalted butter, softened
- 1 1/2 cups white sugar
- 1 egg
- 1 teaspoon vanilla extract
- 1/2 teaspoon almond extract
- 1/2 teaspoon salt
- Red, white, and blue food coloring
- Royal icing for decoration
Instructions
- Prepare the Dough: In a bowl, mix together flour, baking soda, and baking powder. In a separate bowl, cream together the butter and sugar until smooth. Beat in the egg, vanilla extract, and almond extract. Gradually add the dry ingredients to the wet, mixing until combined.
- Chill: Wrap the dough in plastic wrap and refrigerate for at least 1 hour to firm it up.
- Roll and Cut: Preheat your oven to 375°F (190°C). Roll out the dough on a floured surface to about 1/4 inch thick. Use cookie cutters to cut out star shapes.
- Bake: Place the cookies on ungreased baking sheets and bake for 8-10 minutes until the edges are lightly golden. Let them cool completely.
- Decorate: Once cooled, use royal icing colored with food coloring to decorate your cookies in festive red, white, and blue designs.
Berry Blast Smoothie Bowl
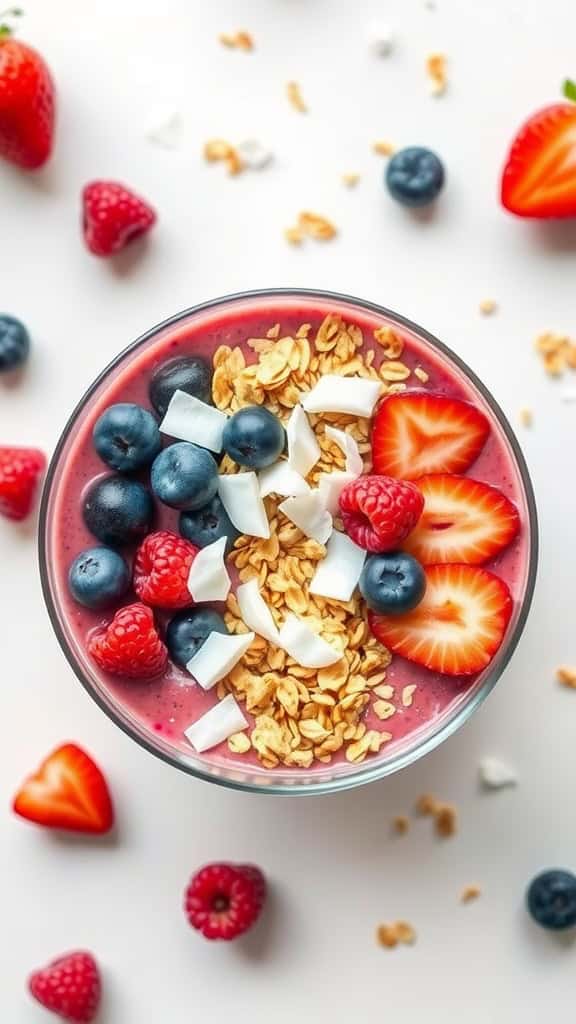
The Berry Blast Smoothie Bowl is a delightful way to celebrate summer with its vibrant red, white, and blue colors. This refreshing dish combines the natural sweetness of berries with creamy yogurt for a wholesome treat. It’s not only pleasing to the eye but also packs a punch of flavor, making it an enjoyable breakfast or snack option.
Simple to whip up, this smoothie bowl can be customized with a variety of toppings. Whether you prefer crunchy granola, nutty coconut flakes, or extra fresh fruit, you can make it your own. Get ready to serve up a delicious and nutritious treat!
Ingredients
- 1 cup frozen strawberries
- 1/2 cup frozen raspberries
- 1 cup Greek yogurt
- 1/2 cup almond milk
- 1 tablespoon honey (optional)
- 1/2 cup granola
- 1/2 cup fresh blueberries
- 1/4 cup shredded coconut
Instructions
- Blend the Berries: In a blender, combine frozen strawberries, raspberries, Greek yogurt, almond milk, and honey if desired. Blend until smooth and creamy.
- Prepare the Bowl: Pour the smoothie mixture into a bowl and use a spoon to create a nice, even surface.
- Add Toppings: Sprinkle granola over the smoothie bowl, then arrange fresh blueberries and sliced strawberries on top. Finish with shredded coconut for an extra touch of flavor.
- Serve Immediately: Enjoy your Berry Blast Smoothie Bowl fresh for the best taste and texture!
Red, White, And Blue Cheesecake
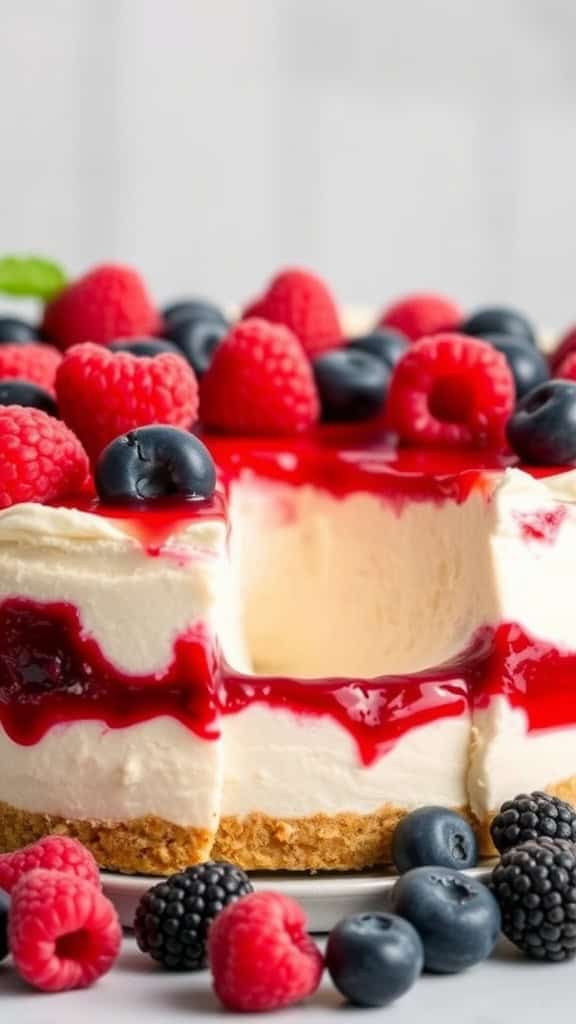
This Red, White, and Blue Cheesecake is a delightful dessert that combines creamy cheesecake with a refreshing burst of berries. It offers a rich, velvety texture with a hint of tanginess from the cream cheese, perfectly balanced by the sweetness of the fresh fruits. Ideal for summer gatherings or patriotic celebrations, this treat is simple to whip up and will certainly impress your friends and family.
Layered with a buttery graham cracker crust, smooth cheesecake filling, and vibrant red raspberry sauce topped with blueberries and raspberries, it’s a feast for both the eyes and the palate. Not only is it visually appealing, but the combination of flavors is sure to satisfy any sweet tooth!
Ingredients
- 1 ½ cups graham cracker crumbs
- ½ cup unsalted butter, melted
- 2 cups cream cheese, softened
- 1 cup granulated sugar
- 2 large eggs
- 1 teaspoon vanilla extract
- 1 cup sour cream
- 1 cup fresh raspberries
- 1 cup fresh blueberries
- 1 cup raspberry sauce
Instructions
- Prepare the Crust: Preheat the oven to 325°F (160°C). In a mixing bowl, combine graham cracker crumbs and melted butter. Press the mixture firmly into the bottom of a springform pan. Bake for 10 minutes and let it cool.
- Make the Cheesecake Filling: In a large bowl, beat the softened cream cheese and granulated sugar until smooth. Add eggs one at a time, mixing well after each addition. Stir in vanilla and sour cream until well combined.
- Pour the Filling: Pour the cheesecake mixture over the cooled crust, smoothing the top with a spatula. Bake for 50-60 minutes, until the center is set but still slightly jiggly.
- Cool and Chill: Turn off the oven and let the cheesecake cool inside with the door slightly ajar for about an hour. Then, refrigerate for at least 4 hours or overnight.
- Finish with Toppings: Once chilled, carefully remove the sides of the springform pan. Drizzle raspberry sauce over the top, and scatter fresh raspberries and blueberries to create a festive look.
Patriotic Chocolate-Covered Strawberries
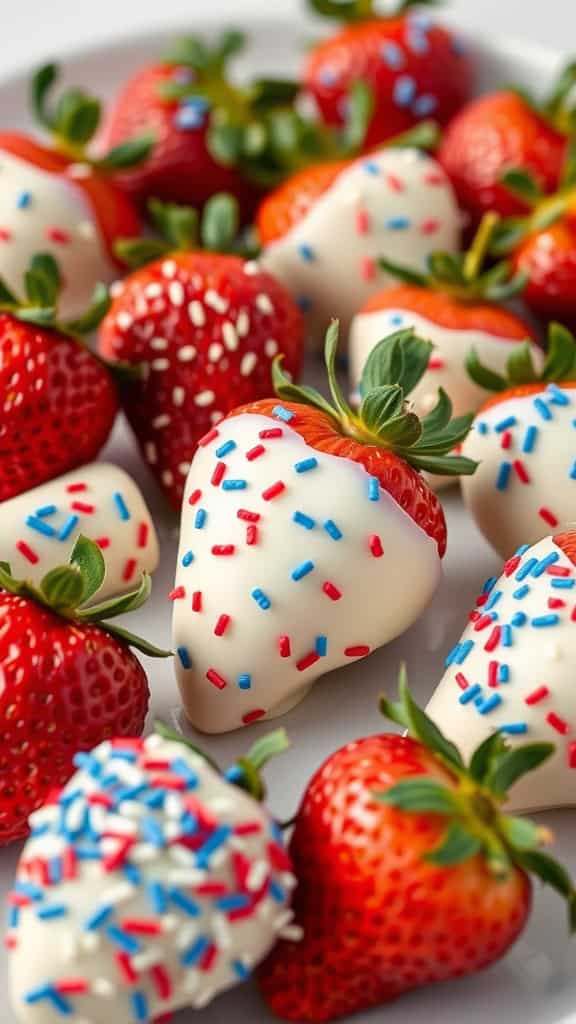
These delightful chocolate-covered strawberries are a fun and festive treat that add a splash of color to any celebration. Dipped in white chocolate and sprinkled with red and blue decorations, they are not just visually appealing but also bursting with fresh flavor. The sweet, creamy chocolate pairs perfectly with the juicy strawberries, making every bite a delightful experience.
Making these treats is simple and does not require any baking skills, making them a great option for both seasoned bakers and kitchen novices alike. They are perfect for gatherings, picnics, or just enjoying at home while celebrating any patriotic occasion.
Ingredients
- 1 pound fresh strawberries
- 8 ounces white chocolate, chopped
- Red and blue sprinkles or edible decorations
Instructions
- Wash and dry the strawberries thoroughly, ensuring there is no moisture left.
- Melt the white chocolate in a microwave-safe bowl, heating in 30-second intervals and stirring until smooth.
- Dip each strawberry into the melted chocolate, covering about two-thirds of the berry.
- Allow excess chocolate to drip off, then immediately sprinkle red and blue decorations over the chocolate coating.
- Place the decorated strawberries on a baking sheet lined with parchment paper.
- Refrigerate the strawberries for about 30 minutes, or until the chocolate is set. Serve chilled and enjoy!