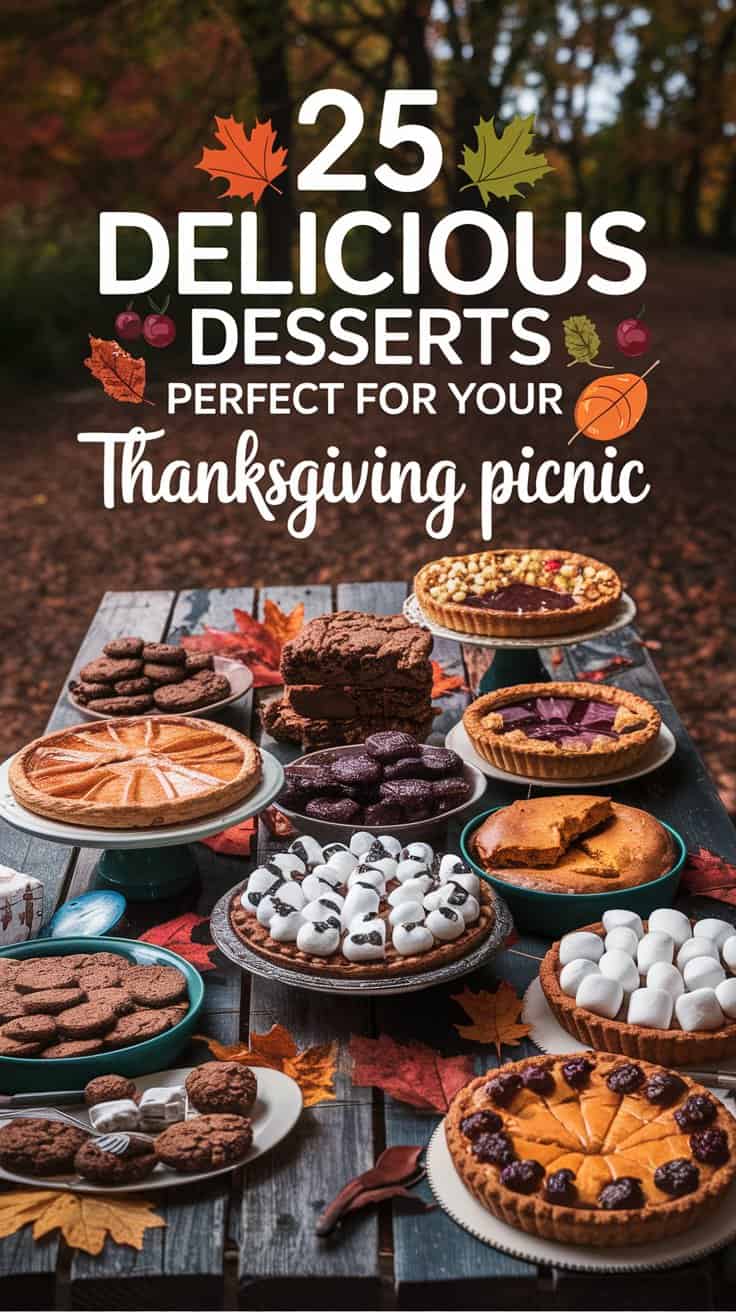
When it’s time to pack up for a Thanksgiving picnic, desserts can really take your spread to the next level. Whether you prefer something classic like pie or want to whip up a fun treat, there are plenty of options that are easy to transport and sure to satisfy. Here’s a roundup of delightful desserts that will sweeten your outdoor feast and keep everyone coming back for seconds.
Pumpkin Spice Cupcakes

Pumpkin spice cupcakes are a delightful treat that captures the essence of fall in every bite. These moist and flavorful cupcakes are infused with warm spices, making them a perfect addition to your Thanksgiving picnic. Simple to prepare, they bring together the comforting flavors of pumpkin, cinnamon, and nutmeg, topped with a creamy frosting that adds just the right touch of sweetness.
Whether you’re a pumpkin lover or just looking to impress your guests, these cupcakes are sure to please. They are easy to make, requiring common ingredients and minimal effort, so you can spend more time enjoying the festivities with family and friends.
Ingredients
- 1 cup all-purpose flour
- 1 teaspoon baking powder
- 1/2 teaspoon baking soda
- 1/2 teaspoon salt
- 1 teaspoon ground cinnamon
- 1/2 teaspoon ground nutmeg
- 1/4 teaspoon ground ginger
- 1/2 cup granulated sugar
- 1/2 cup brown sugar, packed
- 1/2 cup vegetable oil
- 2 large eggs
- 1 cup canned pumpkin puree
- 1 teaspoon vanilla extract
- 1 cup cream cheese, softened
- 2 cups powdered sugar
- 1 tablespoon milk
- 1 teaspoon vanilla extract
Instructions
- Preheat the Oven: Preheat your oven to 350°F (175°C) and line a muffin tin with cupcake liners.
- Mix Dry Ingredients: In a bowl, whisk together flour, baking powder, baking soda, salt, cinnamon, nutmeg, and ginger.
- Combine Wet Ingredients: In another bowl, beat together granulated sugar, brown sugar, and vegetable oil until well combined. Add the eggs, pumpkin puree, and vanilla extract, mixing until smooth.
- Combine Mixtures: Gradually add the dry ingredients to the wet mixture, stirring gently until just combined. Do not overmix.
- Fill the Cupcake Liners: Divide the batter evenly among the cupcake liners, filling each about two-thirds full.
- Bake: Bake for 18-20 minutes, or until a toothpick inserted in the center comes out clean. Allow to cool in the pan for a few minutes before transferring to a wire rack to cool completely.
- Prepare the Frosting: In a bowl, mix the softened cream cheese, powdered sugar, milk, and vanilla until smooth and creamy.
- Frost the Cupcakes: Once the cupcakes are completely cool, frost them with the cream cheese frosting. Optional: sprinkle with a bit of cinnamon for garnish.
Apple Pie Bars
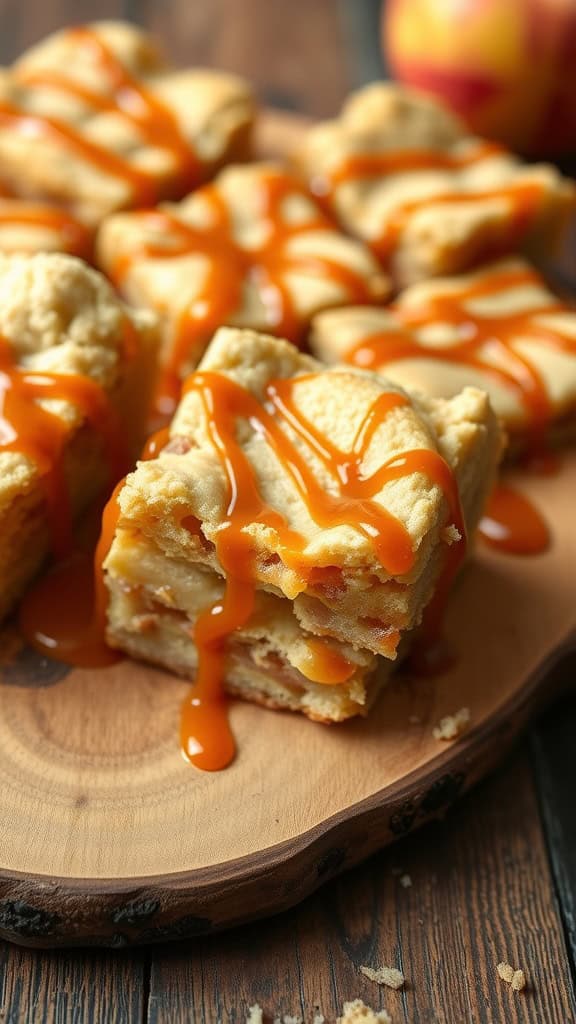
Apple pie bars are a lovely twist on the classic dessert, combining the comforting flavors of cinnamon-spiced apples with a buttery crust. These bars strike a balance between sweet and tart, offering that familiar apple pie taste in a more portable form, making them a fantastic option for a Thanksgiving picnic.
Making apple pie bars is quite simple. The crust is easy to prepare, and the filling comes together quickly, allowing you to bake a delicious dessert without much fuss. Plus, they can be served warm or at room temperature, making them perfect for sharing outdoors.
Ingredients
- 2 cups all-purpose flour
- 1/2 cup granulated sugar
- 1/2 teaspoon salt
- 1 teaspoon ground cinnamon
- 1/2 cup unsalted butter, softened
- 1/4 cup brown sugar, packed
- 3 cups peeled and diced apples (about 3 medium apples)
- 2 teaspoons lemon juice
- 1 tablespoon cornstarch
- 1/2 teaspoon vanilla extract
- Caramel sauce for drizzling (optional)
Instructions
- Prep the Crust: Preheat your oven to 350°F (175°C). In a large bowl, mix flour, granulated sugar, salt, and cinnamon. Cut in the softened butter until the mixture resembles coarse crumbs.
- Form the Base: Press half of the dough into the bottom of a greased 9×13 inch baking dish. Bake for 10 minutes, then remove from the oven.
- Make the Filling: In a separate bowl, toss the diced apples with lemon juice, brown sugar, cornstarch, and vanilla extract. Spread the apple mixture evenly over the pre-baked crust.
- Add the Crumble: Crumble the remaining dough over the apple filling evenly.
- Bake: Return the dish to the oven and bake for an additional 25-30 minutes, or until the top is golden brown. Let cool before cutting into bars.
- Serve: Drizzle with caramel sauce if desired, and enjoy!
Mini Pecan Pies
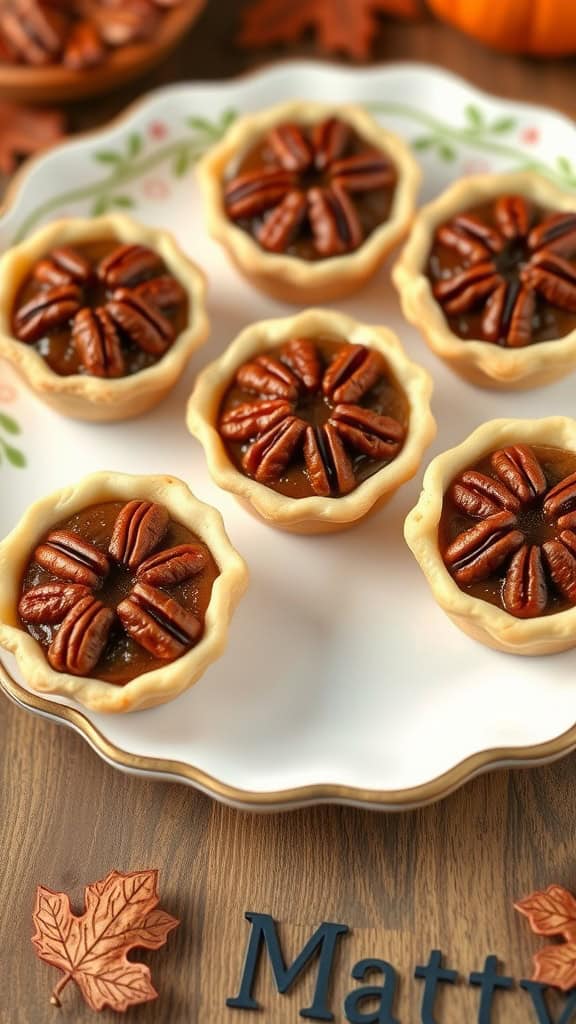
Mini pecan pies are delightful bite-sized treats that capture the essence of traditional pecan pie in a fun, portable form. With a rich and sweet filling made from brown sugar, eggs, and buttery pecans, these mini desserts offer a satisfying crunch and a burst of flavor with every bite.
They’re surprisingly simple to make, making them perfect for your Thanksgiving picnic. The flaky crust perfectly complements the gooey filling, and the toasted pecans on top add a lovely finishing touch. Everyone will love these little gems!
Ingredients
- 1 cup chopped pecans
- 1 pre-made pie crust
- 3/4 cup brown sugar
- 1/4 cup corn syrup
- 2 large eggs
- 2 tablespoons melted butter
- 1 teaspoon vanilla extract
- 1/4 teaspoon salt
Instructions
- Preheat your oven to 350°F (175°C).
- Roll out the pie crust and cut it into small circles to fit into a mini muffin tin. Place the dough circles in the muffin tin cups.
- In a mixing bowl, combine the brown sugar, corn syrup, eggs, melted butter, vanilla extract, and salt. Whisk until smooth.
- Add the chopped pecans to the mixture and stir gently to combine.
- Pour the filling into each mini crust, filling them about three-quarters full.
- Bake for 20-25 minutes until the filling is set and the tops are golden.
- Let them cool before serving, and enjoy your mini pecan pies at the picnic!
Cranberry Orange Muffins
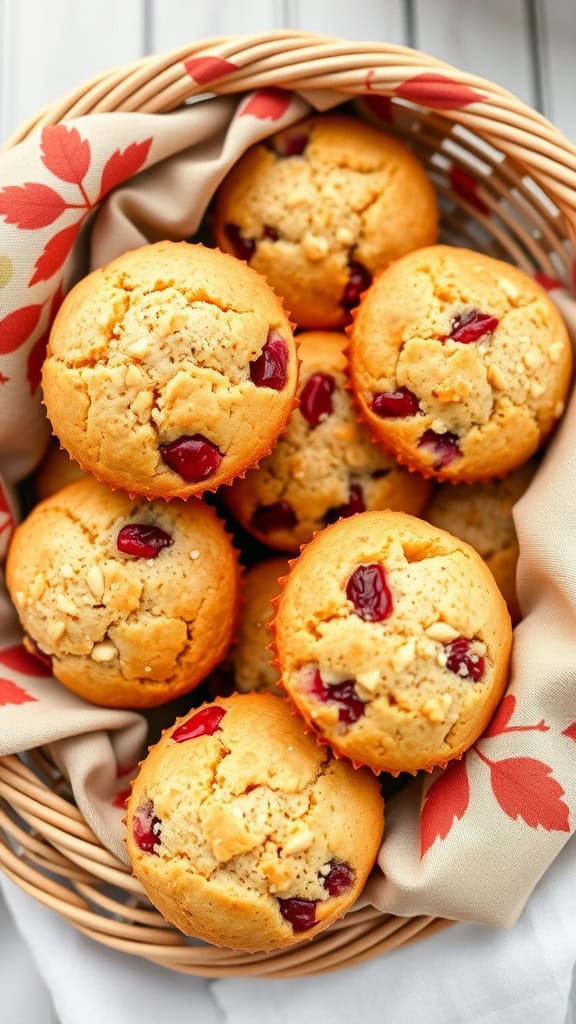
Cranberry orange muffins are a delightful blend of sweet and tart flavors, making them an excellent choice for a Thanksgiving picnic. These muffins are not only easy to whip up, but they also fill your kitchen with a warm, inviting aroma that perfectly captures the essence of the season.
The zesty orange complements the tangy cranberries beautifully, resulting in a moist and flavorful treat. Whether enjoyed as a snack or as a part of your picnic spread, these muffins are sure to please everyone.
Ingredients
- 2 cups all-purpose flour
- 1 cup granulated sugar
- 1 tablespoon baking powder
- 1/2 teaspoon salt
- 1 cup orange juice
- 1/2 cup vegetable oil
- 2 large eggs
- 1 cup fresh cranberries, chopped
- 1 tablespoon orange zest
Instructions
- Preheat your oven to 375°F (190°C) and line a muffin tin with paper liners.
- In a large bowl, mix together the flour, sugar, baking powder, and salt.
- In another bowl, whisk the orange juice, vegetable oil, and eggs until well combined.
- Pour the wet ingredients into the dry ingredients, stirring gently until just combined. Fold in the cranberries and orange zest.
- Divide the batter evenly among the muffin cups, filling each about 2/3 full.
- Bake for 18-20 minutes or until a toothpick inserted in the center comes out clean. Let cool before serving.
Maple Pecan Cheesecake Bites
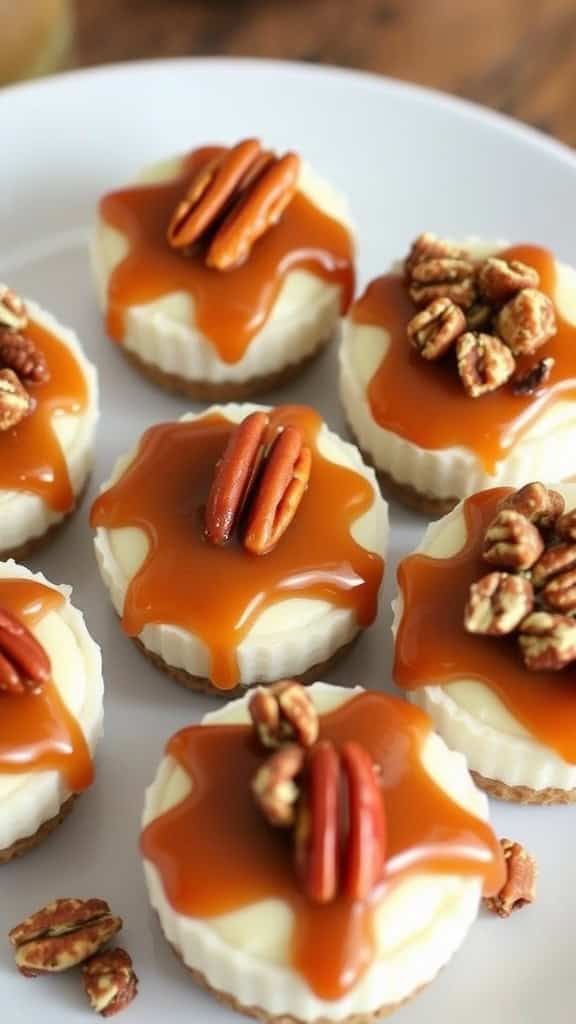
Maple Pecan Cheesecake Bites are a delightful treat that perfectly combine creamy cheesecake with the warm flavors of maple and crunchy pecans. These little bites are not only delicious but also simple to make, making them an ideal choice for a Thanksgiving picnic. Each bite offers a rich, sweet, and nutty flavor that will leave your guests craving more.
These mini cheesecakes are easy to prepare and can be made ahead of time, allowing you to enjoy more time with family and friends during the holiday. With a buttery crust, smooth filling, and a drizzle of caramel, these bites are sure to impress. They’re a festive and fun way to share the spirit of the season!
Ingredients
- 1 cup graham cracker crumbs
- 1/4 cup unsalted butter, melted
- 2 (8 oz) packages cream cheese, softened
- 1/2 cup granulated sugar
- 1/2 cup maple syrup
- 2 large eggs
- 1 teaspoon vanilla extract
- 1 cup pecans, chopped
- Caramel sauce for drizzling
Instructions
- Preheat your oven to 350°F (175°C) and line a mini muffin tin with paper liners.
- In a medium bowl, mix graham cracker crumbs with melted butter until combined. Press about a teaspoon of the mixture into the bottom of each muffin liner.
- In a large mixing bowl, beat cream cheese and sugar until smooth. Add maple syrup, eggs, and vanilla, mixing until well combined.
- Fold in chopped pecans, then spoon the cheesecake mixture into the prepared crusts, filling each liner about 3/4 full.
- Bake for about 18-20 minutes until the centers are set. Allow them to cool completely before placing them in the refrigerator for at least 2 hours.
- Before serving, drizzle with caramel sauce and top with additional pecans if desired.
Sweet Potato Pie Slices
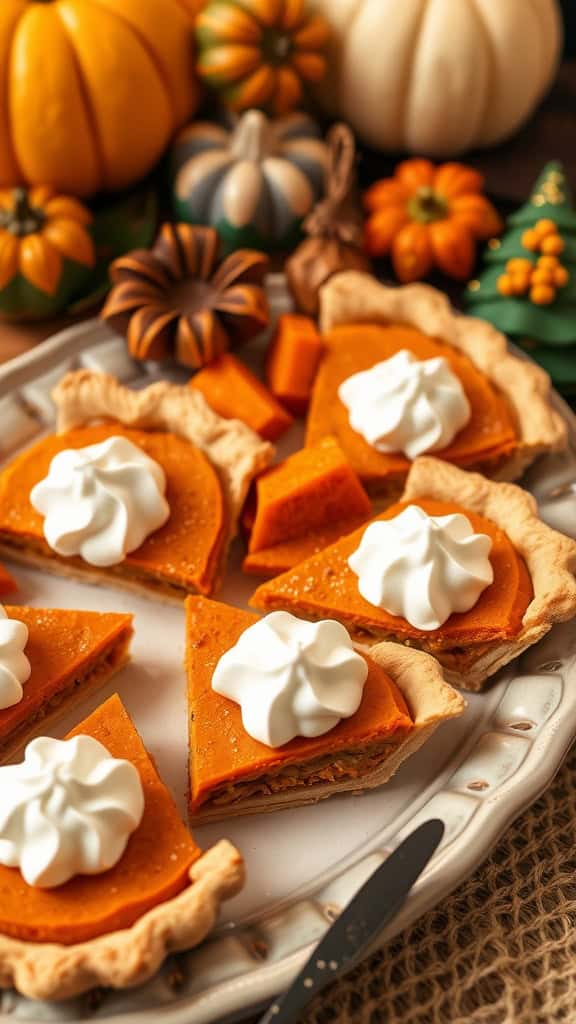
Sweet potato pie slices are a delightful addition to any Thanksgiving picnic. With their rich, creamy filling and a hint of warm spices, these slices bring a taste of home to outdoor gatherings. Not only do they have a comforting flavor profile, but they are also surprisingly simple to prepare, making them a go-to choice for both seasoned bakers and beginners.
The combination of sweet potato and traditional spices like cinnamon and nutmeg creates a comforting dessert that pairs perfectly with a dollop of whipped cream. Each slice offers a satisfying balance of sweetness and creamy texture, making it a standout dish. Plus, they can be made ahead of time, allowing you to enjoy more time with your loved ones on the big day!
Ingredients
- 1 ½ cups mashed sweet potatoes (about 2 medium sweet potatoes)
- 1 cup granulated sugar
- 1 teaspoon vanilla extract
- 1 teaspoon ground cinnamon
- ½ teaspoon ground nutmeg
- ½ teaspoon salt
- 2 large eggs
- 1 cup evaporated milk
- 1 pre-made pie crust
- Whipped cream (for topping)
Instructions
- Preheat your oven to 350°F (175°C).
- In a mixing bowl, combine the mashed sweet potatoes, sugar, vanilla, cinnamon, nutmeg, and salt. Mix until smooth.
- Add the eggs one at a time, mixing well after each addition. Gradually stir in the evaporated milk until fully incorporated.
- Pour the sweet potato mixture into the pre-made pie crust.
- Bake for 45-50 minutes, or until a knife inserted into the center comes out clean.
- Allow the pie to cool before slicing. Serve with a generous dollop of whipped cream on top.
Chocolate Chip Pumpkin Cookies
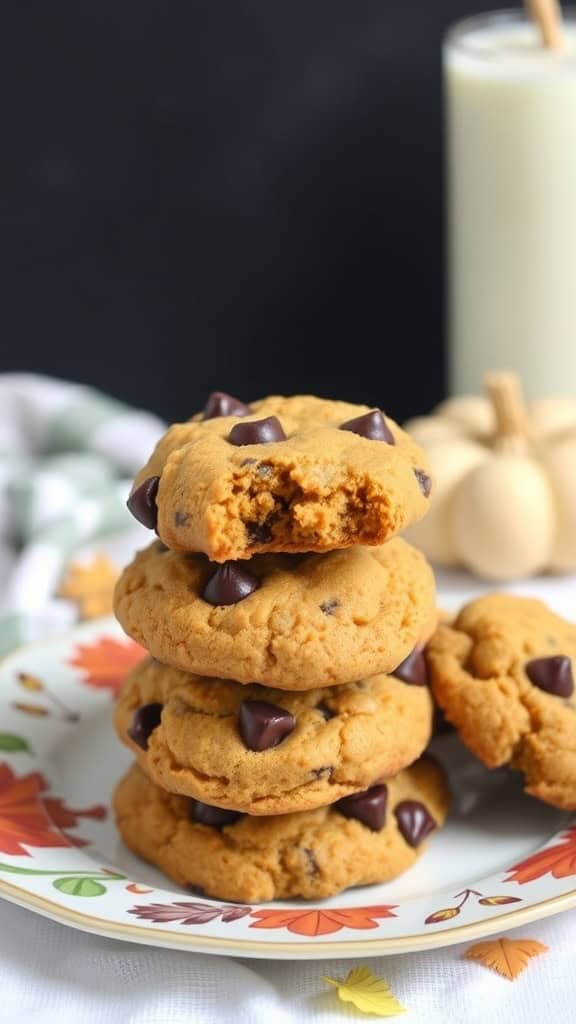
Chocolate Chip Pumpkin Cookies are a delightful blend of fall flavors and classic sweetness. The combination of pumpkin and chocolate creates a soft, chewy texture that melts in your mouth. These cookies are not only delicious but also easy to whip up, making them a cozy addition to any Thanksgiving picnic.
With warm spices and rich chocolate chips, every bite is a little slice of autumn bliss. Plus, they’re a fun twist on traditional cookies that everyone will enjoy. Get ready to impress your friends and family with these tasty treats!
Ingredients
- 1 cup pumpkin puree
- 1 cup brown sugar, packed
- 1/2 cup granulated sugar
- 1/2 cup unsalted butter, softened
- 1 large egg
- 1 teaspoon vanilla extract
- 2 cups all-purpose flour
- 1 teaspoon baking soda
- 1 teaspoon ground cinnamon
- 1/2 teaspoon ground nutmeg
- 1/2 teaspoon salt
- 1 cup chocolate chips
Instructions
- Preheat your oven to 350°F (175°C) and line a baking sheet with parchment paper.
- In a large bowl, mix the pumpkin puree, brown sugar, granulated sugar, and softened butter until well combined. Add the egg and vanilla extract, mixing until smooth.
- In another bowl, whisk together the flour, baking soda, cinnamon, nutmeg, and salt. Gradually add the dry ingredients to the wet mixture, stirring until just combined.
- Fold in the chocolate chips, ensuring they’re evenly distributed throughout the dough.
- Drop rounded tablespoons of dough onto the prepared baking sheet, spacing them about 2 inches apart.
- Bake for 10-12 minutes or until the edges are lightly golden. Allow them to cool on the baking sheet for a few minutes before transferring to a wire rack to cool completely.
Caramel Apple Crumble Cups
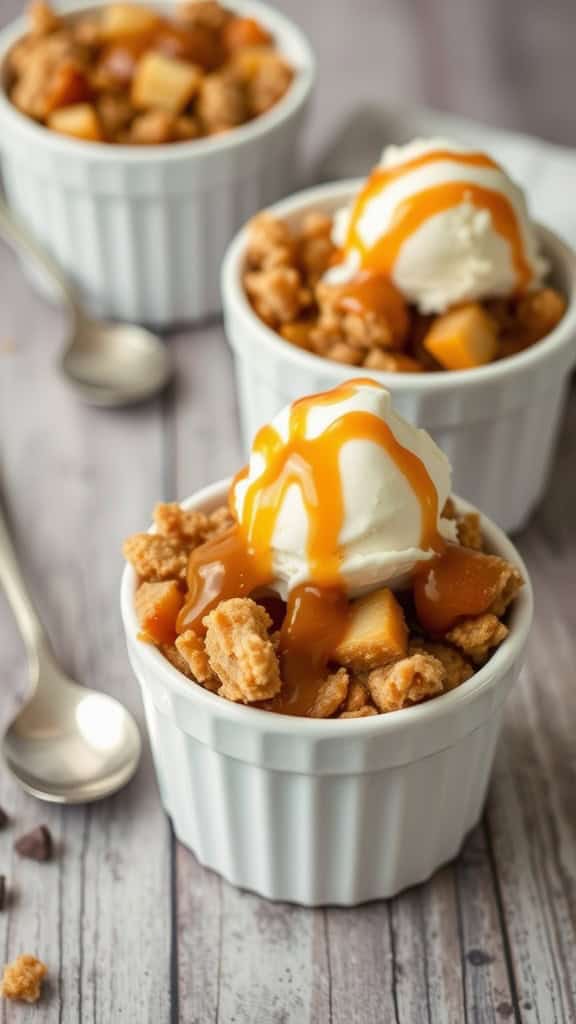
Caramel Apple Crumble Cups bring together the delightful flavors of fall in a fun, individual serving. These cups are filled with sweet, spiced apples, topped with a crunchy crumble and a drizzle of rich caramel sauce. The combination of warm apples with a buttery crumble makes this dessert comforting and satisfying, making it a great choice for your Thanksgiving picnic.
Not only do these crumble cups taste fantastic, but they are also simple to prepare. You can assemble them ahead of time and bake just before serving, allowing you to focus on enjoying the day with friends and family!
Ingredients
- 4 medium apples, peeled and diced
- 1 tablespoon lemon juice
- 1 teaspoon ground cinnamon
- 1/2 cup brown sugar
- 1 tablespoon all-purpose flour
- 1 cup rolled oats
- 1/2 cup all-purpose flour
- 1/2 cup cold butter, cubed
- 1/2 cup granulated sugar
- 1/2 teaspoon salt
- Caramel sauce for drizzling
- Vanilla ice cream (optional)
Instructions
- Preheat your oven to 350°F (175°C). In a mixing bowl, toss the diced apples with lemon juice, cinnamon, brown sugar, and flour until well coated. Distribute the apple mixture evenly into ramekins.
- In another bowl, mix rolled oats, flour, brown sugar, and salt. Add the cold butter and use a fork or pastry cutter to blend until crumbly.
- Sprinkle the crumble mixture on top of the apples in the ramekins. Bake for 25-30 minutes or until the apples are bubbly and the crumble is golden brown.
- Remove from the oven and let cool slightly. Drizzle with caramel sauce and serve warm, optionally with a scoop of vanilla ice cream.
Thanksgiving-Themed Rice Krispie Treats
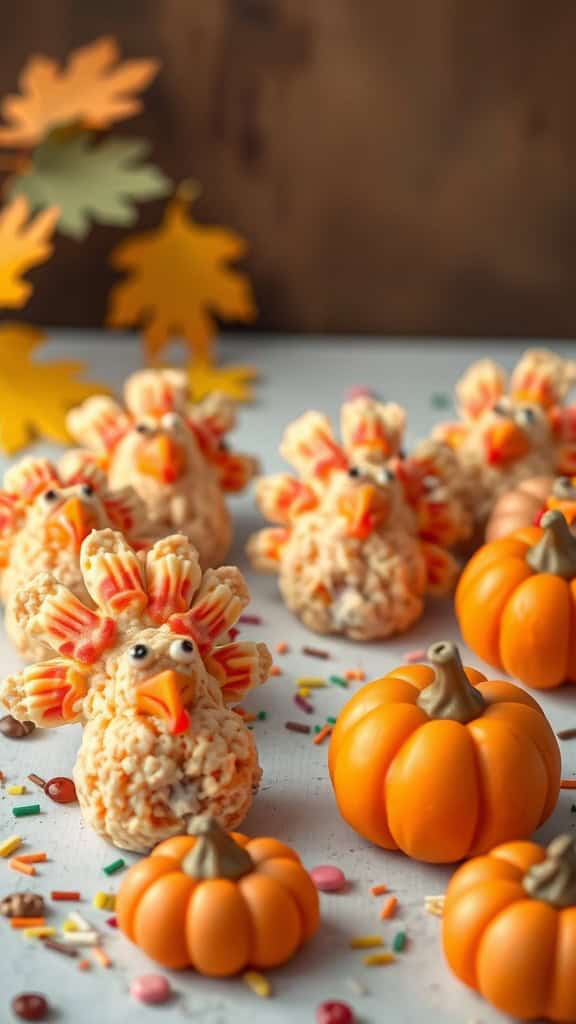
Thanksgiving-themed Rice Krispie treats are a fun and festive way to celebrate the holiday. These treats combine the classic, sweet, and chewy texture of Rice Krispies with a seasonal twist, making them a delightful addition to any picnic. They are easy to make and perfect for both kids and adults, delivering a nostalgic taste that everyone loves.
The process is simple: melt some marshmallows and butter, mix in the Rice Krispies, and shape them into adorable turkey or pumpkin figures. These treats not only taste great but also add a charming touch to your Thanksgiving spread. Plus, you can get creative with decorations to make them even more festive!
Ingredients
- 3 tablespoons unsalted butter
- 1 package (10 oz) mini marshmallows
- 6 cups Rice Krispies cereal
- 1 cup candy corn (for decoration)
- 1/2 cup chocolate chips
- Food coloring (orange, yellow, and brown)
- Various edible decorations (sprinkles, icing)
Instructions
- Melt Butter and Marshmallows: In a large pot over low heat, melt the butter. Once melted, add the marshmallows and stir until completely melted and smooth.
- Add Rice Krispies: Remove the pot from heat and gradually add the Rice Krispies cereal. Stir until well-coated.
- Shape the Treats: Lightly butter your hands and shape the mixture into small turkey or pumpkin forms. Use your creativity to make them look festive!
- Decorate: Melt chocolate chips and drizzle over the treats. Use candy corn and food coloring to add fun details.
- Let It Set: Allow the treats to cool and set at room temperature before serving.
Gingerbread Cookies

Gingerbread cookies are a delightful treat that capture the essence of the holiday season. With their warm spices and sweet aroma, they offer a cozy taste that brings comfort to any Thanksgiving picnic. These cookies are not only delicious but also surprisingly simple to make, making them a fun activity for the whole family.
With just the right amount of spices, like ginger, cinnamon, and nutmeg, these cookies are sure to be a hit. You can get creative with shapes and decorations, adding a festive flair that everyone will appreciate. Whether you choose to decorate them with icing or enjoy them plain, gingerbread cookies are a timeless addition to your Thanksgiving festivities.
Ingredients
- 3 cups all-purpose flour
- 1 teaspoon baking soda
- 1 tablespoon ground ginger
- 1 tablespoon ground cinnamon
- 1/2 teaspoon ground nutmeg
- 1/2 teaspoon salt
- 1/4 cup granulated sugar
- 1/4 cup brown sugar, packed
- 3/4 cup unsalted butter, softened
- 1 large egg
- 1/2 cup molasses
Instructions
- Preheat the Oven: Preheat your oven to 350°F (175°C) and line a baking sheet with parchment paper.
- Mix Dry Ingredients: In a bowl, whisk together flour, baking soda, ginger, cinnamon, nutmeg, and salt.
- Cream Butter and Sugars: In another bowl, cream together the softened butter, granulated sugar, and brown sugar until light and fluffy. Add the egg and molasses, mixing until well combined.
- Combine Mixtures: Gradually add the dry ingredients to the wet mixture, stirring until a dough forms.
- Roll and Cut: Roll out the dough on a lightly floured surface to about 1/4-inch thickness. Use cookie cutters to cut out shapes and place them on the prepared baking sheet.
- Bake: Bake in the preheated oven for 8-10 minutes, or until the edges are firm. Allow to cool on a wire rack before decorating, if desired.
Pumpkin Cheesecake Bars
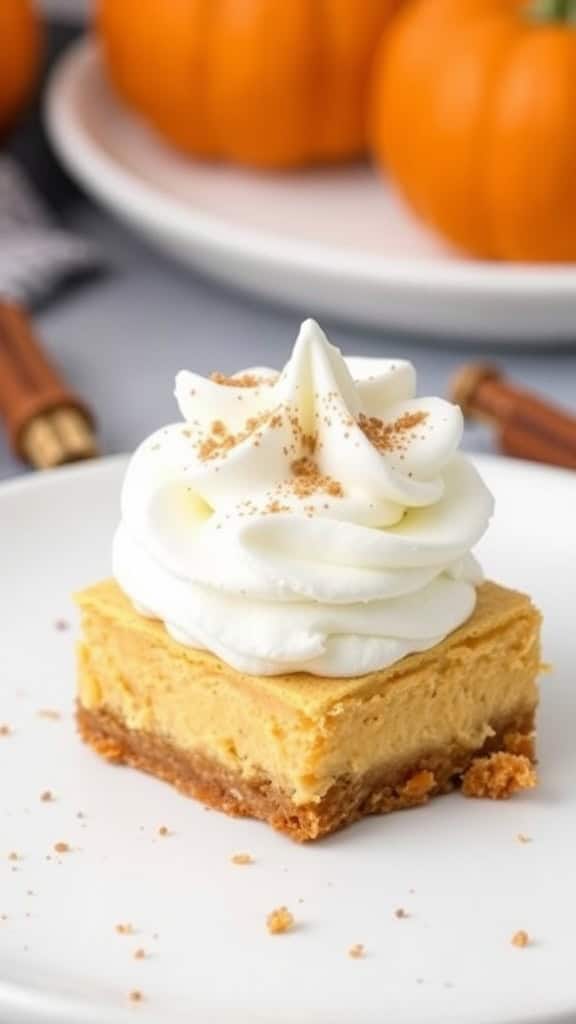
These pumpkin cheesecake bars bring all the warm, cozy flavors of fall into a delicious, easy-to-serve dessert. With a creamy filling made from pumpkin puree and cream cheese, they offer a delightful balance of sweetness and spice. The buttery graham cracker crust adds a satisfying crunch, making each bite a wonderful experience.
Not only are these bars a treat for the taste buds, but they’re also simple to make. Perfect for a Thanksgiving picnic, they can be prepared ahead of time and are easy to transport. Just slice them up, add a dollop of whipped cream on top, and you’re ready to share a slice of autumn joy!
Ingredients
- 1 ½ cups graham cracker crumbs
- ½ cup unsalted butter, melted
- ¼ cup granulated sugar
- 16 ounces cream cheese, softened
- 1 cup pumpkin puree
- ¾ cup brown sugar
- 2 large eggs
- 1 teaspoon vanilla extract
- 1 teaspoon ground cinnamon
- ¼ teaspoon ground nutmeg
- ¼ teaspoon ground ginger
- ½ cup heavy cream (for whipping)
- Extra cinnamon for garnish
Instructions
- Preheat your oven to 350°F (175°C). Grease a 9×9 inch baking dish.
- In a bowl, mix graham cracker crumbs, melted butter, and granulated sugar until well combined. Press this mixture into the bottom of the prepared baking dish to form an even crust.
- In a separate bowl, beat the cream cheese until smooth. Add pumpkin puree, brown sugar, eggs, vanilla extract, and spices. Mix until everything is well integrated and creamy.
- Pour the pumpkin mixture over the crust in the baking dish, spreading it evenly. Bake for about 30-35 minutes, or until the edges are set and the center is slightly jiggly.
- Remove from the oven and let cool completely. Refrigerate for at least 2 hours before slicing into bars.
- Before serving, whip the heavy cream until soft peaks form. Top each bar with a dollop of whipped cream and a sprinkle of cinnamon.
Chocolate Pumpkin Mousse
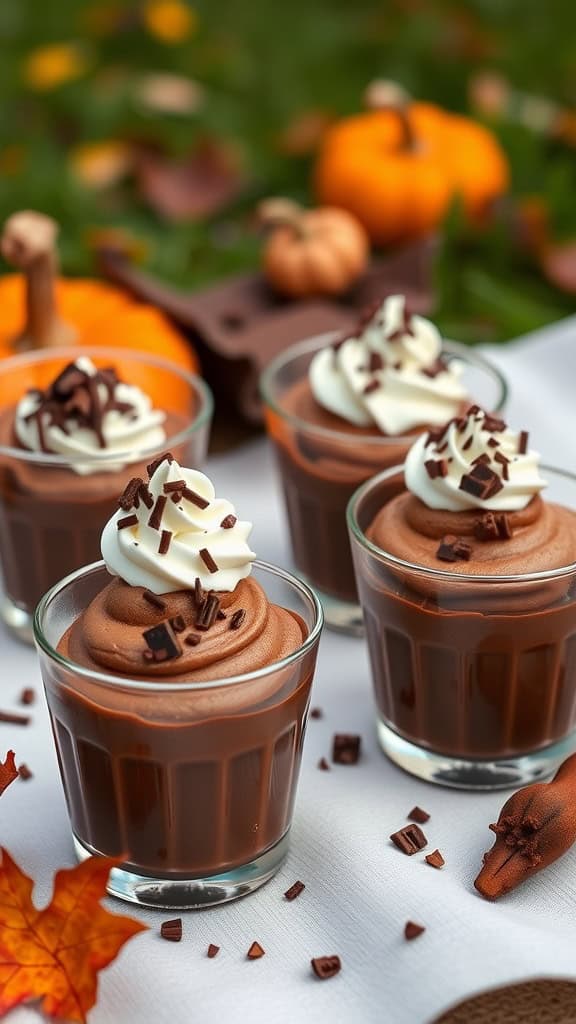
Chocolate pumpkin mousse is a delightful twist on traditional dessert that combines the rich, creamy texture of chocolate with the warm, spiced flavor of pumpkin. This dessert is not only delicious but also simple to make, making it a great choice for a Thanksgiving picnic. The silky mousse is both comforting and festive, perfect for the holiday season.
This treat offers a nice balance of flavors, with the chocolate providing a decadent touch while the pumpkin adds a hint of earthiness. Topped with whipped cream and chocolate shavings, it’s an inviting dessert that will impress your friends and family without requiring hours in the kitchen.
Ingredients
- 1 cup heavy cream
- 1/2 cup pumpkin puree
- 1/4 cup granulated sugar
- 1/2 cup semi-sweet chocolate chips
- 1 teaspoon vanilla extract
- 1 teaspoon pumpkin pie spice
- 1/4 cup whipped cream (for topping)
- Chocolate shavings (for garnish)
Instructions
- In a small saucepan, melt the chocolate chips over low heat until smooth. Remove from heat and let cool slightly.
- In a mixing bowl, combine pumpkin puree, granulated sugar, vanilla extract, and pumpkin pie spice. Mix well until combined.
- In another bowl, whip the heavy cream until stiff peaks form.
- Gently fold the melted chocolate into the pumpkin mixture until well combined.
- Next, fold in the whipped cream until no streaks remain.
- Divide the mousse into serving glasses and refrigerate for at least 2 hours before serving.
- Before serving, top each mousse with a dollop of whipped cream and sprinkle with chocolate shavings.
Cinnamon Roll Casserole
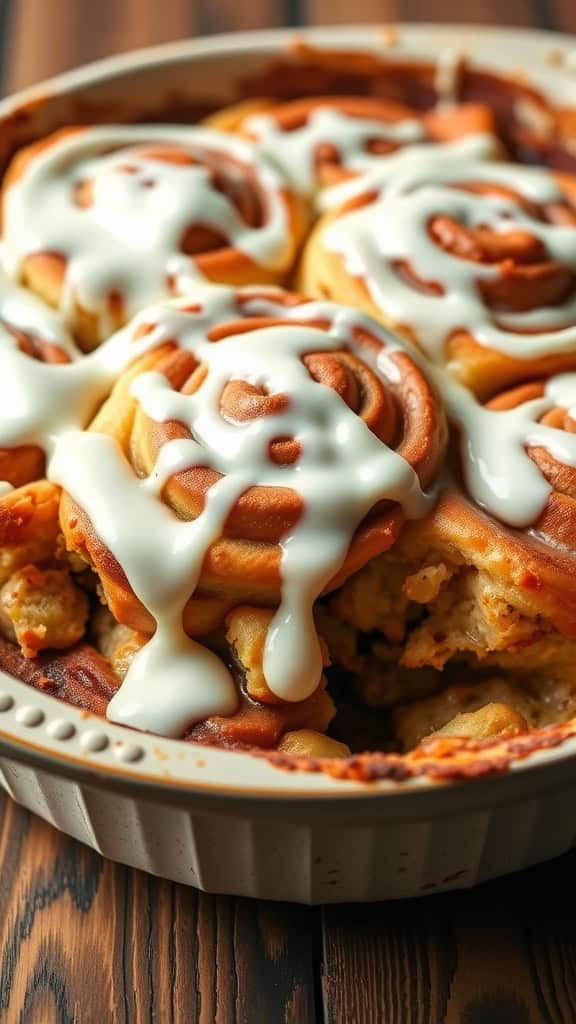
Cinnamon Roll Casserole brings the warmth of cinnamon rolls to the picnic table in a fun and shareable way. This dish combines fluffy cinnamon rolls with a creamy custard, creating a delightful blend of textures and flavors. It’s sweet, comforting, and perfect for a festive gathering.
Not only is this recipe easy to make, but it also allows for some creative twists. You can add fruit, nuts, or even chocolate chips to the mix. It’s a crowd-pleaser that will have everyone returning for seconds!
Ingredients
- 2 cans refrigerated cinnamon rolls (with icing)
- 4 large eggs
- 1 cup milk
- 1 teaspoon vanilla extract
- 1/4 cup granulated sugar
- 1 teaspoon ground cinnamon
- 1/4 teaspoon nutmeg (optional)
Instructions
- Preheat your oven to 350°F (175°C) and grease a 9×13-inch baking dish.
- Cut the cinnamon rolls into quarters and spread them evenly in the prepared baking dish.
- In a large bowl, whisk together the eggs, milk, vanilla extract, sugar, cinnamon, and nutmeg until well combined.
- Pour the egg mixture over the cinnamon roll pieces, ensuring they’re all coated.
- Bake for about 25-30 minutes, or until the casserole is set and golden brown on top.
- Drizzle the icing from the cinnamon rolls over the warm casserole before serving.
Maple Glazed Donuts
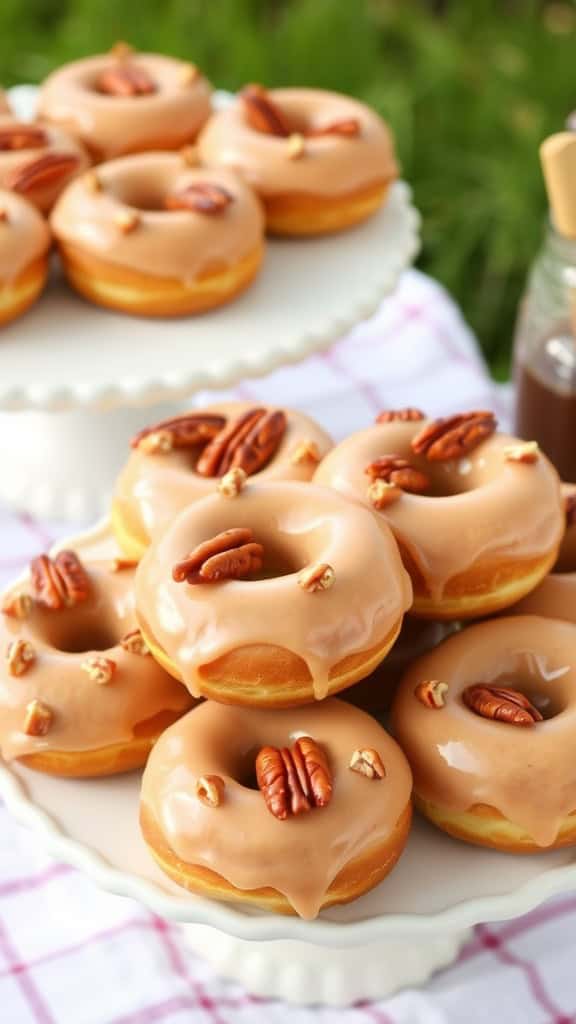
Maple glazed donuts are a delightful treat that brings the warmth of fall flavors to any picnic. These donuts are soft, fluffy, and topped with a sweet maple glaze that adds a rich flavor perfect for the Thanksgiving season. They are surprisingly simple to make, ensuring you spend more time enjoying the outdoors than in the kitchen.
The combination of sweet maple syrup and a hint of vanilla creates a comforting taste that pairs well with a cup of hot cider or coffee. Plus, they’re a fun way to impress your friends and family with your baking skills while keeping it casual and enjoyable!
Ingredients
- 2 cups all-purpose flour
- 1/2 cup granulated sugar
- 1 tablespoon baking powder
- 1/2 teaspoon salt
- 1/2 teaspoon ground cinnamon
- 1 large egg
- 3/4 cup milk
- 1/4 cup unsalted butter, melted
- 1 teaspoon vanilla extract
- 1 cup powdered sugar
- 1/4 cup maple syrup
Instructions
- Prepare the Dough: In a large bowl, mix flour, sugar, baking powder, salt, and cinnamon. In another bowl, whisk together the egg, milk, melted butter, and vanilla. Pour the wet mixture into the dry ingredients and stir until just combined.
- Shape the Donuts: Preheat your oven to 350°F (175°C). Grease a donut pan. Spoon the batter into the pan, filling each donut cavity about halfway. Bake for 10-12 minutes or until golden brown and a toothpick comes out clean.
- Make the Glaze: While the donuts cool, whisk together the powdered sugar and maple syrup in a small bowl until smooth. Add a little milk if the glaze is too thick.
- Glaze the Donuts: Once the donuts have cooled slightly, dip the tops into the maple glaze. Allow any excess glaze to drip off and let the donuts set for a few minutes before serving.
Carrot Cake Cupcakes
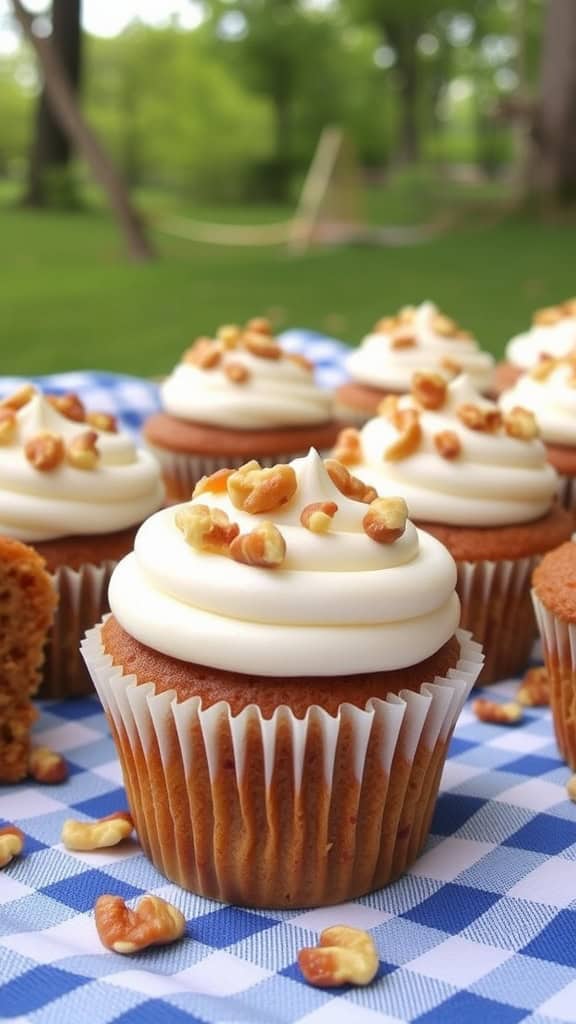
Carrot cake cupcakes are a delightful treat that brings a hint of nostalgia to any picnic. With their moist texture and rich flavor, these cupcakes are a lovely blend of sweet carrots, warm spices, and a smooth cream cheese frosting. They offer a wonderful balance of sweetness and spice, making them a favorite among dessert lovers.
Not only are these cupcakes delicious, but they are also quite simple to make. The recipe requires common ingredients that you probably have on hand, and the steps are easy to follow, ensuring that even beginner bakers can whip them up with confidence.
Ingredients
- 1 1/2 cups all-purpose flour
- 1 teaspoon baking powder
- 1/2 teaspoon baking soda
- 1/2 teaspoon salt
- 1 teaspoon ground cinnamon
- 1/2 teaspoon ground nutmeg
- 1/2 cup vegetable oil
- 1 cup granulated sugar
- 3 large eggs
- 1 teaspoon vanilla extract
- 1 1/2 cups grated carrots
- 1/2 cup chopped walnuts (optional)
- 8 ounces cream cheese, softened
- 1/2 cup unsalted butter, softened
- 4 cups powdered sugar
Instructions
- Preheat your oven to 350°F (175°C) and line a muffin tin with paper liners.
- In a large bowl, whisk together flour, baking powder, baking soda, salt, cinnamon, and nutmeg.
- In another bowl, mix the oil, sugar, eggs, and vanilla until well combined. Gradually add the dry ingredients, mixing until just combined.
- Fold in the grated carrots and walnuts (if using).
- Divide the batter evenly among the cupcake liners, filling each about two-thirds full.
- Bake for 18-20 minutes or until a toothpick inserted comes out clean. Let them cool completely.
- For the frosting, beat together the cream cheese and butter until smooth. Gradually add powdered sugar until you reach your desired consistency.
- Frost the cooled cupcakes and enjoy!
Chocolate Chip Cookie Pie

If you’re looking for a sweet treat that combines the comforting flavors of cookies with the delightful experience of pie, then chocolate chip cookie pie is a fantastic choice. This dessert features a warm, gooey chocolate chip filling nestled in a buttery crust, making it a cozy addition to any picnic. It’s simple to whip up, so even if you’re short on time, you can still impress your friends and family.
The taste is everything you hope for in a chocolate chip cookie but with an extra bit of decadence. The crust adds a delightful crunch, while the chocolate chips melt into pockets of sweetness that everyone will love. Pair it with a scoop of vanilla ice cream or a drizzle of chocolate sauce, and you’ve got a dessert that’s sure to please.
Ingredients
- 1 1/2 cups all-purpose flour
- 1/2 teaspoon baking soda
- 1/2 teaspoon salt
- 1/2 cup unsalted butter, softened
- 1/2 cup granulated sugar
- 1/2 cup brown sugar, packed
- 1 large egg
- 1 teaspoon vanilla extract
- 1 cup semi-sweet chocolate chips
- 1 pre-made pie crust
Instructions
- Preheat your oven to 350°F (175°C).
- In a bowl, mix together the flour, baking soda, and salt; set aside.
- In another large bowl, cream the softened butter, granulated sugar, and brown sugar until light and fluffy.
- Add the egg and vanilla extract, mixing until well combined.
- Gradually add the dry ingredients to the wet mixture, stirring until just combined. Fold in the chocolate chips.
- Pour the cookie dough into the pie crust and spread it evenly.
- Bake for 25-30 minutes or until the edges are golden brown and the center is set.
- Let it cool slightly before serving, and enjoy with ice cream or whipped cream!
Butterscotch Pudding Parfaits
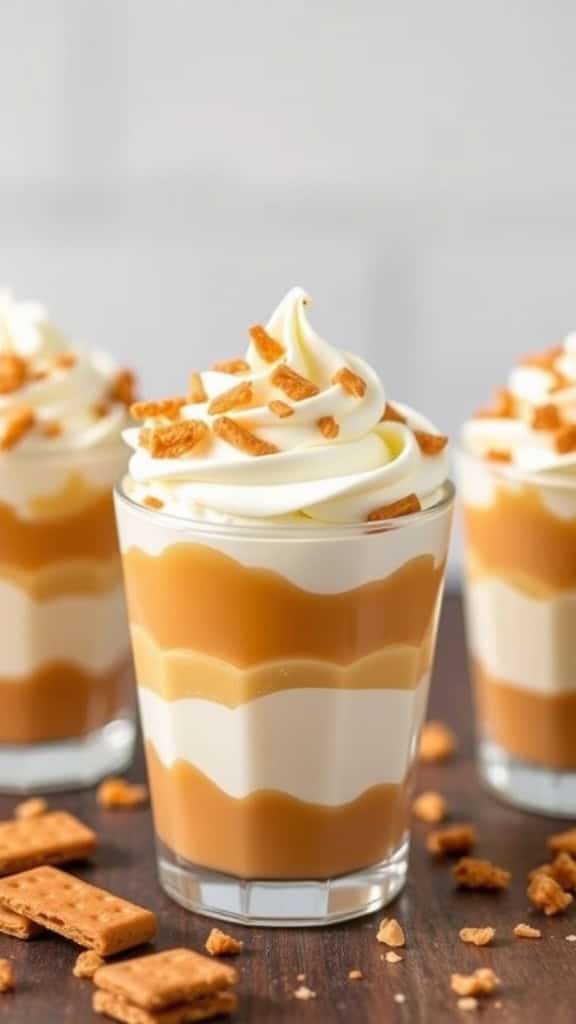
Butterscotch pudding parfaits are a delightful dessert that brings together the rich, buttery flavor of butterscotch with the smoothness of whipped cream and a crunchy layer of cookies. This layered treat is not only delicious but also quite easy to prepare, making it a fantastic choice for a Thanksgiving picnic. Each bite offers a balance of sweetness and creaminess, perfect for satisfying your dessert cravings.
These parfaits are visually appealing and can be made in individual cups for a festive touch. They come together quickly, with just a few ingredients, and can be prepared ahead of time. Friends and family will love digging into these charming little desserts while enjoying the outdoors!
Ingredients
- 1 cup butterscotch pudding mix
- 2 cups cold milk
- 1 cup heavy whipping cream
- 1/4 cup powdered sugar
- 1 teaspoon vanilla extract
- 1 cup crushed graham crackers or vanilla wafers
- Extra crushed cookies for topping
Instructions
- Prepare the Pudding: In a large bowl, whisk together the butterscotch pudding mix and cold milk until smooth. Let it sit for about 5 minutes to thicken.
- Make the Whipped Cream: In another bowl, beat the heavy cream, powdered sugar, and vanilla extract until soft peaks form.
- Assemble the Parfaits: In serving cups, layer the butterscotch pudding, followed by a layer of whipped cream, and then a layer of crushed cookies. Repeat the layers until the cups are filled.
- Finish Up: Top each parfait with a dollop of whipped cream and sprinkle extra crushed cookies on top for a crunchy finish.
- Chill: Refrigerate the parfaits for at least 2 hours before serving to allow the flavors to meld.
Peanut Butter Chocolate Bars
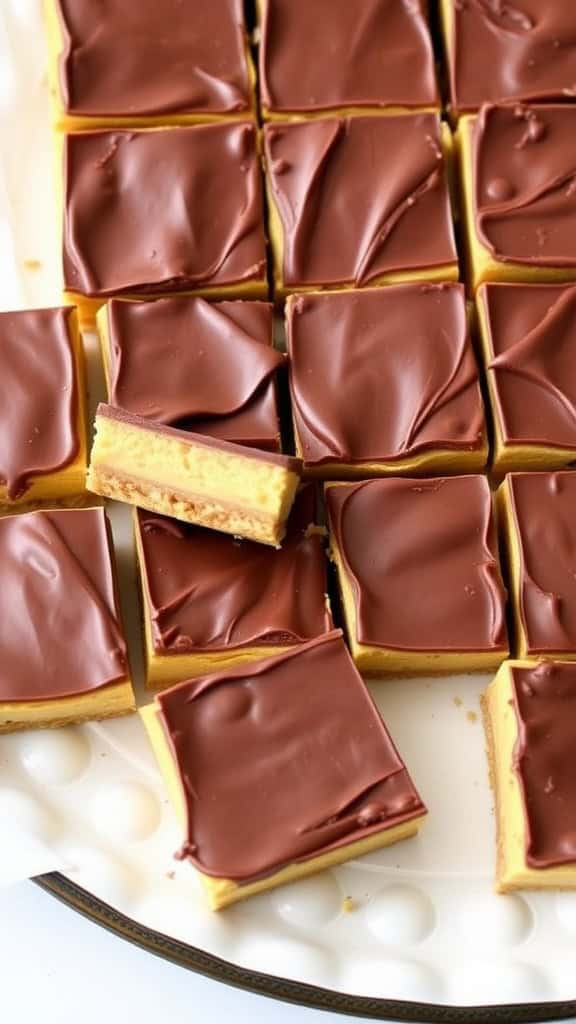
If you’re looking for a delightful treat to share at your Thanksgiving picnic, peanut butter chocolate bars should definitely be on your list. These bars combine the rich, creamy taste of peanut butter with a smooth chocolate layer on top, creating a balance of flavors that everyone will enjoy. Plus, they’re simple to make, making them perfect for bakers of any skill level.
These bars are not just delicious; they also offer a satisfying texture that makes each bite enjoyable. The combination of the crunchy and creamy elements is sure to be a hit. Serve them chilled or at room temperature, and watch as they disappear in no time!
Ingredients
- 1 cup creamy peanut butter
- 1/2 cup unsalted butter, softened
- 1 cup powdered sugar
- 1 cup graham cracker crumbs
- 2 cups milk chocolate chips
- 2 tablespoons vegetable oil
Instructions
- Prepare the Base: In a mixing bowl, combine the peanut butter and softened butter until smooth. Gradually mix in the powdered sugar and graham cracker crumbs until well combined.
- Press into a Pan: Line an 8×8-inch baking dish with parchment paper. Press the peanut butter mixture firmly into the bottom of the prepared pan, creating an even layer.
- Melt the Chocolate: In a microwave-safe bowl, combine the milk chocolate chips and vegetable oil. Microwave in short bursts, stirring in between, until completely melted and smooth.
- Top the Bars: Pour the melted chocolate evenly over the peanut butter layer, spreading it out to cover completely. Tap the pan gently on the counter to remove any air bubbles.
- Chill: Refrigerate the bars for at least 2 hours or until the chocolate is set. Once firm, remove from the pan and cut into squares.
Pumpkin Whoopie Pies
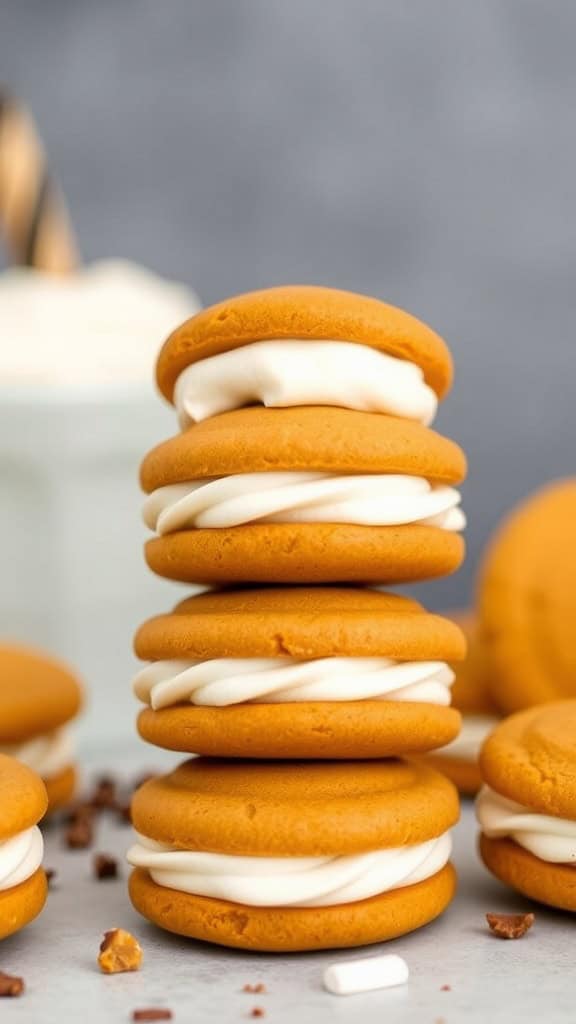
Pumpkin whoopie pies are a delightful treat that perfectly capture the essence of fall. With their soft, spiced pumpkin cookies sandwiched around creamy filling, they offer a delicious combination of flavors that make them a hit at any Thanksgiving picnic.
These treats are easy to make and require simple ingredients, making them a great addition to your dessert table. The sweetness of the pumpkin pairs beautifully with the richness of the filling, creating a cozy dessert that everyone will enjoy.
Ingredients
- 1 1/2 cups all-purpose flour
- 1 teaspoon baking powder
- 1/2 teaspoon baking soda
- 1 teaspoon ground cinnamon
- 1/2 teaspoon ground ginger
- 1/4 teaspoon ground nutmeg
- 1/4 teaspoon salt
- 1 cup pumpkin puree
- 1/2 cup granulated sugar
- 1/2 cup brown sugar, packed
- 1/2 cup vegetable oil
- 1 large egg
- 1 teaspoon vanilla extract
- 1 cup cream cheese, softened
- 2 cups powdered sugar
- 1 teaspoon vanilla extract (for frosting)
Instructions
- Preheat the oven to 350°F (175°C). Line a baking sheet with parchment paper.
- In a bowl, whisk together flour, baking powder, baking soda, spices, and salt.
- In another bowl, combine pumpkin puree, granulated sugar, brown sugar, oil, egg, and vanilla. Mix until smooth.
- Gradually add the dry ingredients to the wet mixture, stirring until just combined.
- Drop tablespoonfuls of dough onto the prepared baking sheet, spacing them about 2 inches apart.
- Bake for 10-12 minutes or until the edges are set. Let them cool completely on a wire rack.
- For the filling, beat together cream cheese, powdered sugar, and vanilla until smooth.
- Spread a generous amount of filling on the flat side of one cookie and top with another, pressing gently. Repeat with the remaining cookies.
Apple Cinnamon Galette
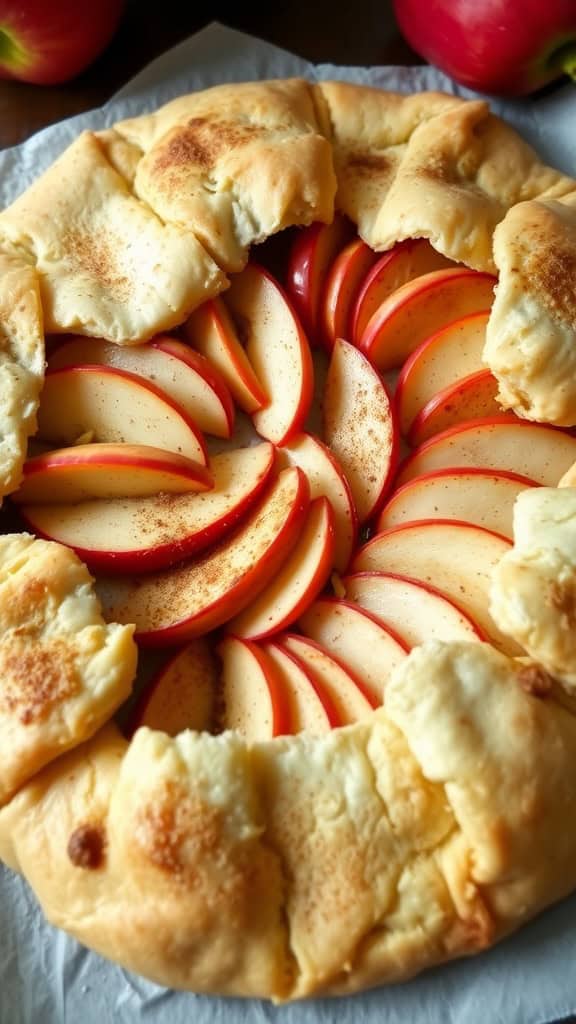
The apple cinnamon galette is a delightful dessert that perfectly combines the warm flavors of baked apples and aromatic cinnamon, all wrapped in a flaky crust. This rustic pastry is not just delicious; it’s also simple to make, making it a great option for any Thanksgiving picnic. The galette’s free-form style gives it a charming, homemade feel that impresses without requiring advanced baking skills.
This dessert offers a balance of sweet and tart flavors, and the buttery crust adds a satisfying crunch. It’s an easy way to showcase seasonal apples, making it a fantastic choice for fall gatherings. Serve it warm or at room temperature, perhaps with a scoop of vanilla ice cream on the side for an extra treat!
Ingredients
- 1 pre-made pie crust (or homemade, if preferred)
- 3-4 medium apples, thinly sliced
- 1/4 cup granulated sugar
- 1 teaspoon ground cinnamon
- 1 tablespoon lemon juice
- 1 tablespoon unsalted butter, cut into small pieces
- 1 egg (for egg wash)
- 1 tablespoon coarse sugar (for topping, optional)
Instructions
- Preheat your oven to 400°F (200°C).
- In a mixing bowl, combine the sliced apples, granulated sugar, cinnamon, and lemon juice. Toss until the apples are well coated.
- Roll out the pie crust on a parchment-lined baking sheet. Arrange the apple mixture in the center of the crust, leaving about a 2-inch border.
- Fold the edges of the crust over the apples, pleating it as you go to create a rustic look.
- Dot the apples with small pieces of butter. Brush the crust edges with beaten egg and sprinkle with coarse sugar if desired.
- Bake for 30-35 minutes, or until the apples are tender and the crust is golden brown.
- Let it cool slightly before slicing and serving. Enjoy!
Chocolate Caramel Tart
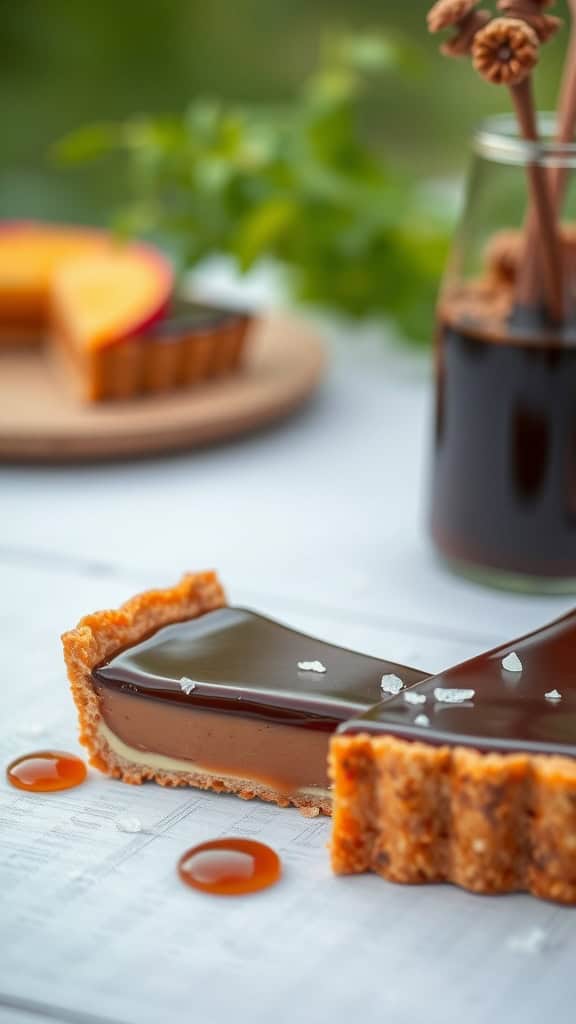
This chocolate caramel tart is a delightful addition to any Thanksgiving picnic. With its rich layers of velvety chocolate and smooth caramel, it’s a dessert that brings both sweetness and sophistication to your table. The buttery crust provides the perfect base, balancing the flavors beautifully.
Making this tart is simpler than it looks! Just a few steps and some patience while it chills will result in a dessert that’s sure to impress family and friends. Plus, it can be made ahead of time, freeing you up to enjoy the festivities!
Ingredients
- 1 1/4 cups graham cracker crumbs
- 1/2 cup unsalted butter, melted
- 1/4 cup granulated sugar
- 1 cup heavy cream
- 1 cup chocolate chips (dark or semi-sweet)
- 1 cup caramel sauce
- 1 teaspoon sea salt (for garnish)
Instructions
- Prepare the Crust: Preheat your oven to 350°F (175°C). In a bowl, mix graham cracker crumbs, melted butter, and sugar until combined. Press this mixture into the bottom and up the sides of a tart pan. Bake for 10 minutes. Let it cool.
- Make the Chocolate Layer: In a saucepan, heat 1/2 cup of heavy cream until it’s just about to boil. Remove from heat and stir in the chocolate chips until melted and smooth. Pour this mixture over the cooled crust and spread evenly. Chill in the refrigerator for about 30 minutes until set.
- Add the Caramel Layer: Once the chocolate layer is set, pour the caramel sauce over the chocolate, spreading it evenly. Chill again for another 30 minutes.
- Finish and Serve: Before serving, whip the remaining 1/2 cup of heavy cream to soft peaks and spread it over the tart. Sprinkle with sea salt for an extra touch. Slice and enjoy!
Berry Crisp Cups
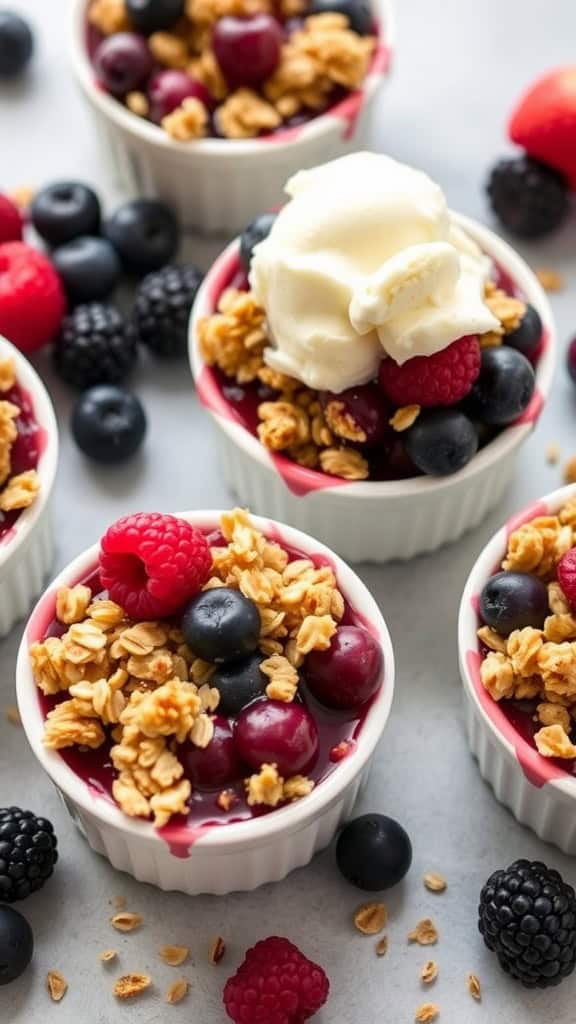
Berry Crisp Cups are a delightful treat that combines the natural sweetness of seasonal berries with a crunchy oat topping. They provide a comforting blend of flavors and textures, making each bite a tasty experience.
These cups are simple to prepare, perfect for bringing along to a Thanksgiving picnic. The vibrant colors of the berries add a festive touch, and the crisp topping gives just the right crunch. Plus, they can be served warm or cold, with a scoop of vanilla ice cream on top for an extra special touch!
Ingredients
- 2 cups mixed berries (such as blueberries, raspberries, and blackberries)
- 1 tablespoon granulated sugar
- 1 tablespoon cornstarch
- 1 teaspoon lemon juice
- 1 cup rolled oats
- 1/2 cup brown sugar
- 1/4 cup all-purpose flour
- 1/2 teaspoon ground cinnamon
- 1/4 cup unsalted butter, melted
- Vanilla ice cream (optional)
Instructions
- Preheat your oven to 350°F (175°C).
- In a bowl, mix the berries with granulated sugar, cornstarch, and lemon juice. Divide this mixture into individual ramekins.
- In another bowl, combine rolled oats, brown sugar, flour, and cinnamon. Stir in melted butter until the mixture resembles coarse crumbs.
- Top each ramekin of berries with the oat mixture, pressing down gently.
- Bake for about 20-25 minutes, until the topping is golden and the berries are bubbling.
- Let cool slightly before serving. Top with a scoop of vanilla ice cream if desired!
Lemon Blueberry Pound Cake
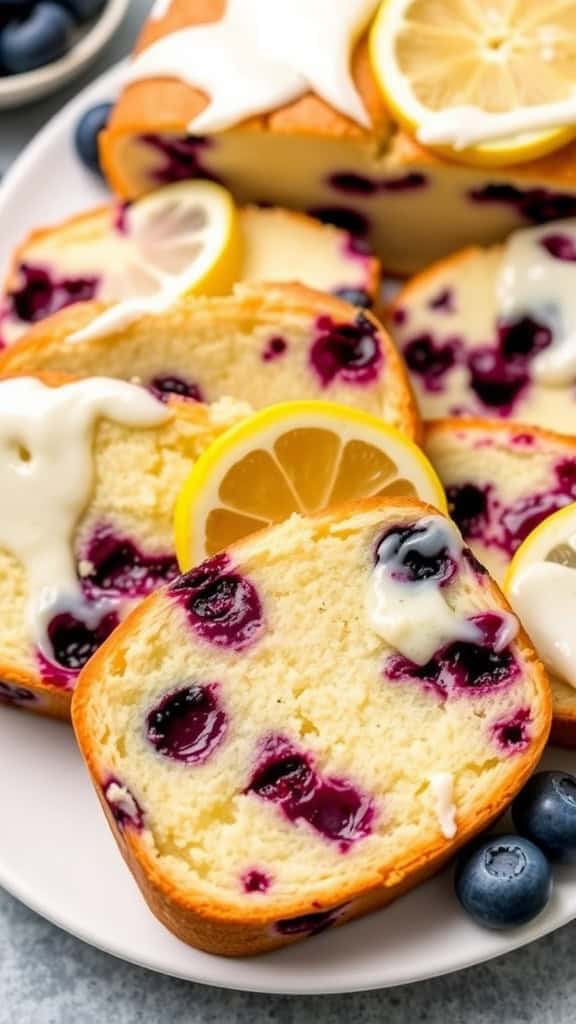
Lemon Blueberry Pound Cake is a delightful treat that perfectly combines tangy lemon and sweet blueberries. This cake offers a moist texture with a burst of flavor in every slice, making it a great addition to any Thanksgiving picnic. Not only is this dessert easy to prepare, but it also provides a refreshing taste that can brighten up your holiday gathering.
The balance of zesty lemon and juicy blueberries creates a harmonious flavor profile that everyone will enjoy. This cake is simple enough for bakers of all levels, so don’t worry if you’re new to baking. With just a few steps, you can whip up a delightful dessert that’s sure to impress.
Ingredients
- 1 cup unsalted butter, softened
- 2 cups granulated sugar
- 4 large eggs
- 1 tablespoon lemon zest
- 1/4 cup fresh lemon juice
- 3 cups all-purpose flour
- 1 teaspoon baking powder
- 1/2 teaspoon salt
- 1 cup fresh blueberries
- 1/4 cup powdered sugar (for optional glaze)
Instructions
- Preheat the oven to 350°F (175°C). Grease and flour a 9×5-inch loaf pan.
- In a large bowl, cream together the softened butter and granulated sugar until light and fluffy. Add in the eggs, one at a time, mixing well after each addition.
- Stir in the lemon zest and lemon juice until fully combined.
- In another bowl, whisk together the flour, baking powder, and salt. Gradually add this dry mixture to the wet ingredients, mixing until just combined.
- Gently fold in the blueberries, being careful not to overmix.
- Pour the batter into the prepared loaf pan and smooth the top. Bake for 60-70 minutes or until a toothpick inserted into the center comes out clean.
- Allow the cake to cool in the pan for about 10 minutes, then transfer it to a wire rack to cool completely. If desired, drizzle with a glaze made from powdered sugar and lemon juice before serving.
Pineapple Upside-Down Cake
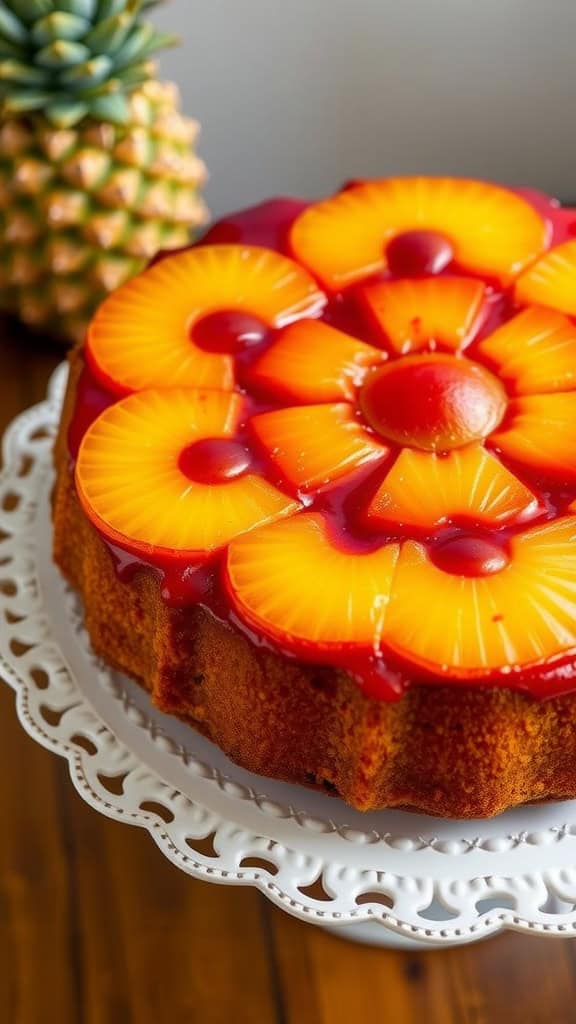
Pineapple Upside-Down Cake is a classic dessert that perfectly balances sweetness and a hint of tang. This cake features a gorgeous arrangement of caramelized pineapple rings topped with cherries, making it visually appealing and delicious. It’s simple to make, which makes it an excellent choice for your Thanksgiving picnic.
The fluffy cake pairs beautifully with the juicy, sweet pineapples and adds a delightful twist to your dessert table. With just a few ingredients and some straightforward steps, you can whip up this delightful treat that’s sure to please both kids and adults alike.
Ingredients
- 1/4 cup unsalted butter
- 1/2 cup brown sugar, packed
- 1 can (20 oz) pineapple slices, drained
- Maraschino cherries (optional)
- 1 cup all-purpose flour
- 1/2 cup granulated sugar
- 1/2 teaspoon baking powder
- 1/4 teaspoon baking soda
- 1/4 teaspoon salt
- 1/2 cup buttermilk
- 1/4 cup vegetable oil
- 1 large egg
- 1 teaspoon vanilla extract
Instructions
- Preheat your oven to 350°F (175°C) and grease a 9-inch round cake pan.
- In a small saucepan, melt the butter over low heat. Stir in the brown sugar until combined and pour it into the bottom of the prepared cake pan.
- Arrange the pineapple slices on top of the butter-sugar mixture, placing cherries in the centers of the pineapple rings if desired.
- In a large bowl, whisk together the flour, granulated sugar, baking powder, baking soda, and salt. In another bowl, mix the buttermilk, vegetable oil, egg, and vanilla extract until well combined.
- Pour the wet ingredients into the dry ingredients and mix until just combined. Do not overmix.
- Pour the batter over the pineapple layer in the cake pan and spread it evenly.
- Bake for 30-35 minutes, or until a toothpick inserted in the center comes out clean.
- Remove the cake from the oven and let it cool for 10 minutes. Carefully invert it onto a serving plate to reveal the beautiful pineapple topping.
- Allow it to cool completely before slicing and serving.
Churro Bites With Chocolate Sauce
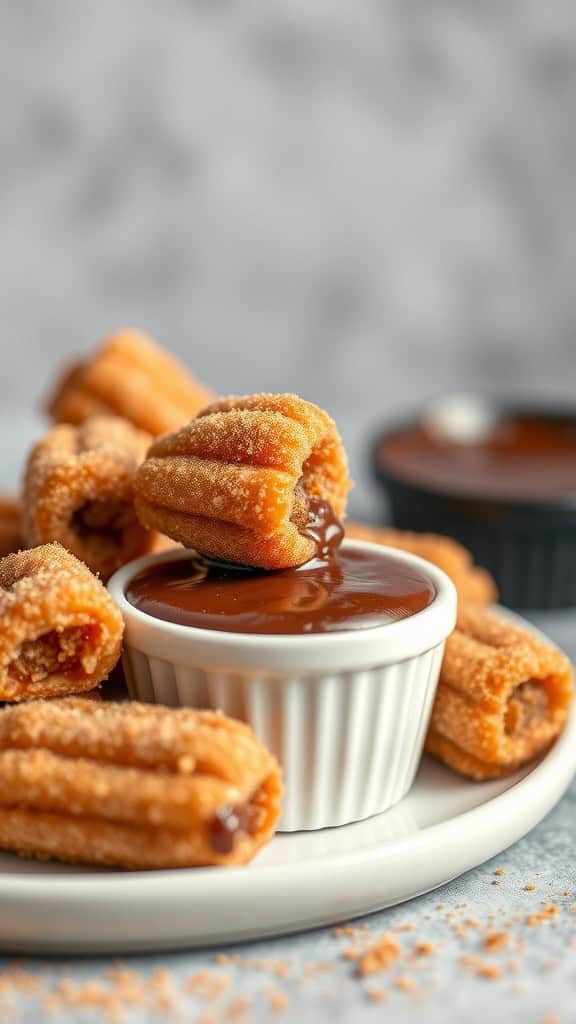
Churro bites are a delightful treat that beautifully blend crispy and soft textures. These little cinnamon-sugar-coated wonders are filled with a rich chocolate center, making them a perfect dessert for a Thanksgiving picnic. They’re easy to whip up and sure to impress everyone with their irresistible flavor.
Served with a warm chocolate sauce for dipping, churro bites offer a comforting sweetness that’s both nostalgic and exciting. Whether you’re sharing them around a picnic blanket or enjoying them at home, they bring a delightful touch to any gathering.
Ingredients
- 1 cup water
- 1/2 cup unsalted butter
- 1 tablespoon granulated sugar
- 1/4 teaspoon salt
- 1 cup all-purpose flour
- 2 large eggs
- 1 1/2 cups chocolate chips
- 1 teaspoon vanilla extract
- 1/2 cup granulated sugar (for coating)
- 2 teaspoons ground cinnamon
- Oil for frying
Instructions
- Make the Dough: In a saucepan, combine water, butter, sugar, and salt. Bring to a boil, then remove from heat and stir in flour until a dough forms. Let it cool slightly before adding the eggs one at a time, mixing until smooth.
- Prepare the Filling: Melt chocolate chips in a microwave-safe bowl, adding vanilla extract once melted. Stir to combine and set aside.
- Shape the Bites: Heat oil in a deep pan. Transfer the dough to a piping bag fitted with a star tip. Pipe small lengths of dough directly into the hot oil, cutting them off with scissors. Fry until golden brown, about 2-3 minutes, then remove to drain on paper towels.
- Coat the Bites: Mix sugar and cinnamon in a bowl. While the churro bites are still warm, roll them in the cinnamon-sugar mixture to coat.
- Serve: Serve warm with the melted chocolate sauce for dipping.