
Planning an outdoor birthday party in warm weather doesn’t have to mean sacrificing delicious cake! Here are some creative cake ideas that not only look good but also stand up to the heat, ensuring your celebration stays sweet and worry-free. From fun flavors to sturdy decorations, you’ll find delightful options that both kids and adults will enjoy.
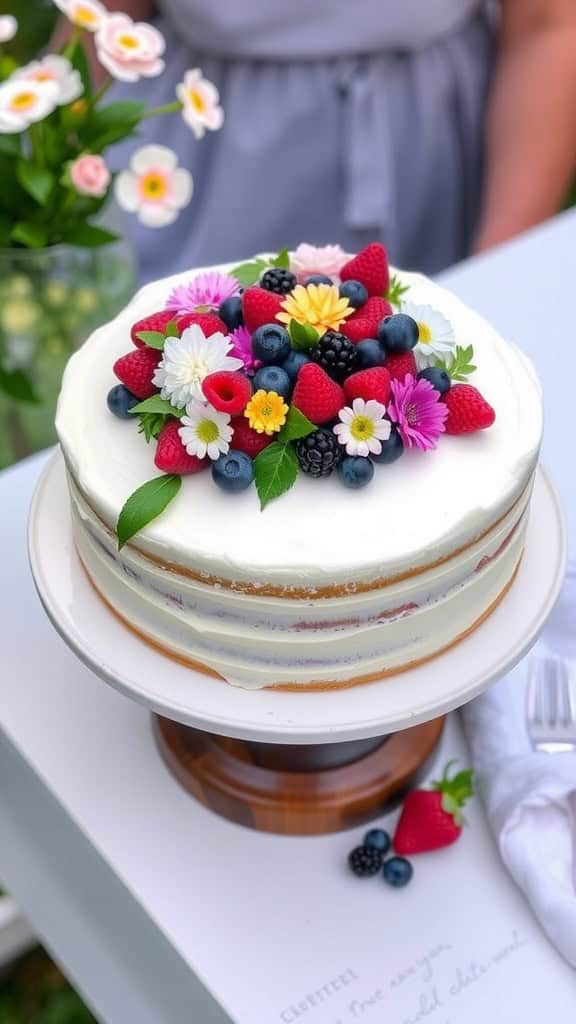
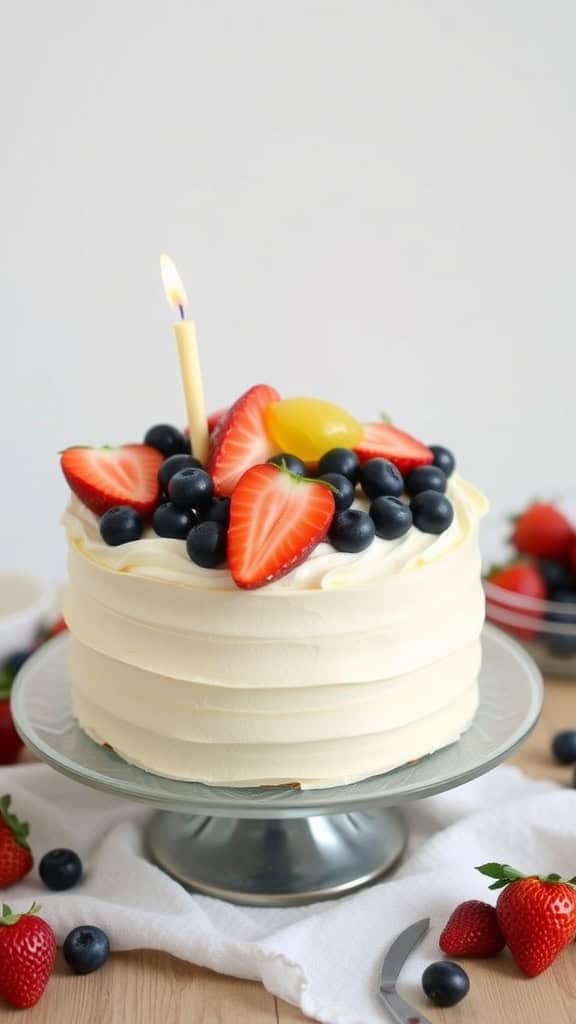
Naked Cake With Fresh Berries
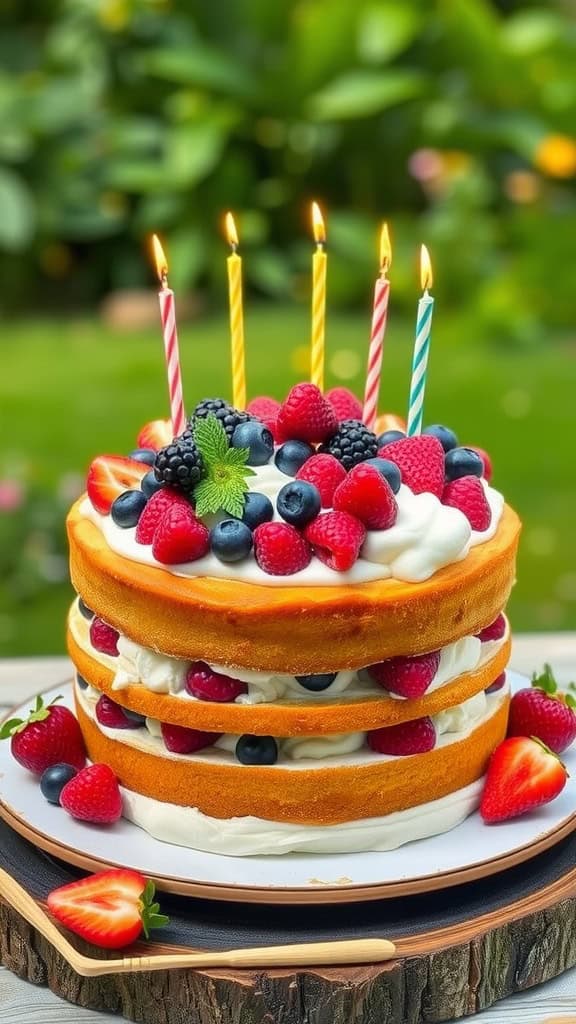
A naked cake is a delightful way to celebrate an outdoor birthday. It’s simple yet stunning, showcasing layers of moist cake and creamy frosting topped with fresh berries. This cake is not only visually appealing, but it also offers a refreshing taste that’s perfect for warm weather gatherings. With its light texture and fruity toppings, it’s an excellent choice for those looking to satisfy their sweet tooth without feeling too heavy.
The beauty of a naked cake lies in its rustic charm. You won’t need to worry about perfecting a thick layer of frosting, as its simplicity is what makes it shine. It’s easy to assemble, making it a breeze for anyone to try, even beginner bakers!
Ingredients
- 2 cups all-purpose flour
- 1 cup granulated sugar
- 1/2 cup unsalted butter, softened
- 1 cup whole milk
- 3 large eggs
- 2 teaspoons baking powder
- 1 teaspoon vanilla extract
- 1/4 teaspoon salt
- 2 cups whipped cream
- 2 cups mixed fresh berries (strawberries, blueberries, raspberries, blackberries)
Instructions
- Preheat your oven to 350°F (175°C) and grease three 8-inch round cake pans.
- In a large bowl, cream together the butter and sugar until light and fluffy. Add in the eggs one at a time, mixing well after each addition.
- In another bowl, whisk together the flour, baking powder, and salt. Gradually add to the butter mixture, alternating with the milk and vanilla extract. Mix until just combined.
- Divide the batter evenly among the prepared pans and smooth the tops. Bake for 25-30 minutes, or until a toothpick inserted into the center comes out clean.
- Allow the cakes to cool in the pans for 10 minutes, then transfer to a wire rack to cool completely.
- Once cooled, layer the cakes on a serving platter, spreading whipped cream between each layer. Top generously with mixed fresh berries. Enjoy your delicious naked cake!
Lemon Blueberry Bundt Cake
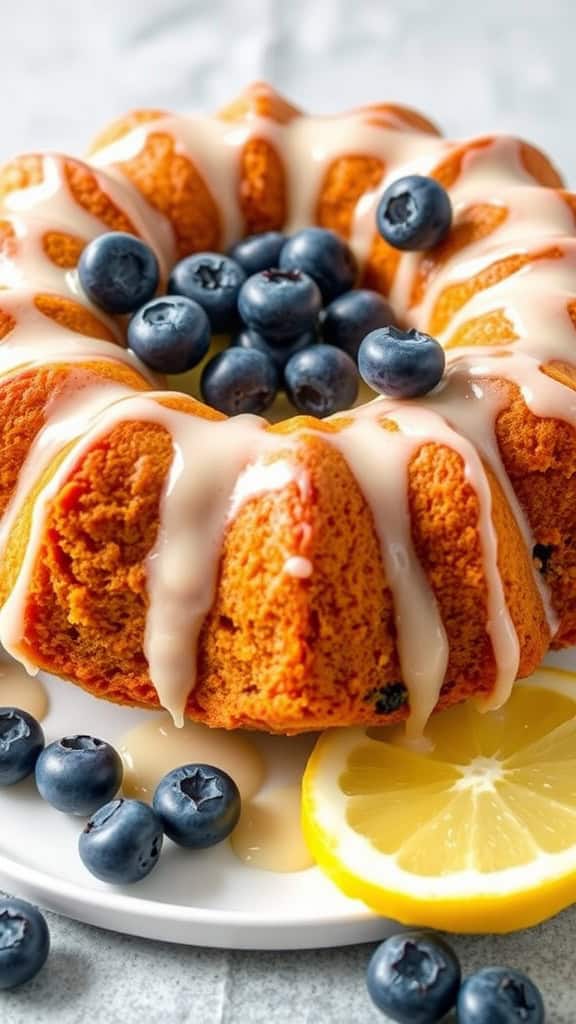
This Lemon Blueberry Bundt Cake is a delightful treat that’s perfect for summer celebrations. The zesty lemon flavor combined with juicy blueberries creates a refreshing taste that’s not too heavy, making it ideal for warm outdoor gatherings.
Making this cake is straightforward, even for novice bakers. With just a few basic ingredients and a simple mixing method, you’ll have a beautiful cake to impress your guests without spending hours in the kitchen.
Ingredients
- 2 cups all-purpose flour
- 1 tablespoon baking powder
- 1/2 teaspoon salt
- 1 cup unsalted butter, softened
- 1 1/2 cups granulated sugar
- 3 large eggs
- 1 tablespoon lemon zest
- 1/4 cup fresh lemon juice
- 1 teaspoon vanilla extract
- 1 cup blueberries, fresh or frozen
- 1 cup powdered sugar
- 2 tablespoons lemon juice (for glaze)
Instructions
- Preheat the oven to 350°F (175°C). Grease and flour a Bundt pan.
- In a bowl, whisk together the flour, baking powder, and salt. Set aside.
- In a large mixing bowl, cream the butter and sugar until light and fluffy. Add the eggs, one at a time, mixing well after each addition.
- Stir in the lemon zest, lemon juice, and vanilla extract.
- Gradually add the dry ingredients to the wet mixture until just combined. Gently fold in the blueberries.
- Pour the batter into the prepared Bundt pan and smooth the top. Bake for 45-50 minutes, or until a toothpick inserted comes out clean.
- Let the cake cool in the pan for about 10 minutes, then invert onto a wire rack to cool completely.
- For the glaze, mix the powdered sugar with lemon juice until smooth and drizzle over the cooled cake.
Chocolate Ganache Tart

This Chocolate Ganache Tart is a deliciously rich dessert that’s perfect for outdoor celebrations. With a smooth, creamy ganache filling and a crisp, buttery crust, it offers both elegance and indulgence in every bite. Plus, it’s a simple recipe that even novice bakers can tackle, making it an excellent choice for a warm-weather birthday party.
The tart can hold up beautifully in warmer temperatures, especially when adorned with fresh fruits and edible flowers. Each slice presents a delightful blend of chocolatey goodness balanced with fruity freshness, creating a crowd-pleasing dessert that’s sure to impress!
Ingredients
- 1 1/2 cups chocolate cookie crumbs
- 1/4 cup unsalted butter, melted
- 1 cup heavy cream
- 8 ounces semi-sweet chocolate, chopped
- 1 teaspoon vanilla extract
- Fresh fruits (berries, mango, etc.) for topping
- Edible flowers for decoration (optional)
Instructions
- Preheat the oven to 350°F (175°C). In a mixing bowl, combine the chocolate cookie crumbs and melted butter. Press the mixture firmly into the bottom and sides of a tart pan to form the crust.
- Bake the crust for about 10 minutes, then remove and let it cool completely.
- In a saucepan, heat the heavy cream over medium heat until just simmering. Remove from heat and add the chopped chocolate and vanilla extract. Stir until the chocolate is completely melted and the mixture is smooth.
- Pour the ganache into the cooled tart shell and spread it evenly. Refrigerate for at least 2 hours or until set.
- Before serving, top the tart with fresh fruits and edible flowers for a vibrant presentation.
Carrot Cake With Cream Cheese Frosting
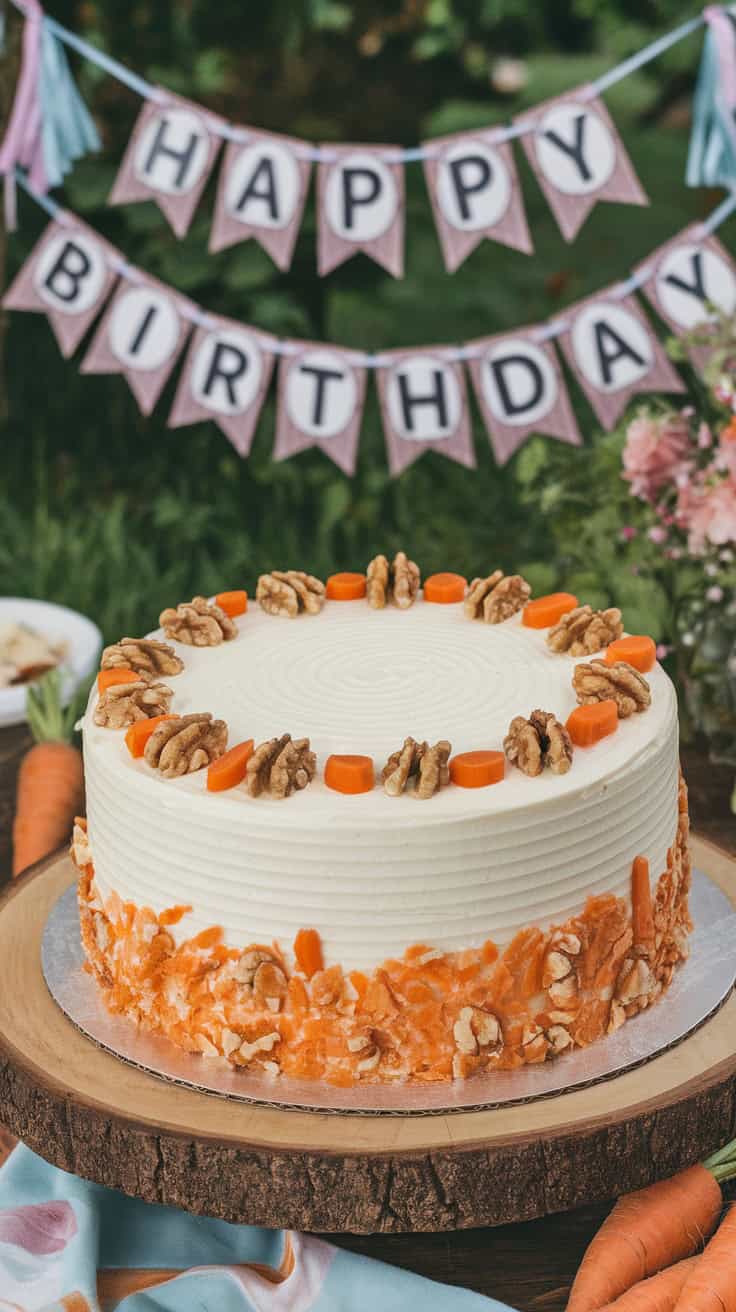
Carrot cake is a delightful dessert that brings a touch of warmth and sweetness to any celebration. With its moist texture and the natural sweetness of carrots, this cake is both comforting and refreshing. The addition of cream cheese frosting adds a rich, tangy flavor that perfectly complements the cake’s spiced notes, making it a crowd-pleaser.
Making a carrot cake is straightforward, and it’s a wonderful treat for outdoor gatherings, especially in warm weather. The ingredients are simple, and it can be prepared ahead of time, ensuring that it holds up well for your birthday festivities.
Ingredients
- 2 cups all-purpose flour
- 2 cups granulated sugar
- 1 teaspoon baking powder
- 1 teaspoon baking soda
- 1/2 teaspoon salt
- 2 teaspoons ground cinnamon
- 4 large eggs
- 1 cup vegetable oil
- 3 cups grated carrots
- 1 cup chopped walnuts (optional)
- 8 oz cream cheese, softened
- 1/2 cup unsalted butter, softened
- 4 cups powdered sugar
- 1 teaspoon vanilla extract
Instructions
- Preheat your oven to 350°F (175°C). Grease and flour two 9-inch round cake pans.
- In a large bowl, mix together the flour, sugar, baking powder, baking soda, salt, and cinnamon.
- In another bowl, whisk eggs and vegetable oil together. Stir in the grated carrots and chopped walnuts if using.
- Combine the wet and dry ingredients until just mixed. Divide the batter evenly between the prepared pans.
- Bake for 25-30 minutes until a toothpick inserted in the center comes out clean. Let the cakes cool in the pans for 10 minutes, then turn them out onto wire racks to cool completely.
- For the frosting, beat the cream cheese and butter together until smooth. Gradually add powdered sugar and vanilla, mixing until creamy.
- Once the cakes are cool, spread the cream cheese frosting between the layers and on the top and sides of the cake.
Fruit-Infused Watermelon Cake
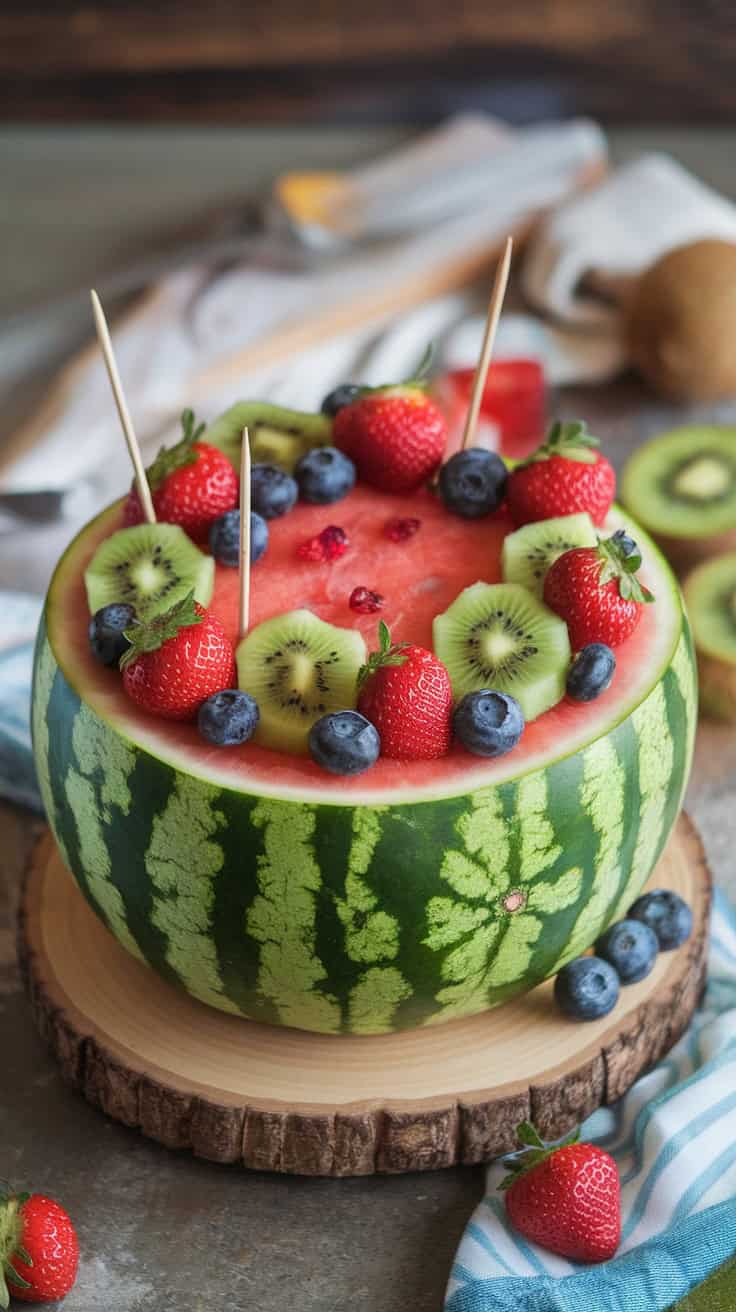
Fruit-infused watermelon cake is a delightful and refreshing dessert, perfect for outdoor birthday parties. This unique cake is not only visually stunning but also bursting with the natural sweetness of fresh fruits. It offers a light and juicy alternative to traditional cakes, making it an ideal choice for warm weather gatherings.
Making this cake is simple and fun! You just need to hollow out a watermelon and fill it with layers of colorful fruits like strawberries, blueberries, and raspberries. It’s a great way to incorporate seasonal fruits and keep your guests hydrated. Plus, it looks impressive on the table!
Ingredients
- 1 medium-sized watermelon
- 2 cups strawberries, hulled and sliced
- 1 cup blueberries
- 1 cup raspberries
- 1 cup pineapple, diced
- 1 tablespoon mint leaves, chopped (optional)
- Candles for decoration (optional)
Instructions
- Prepare the Watermelon: Cut the top off the watermelon and scoop out the flesh, leaving a 1-inch border. Set the watermelon shell aside.
- Cut the Watermelon Flesh: Dice the watermelon flesh and place it in a mixing bowl. Add the sliced strawberries, blueberries, raspberries, and diced pineapple.
- Mix the Fruits: Gently toss the fruits together to combine. If desired, add chopped mint for an extra burst of flavor.
- Fill the Watermelon: Spoon the mixed fruit back into the hollowed-out watermelon shell, packing it in tightly.
- Chill and Serve: Refrigerate the watermelon cake for at least an hour before serving. Add candles on top if celebrating a birthday, and enjoy!
Coconut Cream Cake
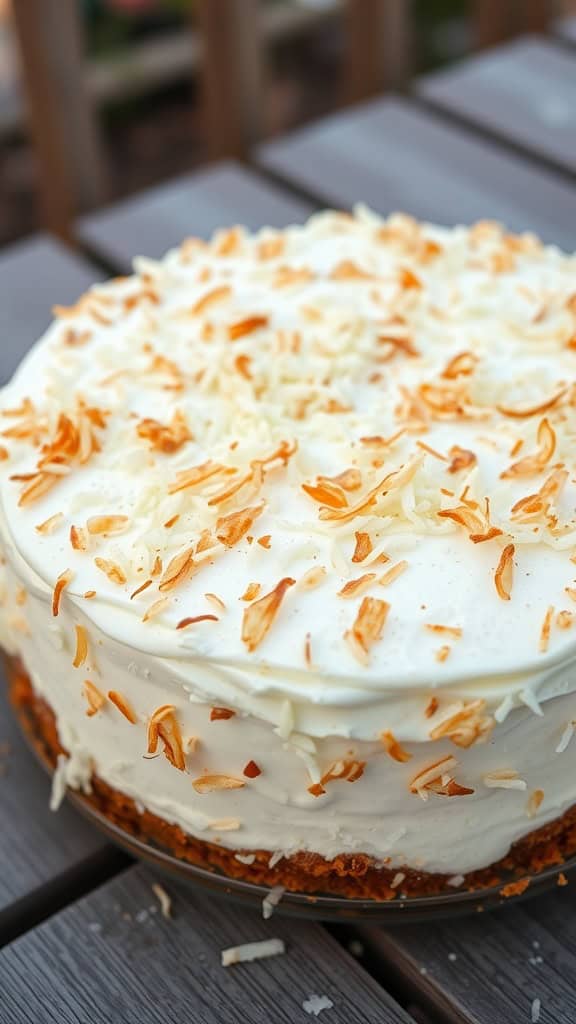
Coconut Cream Cake is a light and refreshing dessert that’s perfect for outdoor celebrations. It boasts a delightful balance of sweetness and a tropical coconut flavor that will transport you to a sunny beach. This cake is not only delicious but also easy to make, making it a great choice for birthday parties in warm weather.
The layers of fluffy coconut cake paired with creamy frosting create a lovely texture that everyone will enjoy. Plus, the coconut topping adds a nice crunch that contrasts beautifully with the soft cake. Whether you’re an experienced baker or just trying your hand at cake making, this recipe is straightforward and fun!
Ingredients
- 2 cups all-purpose flour
- 1 cup granulated sugar
- 1 tablespoon baking powder
- 1/2 teaspoon salt
- 1 cup coconut milk
- 1/2 cup unsalted butter, softened
- 3 large eggs
- 1 teaspoon vanilla extract
- 2 cups shredded coconut (sweetened or unsweetened)
- 1 cup heavy whipping cream
- 1 cup powdered sugar
- 1 teaspoon vanilla extract (for frosting)
- Toasted coconut flakes, for decoration
Instructions
- Preheat your oven to 350°F (175°C). Grease and flour two 9-inch round cake pans.
- In a large bowl, whisk together flour, sugar, baking powder, and salt. In another bowl, mix coconut milk, butter, eggs, and vanilla until combined.
- Combine the wet and dry ingredients, mixing until just combined. Stir in the shredded coconut.
- Divide the batter evenly between the prepared pans and smooth the tops. Bake for 25-30 minutes or until a toothpick inserted in the center comes out clean.
- Let the cakes cool in the pans for about 10 minutes, then transfer to a wire rack to cool completely.
- For the frosting, beat heavy cream until soft peaks form. Gradually add powdered sugar and vanilla, continuing to beat until stiff peaks form.
- Once the cakes are cool, spread a layer of frosting on top of one cake, place the second cake on top, and frost the top and sides of the cake.
- Finish by sprinkling toasted coconut flakes on top. Serve chilled and enjoy your Coconut Cream Cake!
Pineapple Upside-Down Cake
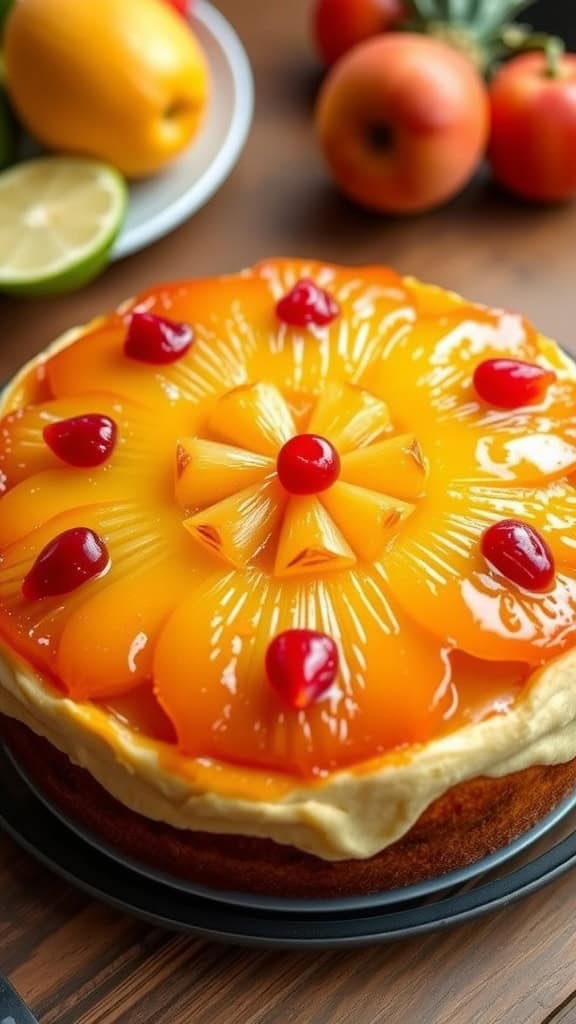
Pineapple Upside-Down Cake is a delightful dessert that combines the sweetness of pineapple with a moist, buttery cake. This classic recipe has a beautiful presentation, featuring caramelized pineapple rings topped with a cherry, making it a perfect centerpiece for outdoor gatherings. The cake is not only visually appealing but also easy to prepare, making it a great choice for those warm-weather celebrations.
The flavors meld together wonderfully, creating a sweet and slightly tangy treat that pairs beautifully with a scoop of vanilla ice cream. Plus, its unique assembly method adds an element of fun to the baking process. You’ll impress your guests with this delicious cake that holds up well in the heat!
Ingredients
- 1/4 cup unsalted butter
- 1/2 cup packed brown sugar
- 1 can (20 oz) sliced pineapple in juice, drained
- Maraschino cherries, for garnish
- 1 cup all-purpose flour
- 1 cup granulated sugar
- 1/2 cup milk
- 1/3 cup vegetable oil
- 2 large eggs
- 2 teaspoons baking powder
- 1 teaspoon vanilla extract
- 1/4 teaspoon salt
Instructions
- Preheat the oven to 350°F (175°C). Melt the butter in a 9-inch round cake pan and sprinkle the brown sugar evenly over the melted butter.
- Arrange the pineapple slices over the brown sugar. Place a cherry in the center of each pineapple slice and set aside.
- In a mixing bowl, combine flour, granulated sugar, baking powder, and salt. In another bowl, whisk together the milk, vegetable oil, eggs, and vanilla extract. Gradually stir the wet ingredients into the dry ingredients until just combined.
- Pour the batter over the pineapple arrangement in the cake pan, spreading it evenly.
- Bake for 30-35 minutes or until a toothpick inserted in the center comes out clean. Allow the cake to cool for 5 minutes, then invert it onto a serving plate. Serve warm or at room temperature.
No-Bake Cheesecake
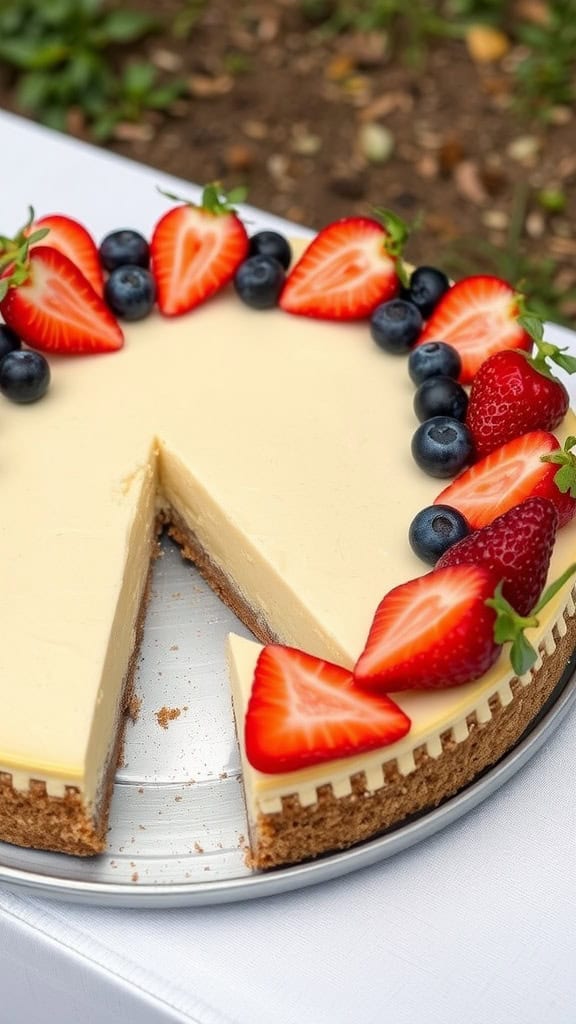
No-bake cheesecake is a delightful dessert that’s light, creamy, and perfect for warm weather celebrations. It requires minimal effort and no oven time, making it an ideal choice for outdoor birthday parties. The combination of a buttery graham cracker crust and a smooth, rich filling offers a lovely balance of flavors and textures that everyone will enjoy.
This cheesecake is not only simple to make, but it can also be customized with your favorite toppings, whether it’s fresh fruit, chocolate, or a drizzle of caramel. Plus, because it can be prepared in advance, you’ll have more time to relax and enjoy the festivities!
Ingredients
- 2 cups graham cracker crumbs
- 1/2 cup unsalted butter, melted
- 1/4 cup granulated sugar
- 16 oz cream cheese, softened
- 1 cup powdered sugar
- 1 teaspoon vanilla extract
- 1 cup heavy whipping cream
- Fresh berries for topping (strawberries, blueberries, etc.)
Instructions
- Make the Crust: In a bowl, combine graham cracker crumbs, melted butter, and granulated sugar until well mixed. Press the mixture into the bottom of a 9-inch springform pan to form a firm crust.
- Prepare the Filling: In a large bowl, beat the softened cream cheese until smooth. Gradually add powdered sugar and vanilla extract, mixing until well combined.
- Whip the Cream: In a separate bowl, whip the heavy cream until stiff peaks form. Gently fold the whipped cream into the cream cheese mixture until fully incorporated.
- Assemble the Cheesecake: Pour the filling over the prepared crust, smoothing the top with a spatula. Refrigerate for at least 4 hours or until set.
- Serve: Once set, remove the cheesecake from the springform pan. Top with fresh berries before serving and enjoy!
Strawberry Shortcake
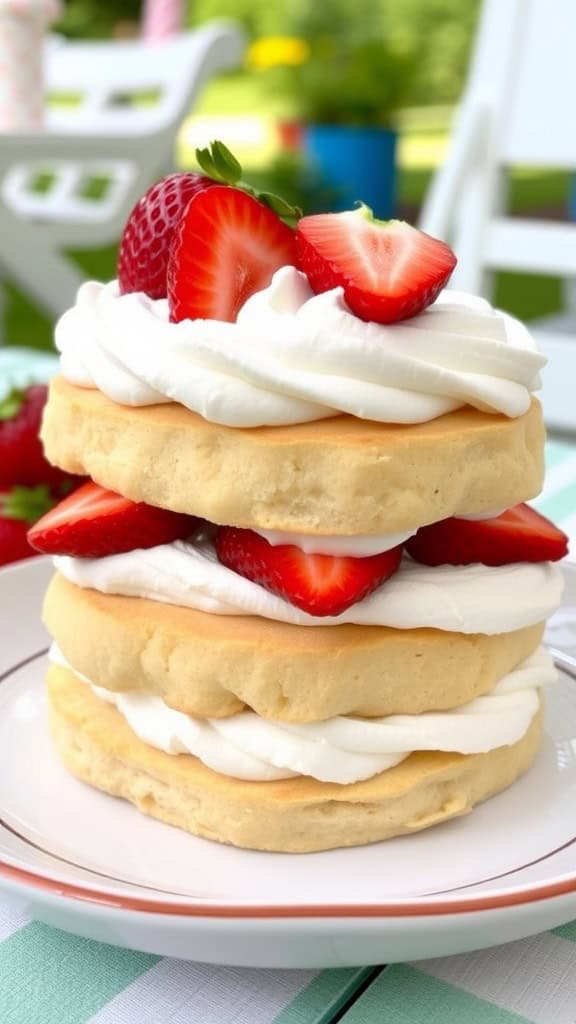
Strawberry shortcake is a delightful dessert that combines fluffy layers of cake with sweet, juicy strawberries and whipped cream. This recipe is not only delicious but also simple to make, making it an excellent choice for outdoor birthday celebrations.
The light and airy texture of the cake pairs perfectly with the freshness of the strawberries, creating a refreshing treat that holds up well in warm weather. It’s a great way to celebrate with friends and family while enjoying the sweetness of summer.
Ingredients
- 2 cups all-purpose flour
- 1/4 cup granulated sugar
- 1 tablespoon baking powder
- 1/2 teaspoon salt
- 1/2 cup unsalted butter, softened
- 1 cup milk
- 2 large eggs
- 1 teaspoon vanilla extract
- 3 cups fresh strawberries, hulled and sliced
- 1 cup heavy cream, whipped
- 2 tablespoons powdered sugar
Instructions
- Preheat the oven to 350°F (175°C). Grease and flour two round cake pans.
- In a bowl, combine flour, sugar, baking powder, and salt. Add softened butter and mix until crumbly.
- In another bowl, whisk together milk, eggs, and vanilla. Gradually add this mixture to the dry ingredients and mix until smooth.
- Pour the batter evenly into the prepared pans and bake for 25-30 minutes, or until a toothpick comes out clean.
- Let the cakes cool in the pans for 10 minutes, then transfer to wire racks to cool completely.
- Once cool, slice each cake in half horizontally. Layer strawberries and whipped cream between the cake layers, then stack them.
- Top with more whipped cream and fresh strawberries for decoration. Serve and enjoy!
Lemon Tart With Meringue
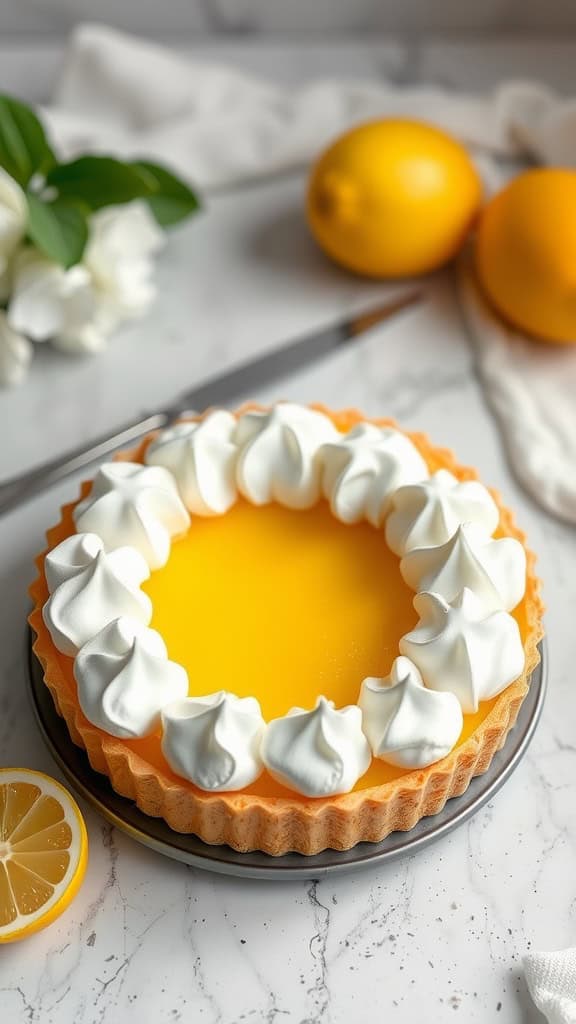
This lemon tart with meringue is a delightfully tangy dessert that’s perfect for warm outdoor celebrations. The bright, zesty lemon filling is balanced beautifully by a light and fluffy meringue topping, creating a refreshing treat that’s sure to please your guests.
Making this tart is relatively simple, even for beginner bakers. With a crumbly crust that holds up well in warm weather, it’s a wonderful choice for birthday parties or picnics. Plus, it’s a great way to use fresh lemons, adding a vibrant touch to your dessert table.
Ingredients
- 1 ½ cups all-purpose flour
- ½ cup unsalted butter, softened
- ¼ cup powdered sugar
- 1 large egg yolk
- 3 tablespoons cold water
- 1 cup granulated sugar
- 3 large eggs
- 1 cup fresh lemon juice
- 1 tablespoon lemon zest
- ¼ teaspoon salt
- 4 large egg whites
- ½ teaspoon cream of tartar
Instructions
- Make the Crust: In a bowl, mix flour, butter, and powdered sugar until crumbly. Add egg yolk and cold water, combining until a dough forms. Press the dough into a tart pan and chill for 30 minutes.
- Bake the Crust: Preheat the oven to 350°F (175°C). Bake the crust for 15-20 minutes until golden. Let it cool.
- Prepare the Filling: In a saucepan, whisk together granulated sugar, eggs, lemon juice, lemon zest, and salt. Cook over medium heat until thickened, about 10 minutes. Pour the filling into the cooled crust.
- Make the Meringue: In a clean bowl, beat the egg whites and cream of tartar until soft peaks form. Gradually add sugar, continuing to beat until glossy peaks form. Spread meringue over the lemon filling.
- Bake the Tart: Bake the tart for an additional 10 minutes until the meringue is lightly browned. Let it cool before serving.
Chocolate Chip Cookie Cake
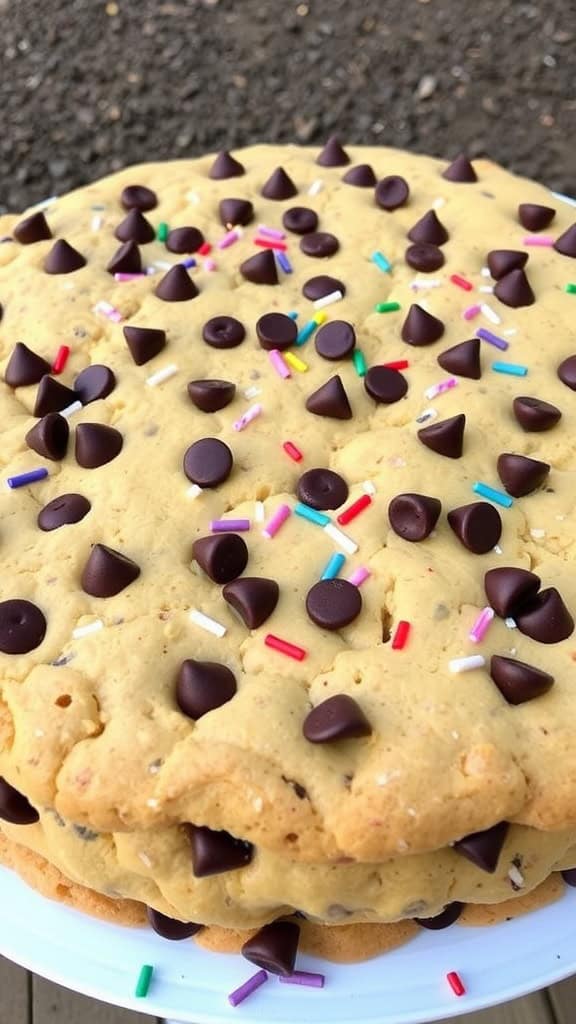
If you’re looking for a fun and delicious way to celebrate a birthday outdoors, a chocolate chip cookie cake is a fantastic option! It’s soft, chewy, and packed with chocolatey goodness, making it a crowd-pleaser for both kids and adults. Plus, it’s super easy to make, which means less stress for you and more time to enjoy the festivities.
This cookie cake brings all the flavors of your favorite chocolate chip cookies in a delightful cake form. With a few simple ingredients, you can whip up a treat that not only looks great but tastes even better. Decorate it with frosting and sprinkles for that extra festive touch!
Ingredients
- 2 1/4 cups all-purpose flour
- 1 teaspoon baking soda
- 1/2 teaspoon salt
- 1 cup unsalted butter, softened
- 3/4 cup granulated sugar
- 3/4 cup brown sugar, packed
- 1 teaspoon vanilla extract
- 2 large eggs
- 2 cups semi-sweet chocolate chips
- 1 cup frosting (for decoration)
- Sprinkles (for decoration)
Instructions
- Preheat the Oven: Preheat your oven to 350°F (175°C) and grease a round cake pan.
- Mix Dry Ingredients: In a bowl, whisk together flour, baking soda, and salt. Set aside.
- Combine Wet Ingredients: In a large mixing bowl, cream together the softened butter, granulated sugar, and brown sugar until light and fluffy. Add in the vanilla extract and eggs, mixing until well combined.
- Add Dry Ingredients: Gradually add the dry ingredient mixture to the wet ingredients, mixing until just combined. Stir in the chocolate chips until evenly distributed.
- Bake the Cake: Spread the dough into the prepared cake pan and bake for about 25-30 minutes, or until the edges are golden and a toothpick comes out clean.
- Cool and Decorate: Let the cake cool in the pan for 10 minutes, then transfer it to a wire rack to cool completely. Once cooled, frost the top and sides with your favorite frosting and sprinkle with colorful sprinkles for a festive touch!
Peach Melba Cake
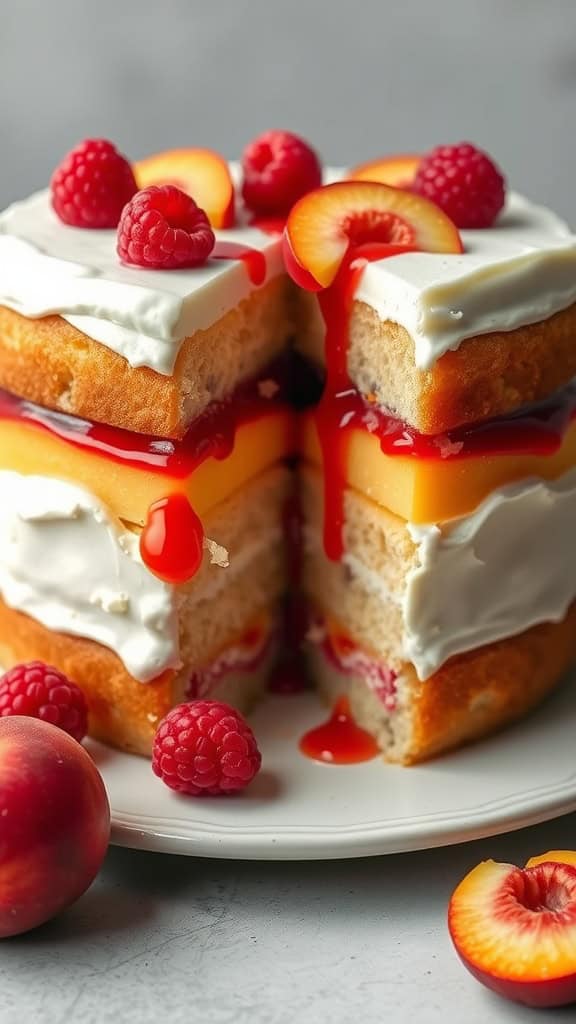
The Peach Melba Cake is a delightful dessert that combines the sweetness of ripe peaches with the tartness of raspberries. This layered cake is not only visually appealing but also a treat for the taste buds, making it a lovely choice for any outdoor birthday celebration.
Simple yet elegant, this cake features fluffy layers of vanilla sponge, luscious peach filling, and a light whipped cream frosting. It’s designed to hold up well in warmer weather, ensuring your guests can enjoy every slice without worry!
Ingredients
- 1 ½ cups all-purpose flour
- 1 cup granulated sugar
- ½ cup unsalted butter, softened
- 2 large eggs
- 1 cup milk
- 2 teaspoons baking powder
- 1 teaspoon vanilla extract
- 1 cup fresh peaches, diced
- 1 cup raspberries
- 1 cup heavy cream
- 2 tablespoons powdered sugar
- Peach preserves for layering
Instructions
- Preheat the oven to 350°F (175°C) and grease two 9-inch round cake pans.
- In a large bowl, cream together the butter and granulated sugar until light and fluffy. Add the eggs one at a time, mixing well after each addition. Stir in the vanilla.
- In another bowl, whisk together the flour and baking powder. Gradually add the dry ingredients to the butter mixture, alternating with milk, until smooth.
- Divide the batter evenly between the prepared pans and bake for 25-30 minutes, or until a toothpick inserted into the center comes out clean. Let cool in the pans for 10 minutes, then transfer to wire racks to cool completely.
- Once cooled, layer the cake with peach preserves, diced peaches, and raspberries, spreading whipped cream in between layers. For the frosting, whip the heavy cream with powdered sugar until soft peaks form, then frost the outside of the cake.
- Garnish with additional peach slices and raspberries before serving. Enjoy your Peach Melba Cake at your outdoor birthday celebration!
Mango Coconut Cake
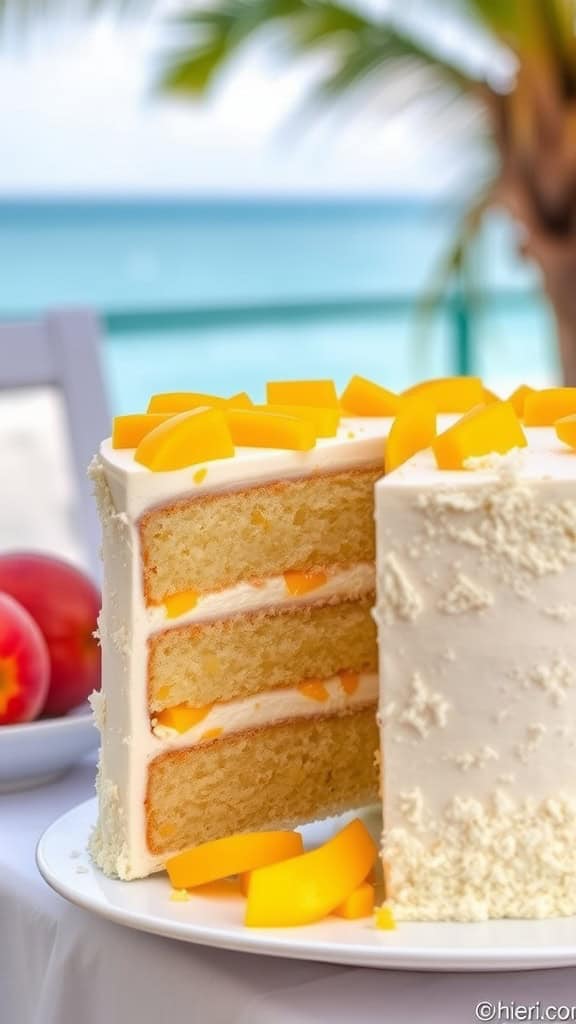
If you’re looking for a sweet treat to celebrate outdoors, a Mango Coconut Cake is a delightful choice. This cake is light and moist, with a refreshing tropical flavor that’s perfect for warm weather. The combination of juicy mango and creamy coconut creates a taste sensation that will brighten any birthday party.
This recipe is simple to make, ensuring you won’t be stuck in the kitchen for hours. With just a few ingredients, you can whip up a cake that not only looks beautiful but also tastes delicious. Let’s dive into how to make this tropical delight!
Ingredients
- 2 cups all-purpose flour
- 1 1/2 cups granulated sugar
- 1 tablespoon baking powder
- 1/2 teaspoon salt
- 1/2 cup unsalted butter, softened
- 1 cup coconut milk
- 3 large eggs
- 1 teaspoon vanilla extract
- 1 cup diced ripe mango
- 1 cup whipped cream (for frosting)
- Fresh mango slices (for decoration)
Instructions
- Preheat the Oven: Preheat your oven to 350°F (175°C). Grease and flour two 9-inch round cake pans.
- Mix Dry Ingredients: In a large bowl, whisk together flour, sugar, baking powder, and salt.
- Combine Wet Ingredients: In another bowl, mix softened butter, coconut milk, eggs, and vanilla until well combined.
- Combine Mixtures: Gradually add the wet mixture to the dry ingredients, mixing until just combined. Fold in the diced mango gently.
- Bake: Divide the batter evenly between the prepared pans and bake for 25-30 minutes or until a toothpick comes out clean. Let the cakes cool for 10 minutes before transferring them to wire racks to cool completely.
- Frost: Once cooled, spread whipped cream between the layers and on top of the cake. Decorate with fresh mango slices for a tropical finish.
S’Mores Layer Cake

If you’re looking for a fun dessert that brings the joy of camping to your birthday celebration, the S’Mores Layer Cake is an excellent choice. With layers of fluffy cake, chocolate frosting, and toasted marshmallows, this cake captures the classic campfire treat in a delightful way. It’s not overly complicated to make, making it a great option for bakers of all skill levels.
The combination of rich chocolate, sweet marshmallows, and a hint of graham cracker flavors creates a deliciously nostalgic taste. This cake not only looks attractive but also holds up well in warm weather, making it perfect for outdoor parties.
Ingredients
- 2 cups all-purpose flour
- 1 3/4 cups granulated sugar
- 3/4 cup unsweetened cocoa powder
- 1 1/2 teaspoons baking powder
- 1 1/2 teaspoons baking soda
- 1 teaspoon salt
- 2 large eggs
- 1 cup whole milk
- 1/2 cup vegetable oil
- 2 teaspoons vanilla extract
- 1 cup boiling water
- 1 cup chocolate frosting (store-bought or homemade)
- 1 cup mini marshmallows
- 1/2 cup graham cracker crumbs
- Chocolate squares for decoration (optional)
Instructions
- Preheat your oven to 350°F (175°C). Grease and flour three 9-inch round cake pans.
- In a large bowl, combine flour, sugar, cocoa powder, baking powder, baking soda, and salt. Mix well.
- Add the eggs, milk, vegetable oil, and vanilla to the dry ingredients. Beat on medium speed for about 2 minutes. Stir in boiling water until well combined.
- Pour the batter evenly into the prepared cake pans. Bake for 30-35 minutes, or until a toothpick inserted into the center comes out clean.
- Allow the cakes to cool in the pans for 10 minutes before transferring them to wire racks to cool completely.
- Once cooled, spread a layer of chocolate frosting on top of the first cake layer. Sprinkle with graham cracker crumbs and mini marshmallows. Repeat with the second layer.
- Top with the final cake layer, cover the whole cake with frosting, and add more marshmallows and chocolate squares for decoration.
- For an extra touch, use a kitchen torch to lightly toast the marshmallows on top before serving.
Raspberry Lemonade Cake
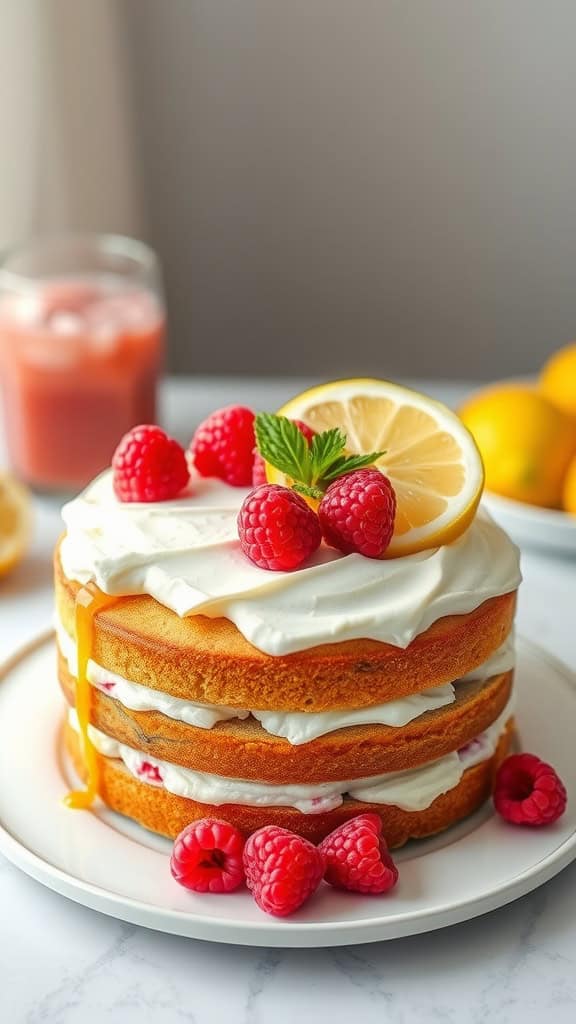
Raspberry Lemonade Cake is a delightful dessert that perfectly balances the tartness of lemons with the sweetness of raspberries. This cake is light, refreshing, and an excellent choice for outdoor birthdays, especially when the weather is warm. The combination of zesty lemon and juicy raspberries creates a flavor profile that is both vibrant and satisfying.
Making this cake is relatively simple and enjoyable, allowing bakers of all levels to create something special. With its layers of fluffy cake and creamy frosting, it’s sure to impress your guests and keep everyone cool during the celebration.
Ingredients
- 2 cups all-purpose flour
- 1 ½ cups granulated sugar
- 1 tablespoon baking powder
- ½ teaspoon salt
- ½ cup unsalted butter, softened
- 1 cup milk
- 3 large eggs
- 1 teaspoon vanilla extract
- 1 tablespoon lemon zest
- 1 cup fresh raspberries
- 1 ½ cups heavy whipping cream
- ½ cup powdered sugar
- Extra raspberries and lemon slices for decoration
Instructions
- Preheat your oven to 350°F (175°C). Grease and flour three 8-inch round cake pans.
- In a large mixing bowl, combine flour, sugar, baking powder, and salt. Add softened butter and mix until crumbly.
- In a separate bowl, whisk together milk, eggs, vanilla extract, and lemon zest. Gradually add this mixture to the dry ingredients, mixing until just combined.
- Gently fold in the fresh raspberries, being careful not to break them apart.
- Divide the batter evenly among the prepared cake pans. Bake for 25-30 minutes, or until a toothpick inserted in the center comes out clean.
- Once baked, let the cakes cool in the pans for 10 minutes before transferring them to wire racks to cool completely.
- For the frosting, whip the heavy cream and powdered sugar together until soft peaks form.
- Once the cakes are completely cool, layer them with whipped cream frosting in between. Frost the top and sides of the cake as desired.
- Decorate with extra raspberries and lemon slices before serving.
Almond Flour Cake
This almond flour cake is a delightful choice for outdoor birthday celebrations. It has a moist texture and a subtly nutty flavor that pairs beautifully with fresh fruits and light frostings. Not only is this cake simple to make, but it also holds up well in warm weather, making it perfect for sunny parties!
The use of almond flour gives this cake a unique twist while keeping it gluten-free. With a few easy steps, you can whip up this cake and decorate it to your heart’s content. It’s great for both kids and adults, ensuring everyone will enjoy a slice!
Ingredients
- 2 cups almond flour
- 1/2 cup granulated sugar
- 4 large eggs
- 1/4 cup unsalted butter, melted
- 1 teaspoon vanilla extract
- 1 teaspoon baking powder
- 1/4 teaspoon salt
- 1/4 cup milk or dairy alternative
Instructions
- Preheat the oven to 350°F (175°C) and grease an 8-inch round cake pan.
- In a large bowl, combine almond flour, sugar, baking powder, and salt.
- In another bowl, whisk together eggs, melted butter, vanilla extract, and milk until smooth.
- Pour the wet ingredients into the dry ingredients and mix until well combined.
- Pour the batter into the prepared cake pan and smooth the top.
- Bake for 25-30 minutes or until a toothpick inserted in the center comes out clean.
- Let the cake cool in the pan for 10 minutes before transferring it to a wire rack to cool completely.
- Once cooled, you can frost the cake as desired and top with fresh fruits and flowers for decoration.
Chocolate Mint Cake
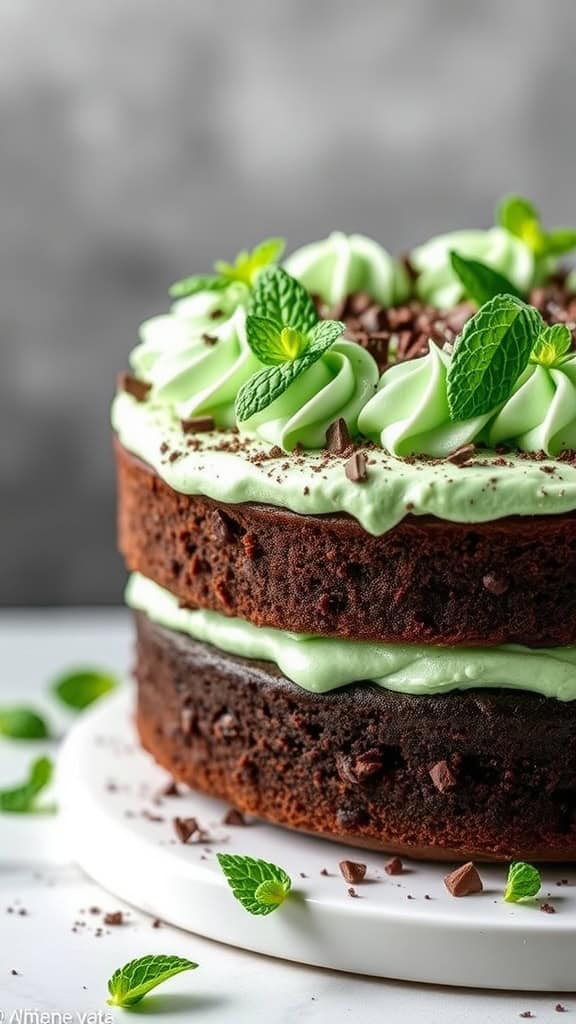
Chocolate Mint Cake is a delightful dessert that combines rich chocolate flavor with a refreshing hint of mint. This cake is perfect for outdoor birthday celebrations, especially during warm weather, as it is light and not overly sweet. The combination of moist chocolate layers with creamy mint frosting creates a delicious contrast that everyone will enjoy.
Making this cake is quite simple, even for those new to baking. With easy-to-follow steps, it can be prepared ahead of time and assembled just before serving, making it a stress-free choice for any gathering. The vibrant mint color adds a festive touch that makes it visually appealing, too!
Ingredients
- 1 3/4 cups all-purpose flour
- 3/4 cup unsweetened cocoa powder
- 2 cups granulated sugar
- 1 1/2 teaspoons baking powder
- 1 1/2 teaspoons baking soda
- 1 teaspoon salt
- 2 large eggs
- 1 cup whole milk
- 1/2 cup vegetable oil
- 2 teaspoons vanilla extract
- 1 cup boiling water
- 1 cup heavy cream
- 1/2 cup powdered sugar
- 1 teaspoon peppermint extract
- Green food coloring (optional)
- Chocolate shavings or chips for garnish
- Fresh mint leaves for decoration
Instructions
- Preheat the oven to 350°F (175°C). Grease and flour two 9-inch round cake pans.
- In a large bowl, mix together flour, cocoa powder, sugar, baking powder, baking soda, and salt.
- Add eggs, milk, oil, and vanilla to the dry ingredients. Beat on medium speed for 2 minutes. Stir in boiling water until combined (the batter will be thin).
- Pour the batter evenly into the prepared cake pans. Bake for 30-35 minutes, or until a toothpick inserted in the center comes out clean.
- Allow the cakes to cool in the pans for 10 minutes, then remove from pans and cool completely on wire racks.
- For the frosting, beat heavy cream until soft peaks form. Gradually add powdered sugar and peppermint extract. If desired, add a few drops of green food coloring to achieve a minty hue.
- Once the cakes are cool, place one layer on a serving plate. Spread a generous amount of mint frosting on top. Place the second layer on top and frost the top and sides of the cake.
- Decorate with chocolate shavings and fresh mint leaves for a charming finish. Serve and enjoy your refreshing Chocolate Mint Cake outdoors!
Key Lime Pie Cake
If you’re looking for a refreshing dessert that can stand up to warm weather, a Key Lime Pie Cake is a delightful choice. This cake combines the tartness of key limes with a moist cake base, balanced perfectly by a creamy frosting. It’s a fun twist on the classic key lime pie, ideal for outdoor celebrations.
This cake is simple to make and requires basic baking skills. The zesty flavor makes it a crowd-pleaser, while the light frosting keeps it from being too heavy in the heat. Plus, it’s visually appealing, making it a lovely centerpiece for any birthday party!
Ingredients
- 1 ½ cups all-purpose flour
- 1 cup granulated sugar
- ½ cup unsalted butter, softened
- 2 large eggs
- ½ cup buttermilk
- 1/3 cup fresh key lime juice
- 1 teaspoon baking powder
- ½ teaspoon baking soda
- ¼ teaspoon salt
- 1 teaspoon vanilla extract
- For frosting: 1 cup heavy cream, whipped
- 2 cups powdered sugar
- Zest of 2 key limes
Instructions
- Preheat your oven to 350°F (175°C). Grease and flour a loaf pan.
- In a large bowl, cream together the butter and sugar until light and fluffy. Add in the eggs, one at a time, mixing well after each addition.
- In another bowl, combine flour, baking powder, baking soda, and salt. Gradually add the dry ingredients to the butter mixture, alternating with buttermilk and key lime juice. Stir in vanilla extract.
- Pour the batter into the prepared loaf pan and bake for 40-45 minutes, or until a toothpick inserted into the center comes out clean.
- Allow the cake to cool completely. Meanwhile, whip the heavy cream and gradually add in powdered sugar and key lime zest until soft peaks form.
- Frost the cooled cake generously with the whipped cream mixture before serving. Garnish with additional lime zest if desired.
Banana Cream Cake
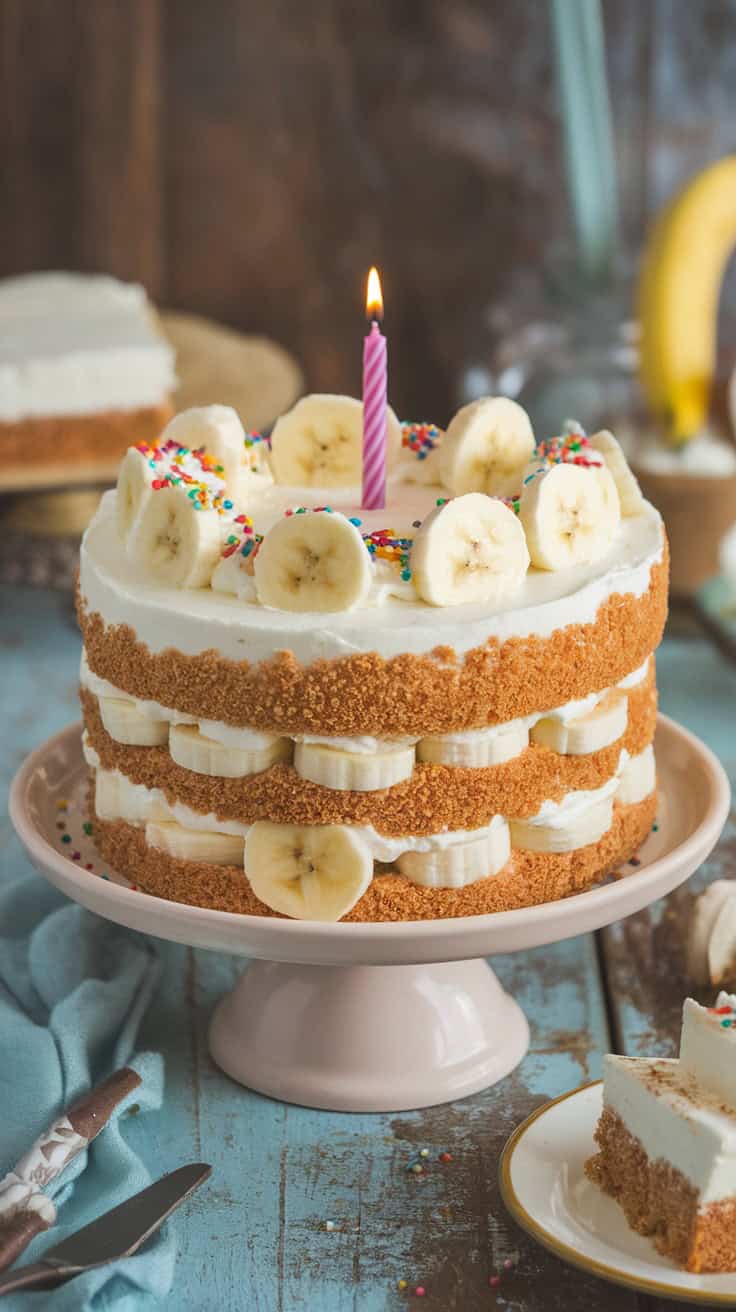
Banana Cream Cake is a delightful treat that’s perfect for outdoor birthday celebrations, especially in warm weather. With its light, fluffy texture and the sweet flavor of ripe bananas, every bite feels like a celebration. This cake is not only delicious but also simple to make, making it a go-to option for busy bakers.
The combination of banana cake layers and creamy frosting creates a refreshing dessert that’s sure to please guests of all ages. It’s a fun way to bring a tropical vibe to any birthday party!
Ingredients
- 2 cups all-purpose flour
- 1 1/2 teaspoons baking powder
- 1 teaspoon baking soda
- 1/2 teaspoon salt
- 1/2 cup unsalted butter, softened
- 1 cup granulated sugar
- 2 large eggs
- 1 teaspoon vanilla extract
- 1 cup ripe bananas, mashed (about 2-3 bananas)
- 1/2 cup buttermilk
- 1 cup whipped cream (for frosting)
- Banana slices for garnish
Instructions
- Preheat the Oven: Begin by preheating your oven to 350°F (175°C). Grease and flour two 9-inch round cake pans.
- Mix Dry Ingredients: In a bowl, whisk together the flour, baking powder, baking soda, and salt.
- Cream Butter and Sugar: In a separate large bowl, beat the softened butter and granulated sugar until light and fluffy. Add the eggs one at a time, mixing well after each addition. Stir in the vanilla extract.
- Add Bananas and Buttermilk: Mix in the mashed bananas and buttermilk until just combined. Gradually fold in the dry ingredients until fully incorporated.
- Bake the Cakes: Divide the batter evenly between the prepared pans. Bake for 25-30 minutes or until a toothpick inserted in the center comes out clean. Allow cakes to cool in pans for 10 minutes before transferring to wire racks to cool completely.
- Frost and Serve: Once cooled, spread whipped cream between the layers and on top of the cake. Garnish with banana slices. Slice and enjoy your Banana Cream Cake at the birthday party!
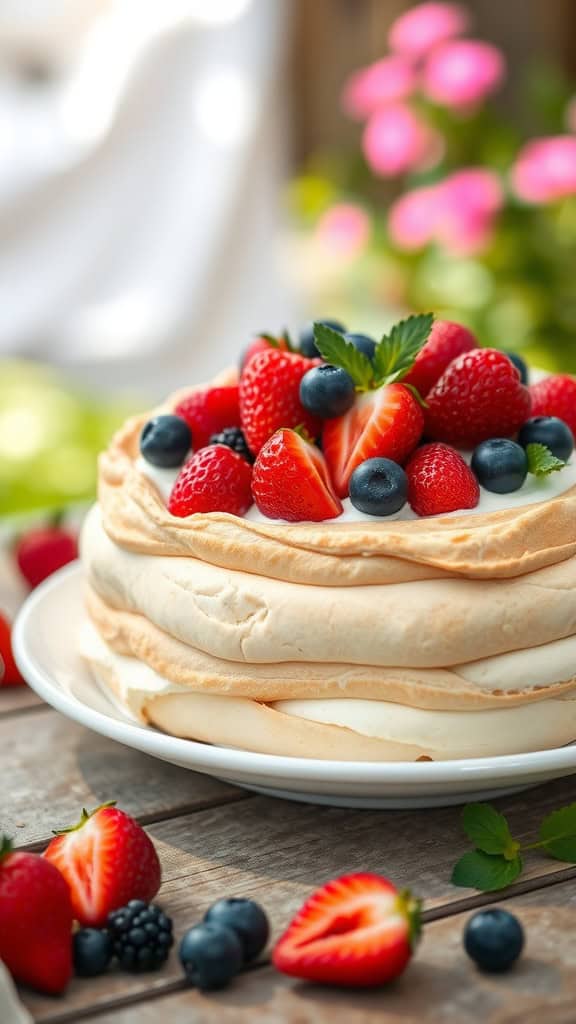
Berry Pavlova
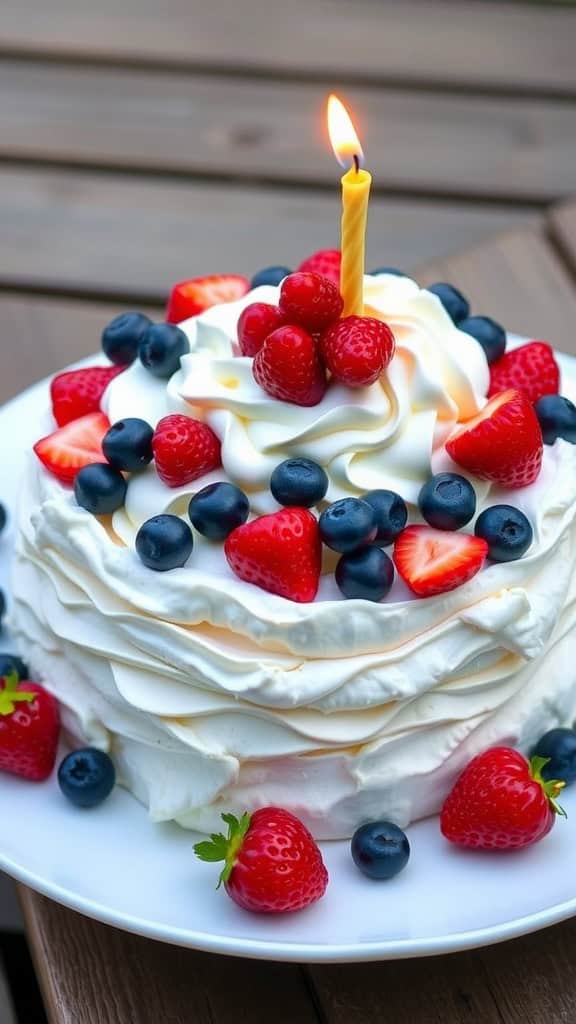
Berry Pavlova is a delightful dessert that combines a crisp meringue shell with a soft, marshmallow-like center, topped with fresh berries and whipped cream. The sweetness of the meringue balances beautifully with the tartness of the berries, creating a light and refreshing treat perfect for warm weather celebrations.
This recipe is surprisingly simple to make and will impress your guests without requiring too much time in the kitchen. The combination of textures and flavors makes it a standout choice for any outdoor birthday party.
Ingredients
- 4 large egg whites
- 1 cup granulated sugar
- 1 teaspoon vanilla extract
- 1 teaspoon cornstarch
- 1 tablespoon white vinegar
- 1 cup heavy whipping cream
- 2 tablespoons powdered sugar
- 1 teaspoon vanilla extract (for the cream)
- 2 cups mixed berries (strawberries, blueberries, raspberries)
Instructions
- Preheat the oven to 275°F (135°C) and line a baking sheet with parchment paper. Draw a 9-inch circle on the parchment as a guide.
- In a clean, dry bowl, beat the egg whites with an electric mixer until soft peaks form. Gradually add the granulated sugar, continuing to beat until the mixture is glossy and forms stiff peaks.
- Gently fold in the vanilla extract, cornstarch, and vinegar.
- Spread the meringue mixture within the circle on the parchment, creating a slight indention in the center.
- Bake for about 1 hour, or until the meringue is dry and can be easily lifted off the parchment. Turn off the oven and let it cool completely inside.
- Once cooled, whip the heavy cream with powdered sugar and vanilla until soft peaks form.
- Carefully transfer the meringue to a serving plate. Top with whipped cream and arrange the mixed berries on top.
Sunshine Citrus Cake
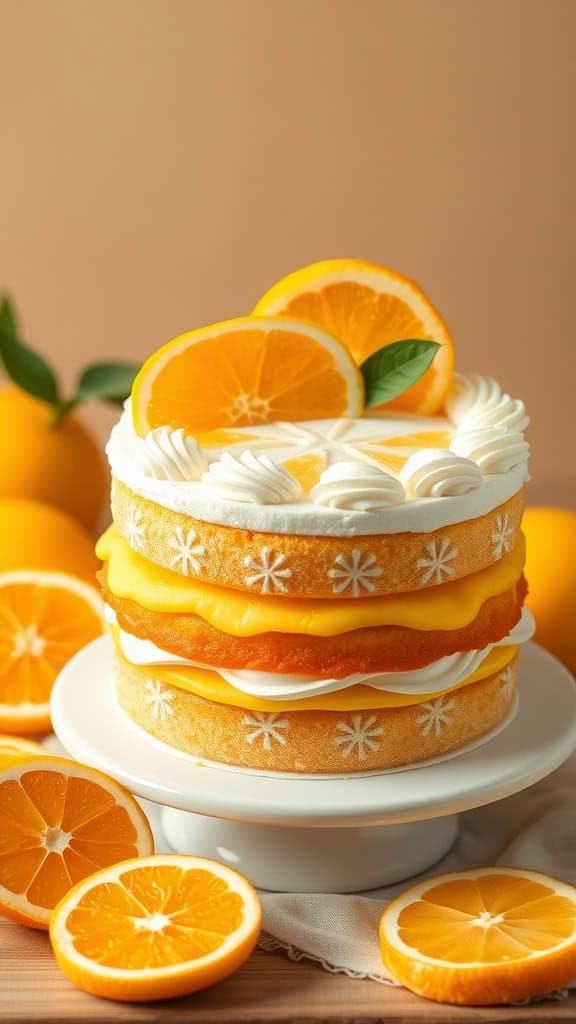
Bright, refreshing, and perfect for those sunny birthday celebrations, the Sunshine Citrus Cake brings a burst of flavor to the table. This cake features layers of fluffy citrus-infused sponge, creamy filling, and a zesty lemon or orange frosting that will make your taste buds dance. It’s not just delicious; it’s also simple to make, with straightforward steps that even beginner bakers can follow.
This cake is ideal for outdoor gatherings, as it holds up well in warm weather. The citrus flavors are light and uplifting, making it the perfect treat for a summer birthday. Plus, with its vibrant colors and beautiful presentation, it’s sure to impress your guests. Let’s get to the recipe!
Ingredients
- 2 cups all-purpose flour
- 1 ½ cups granulated sugar
- 1 tablespoon baking powder
- ½ teaspoon salt
- ½ cup unsalted butter, softened
- 1 cup milk
- 4 large eggs
- 1 teaspoon vanilla extract
- 1 tablespoon lemon zest
- 1 tablespoon orange zest
- 1 cup heavy cream
- ½ cup powdered sugar
- 1 cup lemon or orange curd
- Fresh citrus slices for garnish
Instructions
- Preheat your oven to 350°F (175°C). Grease and flour two 9-inch round cake pans.
- In a large bowl, mix together flour, sugar, baking powder, and salt. Add the softened butter and mix until crumbly.
- In another bowl, whisk together the milk, eggs, vanilla extract, lemon zest, and orange zest. Gradually add this mixture to the dry ingredients and beat until well combined.
- Divide the batter evenly between the prepared pans. Bake for 25-30 minutes or until a toothpick inserted in the center comes out clean.
- Let the cakes cool in the pans for 10 minutes before transferring to wire racks to cool completely.
- Once cooled, whip the heavy cream with powdered sugar until soft peaks form.
- Layer one cake on a serving plate, spread a layer of lemon or orange curd, then top with whipped cream. Place the second cake on top and repeat with curd and whipped cream.
- Garnish with fresh citrus slices before serving. Enjoy your refreshing Sunshine Citrus Cake!
Chocolate Raspberry Tart
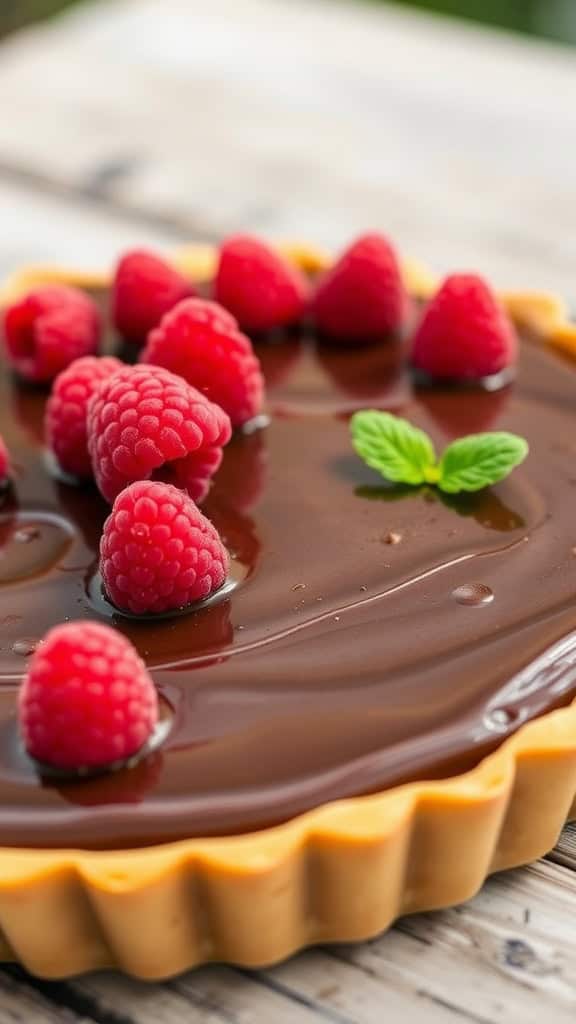
A Chocolate Raspberry Tart is a delightful blend of rich chocolate and tangy raspberries, making it a refreshing choice for warm weather celebrations. This tart features a smooth chocolate ganache layered over a buttery crust, topped with fresh raspberries for a burst of flavor.
This recipe is easy to follow, perfect for bakers of all skill levels. It not only tastes delicious but also looks elegant on any dessert table, making it a great choice for outdoor birthday parties.
Ingredients
- 1 1/2 cups graham cracker crumbs
- 1/4 cup granulated sugar
- 1/2 cup unsalted butter, melted
- 1 cup heavy cream
- 8 ounces semi-sweet chocolate, chopped
- 1 cup fresh raspberries
- Mint leaves for garnish (optional)
Instructions
- Prepare the Crust: Preheat your oven to 350°F (175°C). In a bowl, mix graham cracker crumbs, sugar, and melted butter until combined. Press the mixture into the bottom and sides of a tart pan. Bake for 10 minutes, then let it cool.
- Make the Ganache: In a saucepan, bring the heavy cream to a simmer. Remove from heat and add the chopped chocolate, stirring until smooth. Let the ganache cool slightly before pouring it into the cooled crust.
- Chill: Place the tart in the refrigerator for at least 1-2 hours to allow the ganache to set properly.
- Top with Raspberries: Once the tart is set, arrange fresh raspberries on top. If desired, garnish with mint leaves for an extra touch of freshness.
- Serve: Slice and enjoy your Chocolate Raspberry Tart chilled, making it a perfect treat for your outdoor birthday celebration!
Tropical Fruit Cake
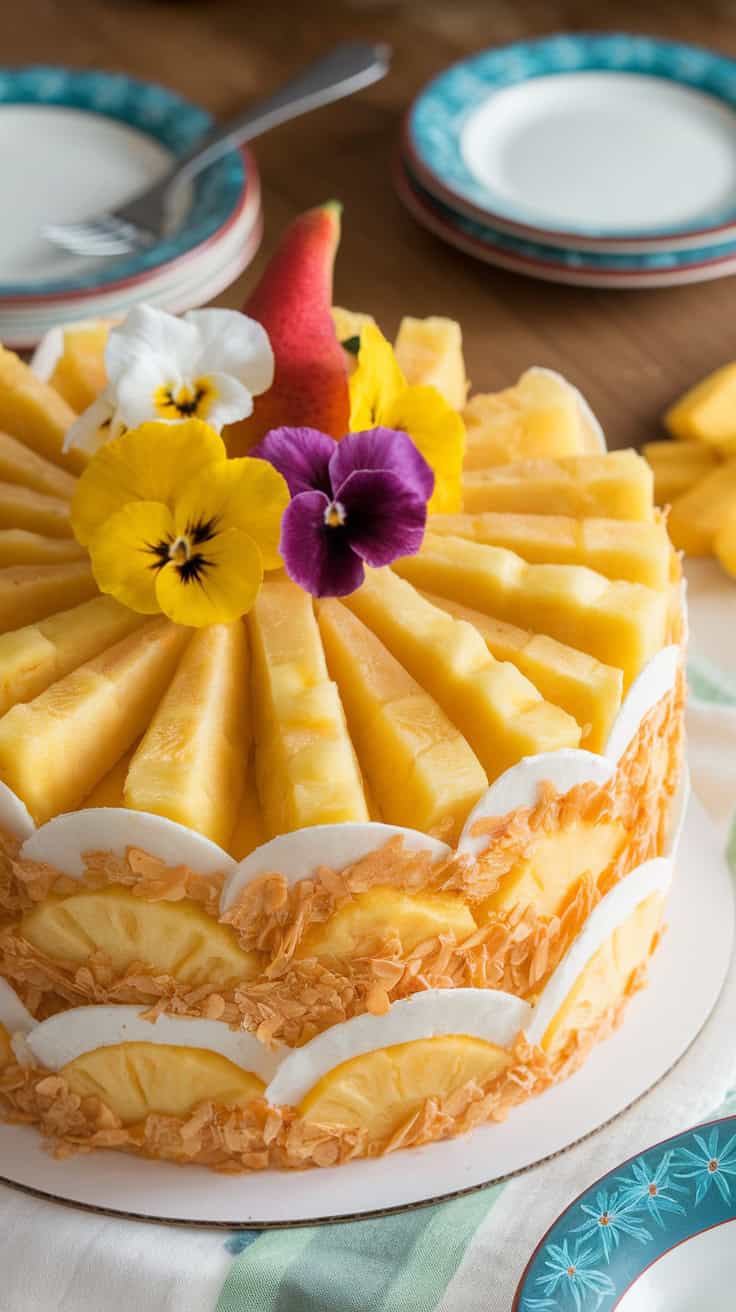
This Tropical Fruit Cake is a delightful treat that’s perfect for warm weather celebrations. Bursting with sweet flavors from fresh fruits like mango and pineapple, it’s a refreshing twist on traditional cakes. The light and airy texture makes it easy to enjoy outdoors, ensuring it holds up well even in the heat.
Simple to assemble, this cake combines layers of fluffy cake with creamy frosting and colorful fruits. It’s not only a feast for the taste buds but also a visual treat, making it a fantastic centerpiece for any birthday bash. Here’s how to make it!
Ingredients
- 2 cups all-purpose flour
- 1 ½ cups granulated sugar
- 1 tablespoon baking powder
- ½ teaspoon salt
- 1 cup unsalted butter, softened
- 4 large eggs
- 1 teaspoon vanilla extract
- 1 cup coconut milk
- 2 cups diced fresh mango
- 1 cup diced pineapple
- 1 cup heavy whipping cream
- ½ cup powdered sugar
- 1 cup chopped nuts (optional)
Instructions
- Preheat the Oven: Preheat your oven to 350°F (175°C) and grease two round cake pans.
- Make the Batter: In a large bowl, mix the flour, sugar, baking powder, and salt. Add the softened butter, eggs, vanilla extract, and coconut milk. Beat until smooth.
- Bake the Cakes: Divide the batter between the two prepared pans. Bake for 25-30 minutes or until a toothpick inserted comes out clean. Let them cool completely.
- Prepare the Frosting: In a separate bowl, whip the heavy cream with powdered sugar until stiff peaks form.
- Assemble the Cake: Once the cakes are cooled, spread a layer of whipped cream on top of one cake, add a layer of diced mango and pineapple, and sprinkle nuts if desired. Place the second cake on top and repeat the process. Top with more fruits and nuts for decoration.
Ice Cream Cone Cupcakes

Ice cream cone cupcakes are a delightful twist on traditional cupcakes, making them perfect for outdoor birthday celebrations. These fun treats combine the joy of cupcakes with the whimsical presentation of ice cream cones, ensuring they stand out at any party. With various flavors and colorful frosting, they are not only visually appealing but also deliciously satisfying.
Making ice cream cone cupcakes is simple and can be a fun activity for kids and adults alike. You can easily personalize them with different colors of frosting and toppings to match the party theme. These treats are also easy to serve, eliminating the need for plates and utensils, which is a bonus for outdoor events!
Ingredients
- 1 box chocolate or vanilla cake mix
- 1 cup water
- 1/2 cup vegetable oil
- 3 large eggs
- 24 ice cream cones
- 2 cups butter, softened
- 4 cups powdered sugar
- 1/4 cup heavy cream
- 1 teaspoon vanilla extract
- Food coloring (optional)
- Sprinkles for decoration
Instructions
- Preheat your oven to 350°F (175°C). In a large mixing bowl, combine the cake mix, water, vegetable oil, and eggs. Mix until smooth.
- Place the ice cream cones upright in a muffin tin to keep them stable while baking. Fill each cone with the cake batter until about three-quarters full.
- Bake for 18-20 minutes or until a toothpick inserted into the center comes out clean. Let them cool completely.
- While the cupcakes are cooling, prepare the frosting. In a large bowl, beat the softened butter until creamy. Gradually add the powdered sugar, heavy cream, and vanilla extract, mixing until light and fluffy. Add food coloring if desired.
- Once the cupcakes are cooled, use a piping bag to decorate the tops with frosting, creating a swirl effect. Finish with sprinkles for a festive touch.
Caramel Apple Cake
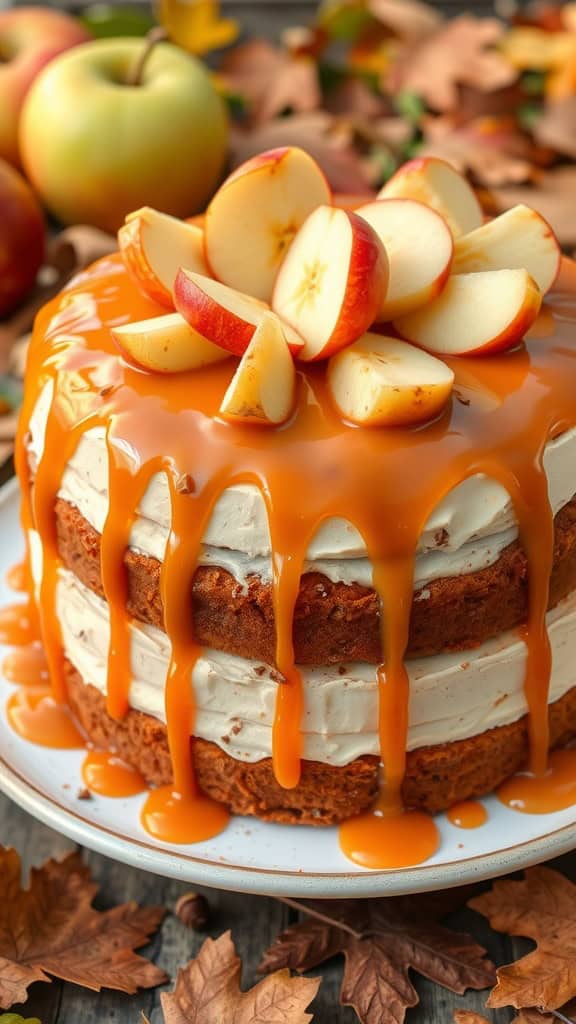
This Caramel Apple Cake is a delightful fusion of sweet and tangy flavors, making it a perfect treat for outdoor celebrations. The moist apple cake layers are complemented by a luscious caramel sauce that drips down the sides, creating a mouthwatering presentation that will impress your guests.
Not only is it simple to whip up, but it also holds up beautifully in warm weather, making it an ideal choice for a birthday bash. With every bite, you’ll enjoy the comforting taste of apples and caramel, bringing a touch of fall right to your table.
Ingredients
- 2 cups all-purpose flour
- 1 1/2 teaspoons baking powder
- 1/2 teaspoon baking soda
- 1/2 teaspoon salt
- 1 teaspoon ground cinnamon
- 1/2 cup unsalted butter, softened
- 1 cup granulated sugar
- 1/2 cup brown sugar, packed
- 2 large eggs
- 1 teaspoon vanilla extract
- 1 cup apples, peeled and diced
- 1 cup heavy cream
- 1 cup caramel sauce
- Extra apple slices for garnish
Instructions
- Preheat your oven to 350°F (175°C). Grease and flour three 8-inch round cake pans.
- In a bowl, whisk together flour, baking powder, baking soda, salt, and cinnamon. Set aside.
- In another large bowl, beat the butter and sugars until light and fluffy. Add eggs, one at a time, then stir in vanilla.
- Gradually add the dry ingredients to the wet mixture, mixing until just combined. Fold in the diced apples.
- Divide the batter evenly among the prepared pans and smooth the tops. Bake for 25-30 minutes or until a toothpick inserted comes out clean.
- Let the cakes cool in the pans for 10 minutes before transferring to wire racks to cool completely.
- Once the cakes are cool, whip the heavy cream until soft peaks form. Spread a layer of whipped cream between each cake layer, then drizzle caramel sauce on top.
- Top with extra apple slices and drizzle more caramel sauce before serving.
Berry And Cream Puff Cake
If you’re looking for a dessert that feels light and refreshing, a Berry and Cream Puff Cake is just the ticket. This delightful cake combines airy cream puffs stacked high with a medley of fresh berries, creating a colorful and tasty centerpiece for any outdoor celebration.
This recipe is simple to make but delivers on flavor and presentation, making it ideal for warm weather gatherings. The soft cream layers and tangy berries create a lovely balance that’s sure to please everyone at the party. Plus, because it’s not a traditional cake, it holds up well outdoors without melting away.
Ingredients
- 1 cup water
- 1/2 cup unsalted butter
- 1 cup all-purpose flour
- 1 teaspoon sugar
- 1/4 teaspoon salt
- 4 large eggs
- 2 cups heavy cream
- 1/4 cup powdered sugar
- 1 teaspoon vanilla extract
- 2 cups mixed fresh berries (strawberries, blueberries, raspberries)
Instructions
- Prepare the Cream Puffs: In a saucepan, combine water and butter over medium heat. Once the butter melts, stir in flour, sugar, and salt until the mixture forms a ball. Remove from heat and let it cool slightly.
- Mix in Eggs: Add eggs one at a time, mixing well after each addition until the dough is smooth. Drop spoonfuls onto a baking sheet lined with parchment paper.
- Bake: Preheat the oven to 400°F (200°C) and bake the puffs for about 20-25 minutes or until golden brown. Let them cool completely.
- Make the Whipped Cream: In a bowl, whip the heavy cream with powdered sugar and vanilla until soft peaks form.
- Assemble the Cake: Slice each cream puff in half and layer whipped cream and mixed berries inside. Stack the filled puffs on a serving plate and top with more whipped cream and a sprinkling of berries.
Peanut Butter Chocolate Cake
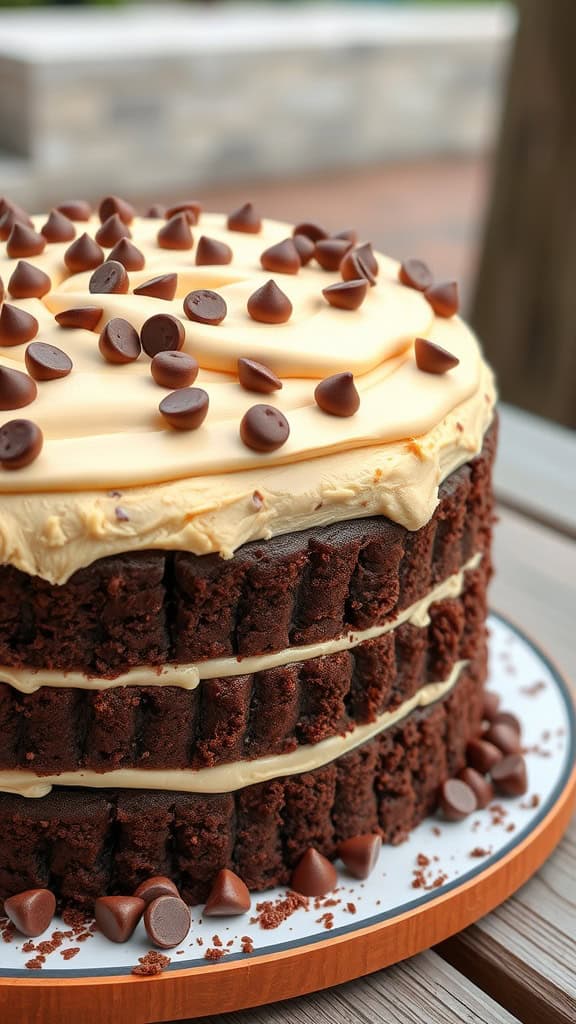
Get ready for a delightful treat that pairs the rich flavors of chocolate and creamy peanut butter! This Peanut Butter Chocolate Cake is a scrumptious option for outdoor birthday celebrations, offering both a tasty experience and a beautiful presentation. It’s simple enough for bakers of all skill levels to whip up, making it a stress-free choice for your next gathering.
This cake brings together moist chocolate layers, luscious peanut butter frosting, and a sprinkle of chocolate chips on top. It’s sure to be a hit, even in warm weather, as the frosting holds up nicely. Let’s dive into the recipe so you can start baking this delicious cake!
Ingredients
- 1 3/4 cups all-purpose flour
- 1 1/2 cups granulated sugar
- 3/4 cup unsweetened cocoa powder
- 1 1/2 teaspoons baking powder
- 1 1/2 teaspoons baking soda
- 1 teaspoon salt
- 2 large eggs
- 1 cup whole milk
- 1/2 cup vegetable oil
- 2 teaspoons vanilla extract
- 1 cup boiling water
- 1 cup creamy peanut butter
- 4 cups powdered sugar
- 1/2 cup unsalted butter, softened
- 1/4 cup milk
- 1 teaspoon vanilla extract
- Chocolate chips for topping
Instructions
- Preheat your oven to 350°F (175°C). Grease and flour two 9-inch round cake pans.
- In a large bowl, mix flour, sugar, cocoa powder, baking powder, baking soda, and salt together.
- Add eggs, milk, oil, and vanilla to the dry ingredients. Beat on medium speed for 2 minutes. Stir in boiling water until combined.
- Pour the batter evenly into the prepared cake pans. Bake for 30-35 minutes or until a toothpick inserted comes out clean. Let the cakes cool in the pans for 10 minutes before transferring to a wire rack to cool completely.
- While the cakes are cooling, prepare the peanut butter frosting. Beat together peanut butter and softened butter until creamy. Gradually add powdered sugar and milk, mixing until smooth. Stir in vanilla.
- Once the cakes are cool, place one layer on a serving plate. Spread a layer of frosting on top, then place the second cake layer on top. Frost the top and sides of the cake. Finish by sprinkling chocolate chips over the frosting.
Floral Buttercream Cake
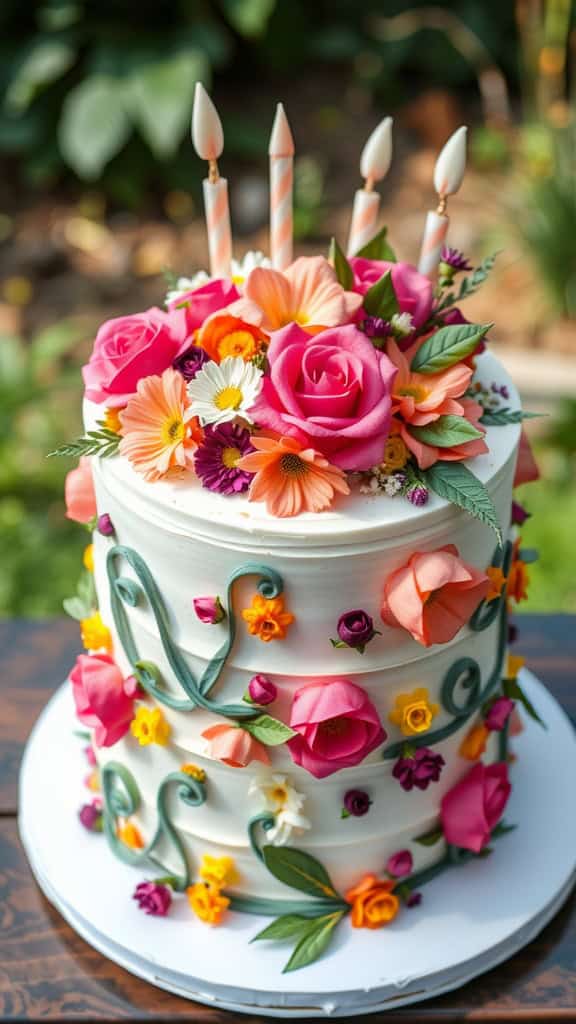
This Floral Buttercream Cake is a delightful choice for outdoor celebrations, especially on warm days. It features a soft, moist cake layered with light and fluffy buttercream, making it not only pleasing to the eye but also a treat for your taste buds. The floral decorations add a lovely touch, bringing a burst of color and natural beauty to your birthday festivities.
Easy to assemble, this cake can be customized with your favorite flavors, whether it’s vanilla, lemon, or chocolate. The buttercream holds up well in warmer temperatures, ensuring that your cake remains intact and delicious throughout the party. Plus, it’s simple enough for anyone to make, even if you’re a beginner in baking.
Ingredients
- 2 cups all-purpose flour
- 1 1/2 cups granulated sugar
- 1/2 cup unsalted butter, softened
- 1 cup milk
- 3 1/2 teaspoons baking powder
- 1 teaspoon vanilla extract
- 1/2 teaspoon salt
- 3 large eggs
- 4 cups buttercream frosting
- Assorted edible flowers for decoration
Instructions
- Preheat your oven to 350°F (175°C) and grease two 9-inch round cake pans.
- In a large bowl, cream together the softened butter and sugar until light and fluffy. Add in the eggs, one at a time, mixing well after each addition.
- In a separate bowl, whisk together the flour, baking powder, and salt. Gradually add this dry mixture to the creamed mixture, alternating with the milk. Stir in the vanilla extract.
- Pour the batter evenly into the prepared cake pans and bake for 25-30 minutes, or until a toothpick inserted in the center comes out clean.
- Allow the cakes to cool in the pans for about 10 minutes before transferring them to a wire rack to cool completely.
- Once cooled, layer the cakes with buttercream frosting in between. Frost the top and sides of the cake with the remaining buttercream.
- Decorate the top and sides of the cake with edible flowers to add a beautiful finishing touch.
Chiffon Cake With Fresh Fruit
Chiffon cake is a light and airy dessert that strikes a delightful balance between cake and sponge. It has a tender crumb and is perfect for outdoor celebrations, especially in warm weather. The cake’s subtle sweetness pairs beautifully with fresh, juicy fruit, making each slice a refreshing treat.
This recipe is simple enough for bakers of all levels. The combination of chiffon cake and seasonal fruits not only looks inviting but also adds a burst of flavor, making it a lovely centerpiece for any birthday party.
Ingredients
- 2 cups all-purpose flour
- 1 1/2 cups granulated sugar
- 1 tablespoon baking powder
- 1/2 teaspoon salt
- 1/2 cup vegetable oil
- 7 large eggs, separated
- 1 cup water
- 2 teaspoons vanilla extract
- 1 teaspoon lemon juice
- 1 cup heavy whipping cream
- 2 tablespoons powdered sugar
- 2 cups mixed fresh fruit (strawberries, blueberries, kiwi)
Instructions
- Preheat the oven to 325°F (160°C). In a large bowl, mix flour, sugar, baking powder, and salt.
- In another bowl, combine vegetable oil, egg yolks, water, vanilla, and lemon juice. Add this mixture to the dry ingredients and mix until smooth.
- In a separate bowl, beat egg whites until stiff peaks form. Gently fold the egg whites into the batter until no white streaks remain.
- Pour the batter into an ungreased tube pan. Bake for 55-60 minutes, or until a toothpick comes out clean. Invert the pan to cool completely.
- Once cooled, whip heavy cream with powdered sugar until soft peaks form. Frost the cake with whipped cream and top with fresh fruit.
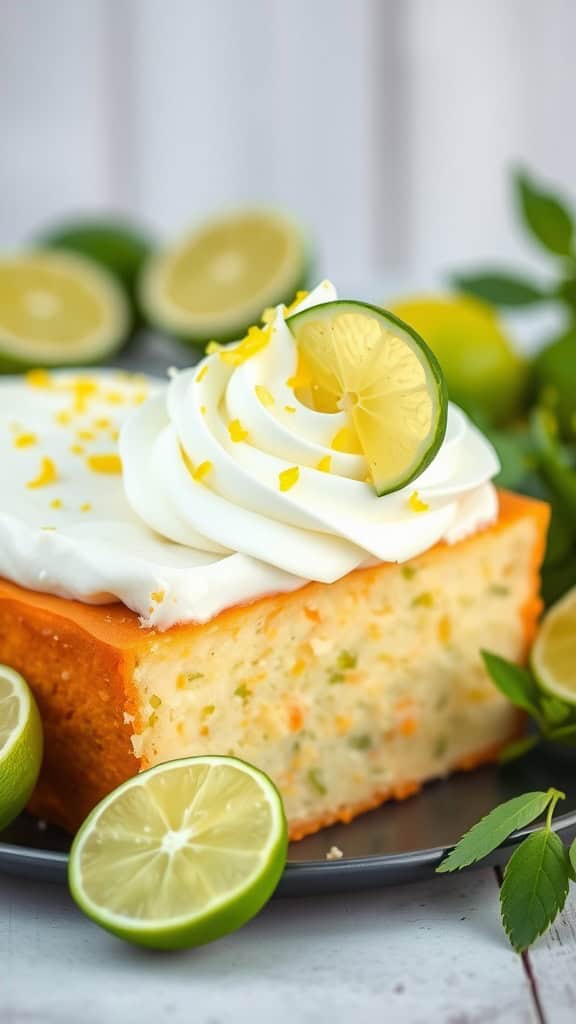
Coconut Lime Pound Cake
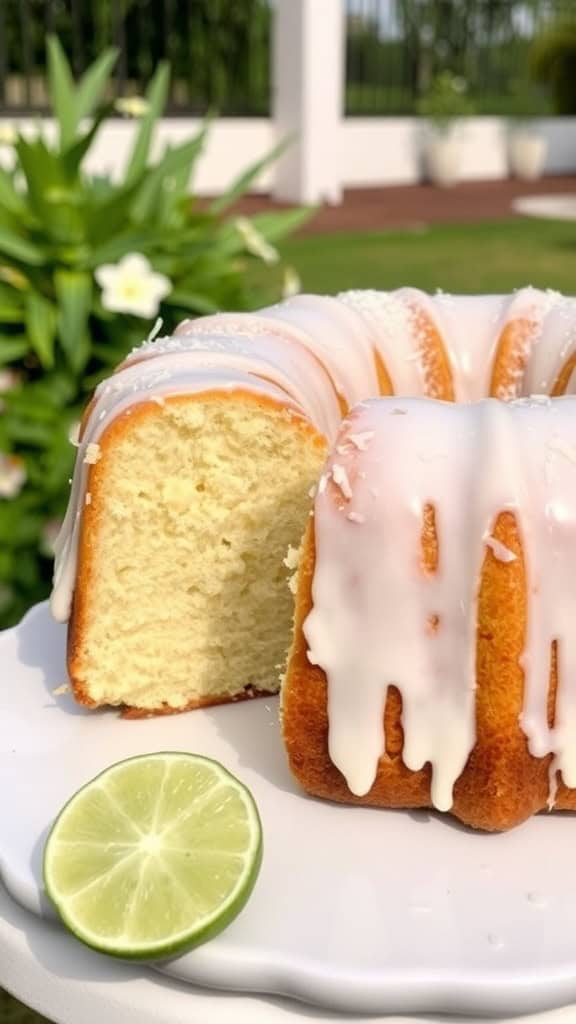
Coconut Lime Pound Cake is a delightful dessert that combines the tropical flavors of coconut and lime in a moist, dense cake. This recipe is not only easy to whip up, but it also holds its own in warmer weather, making it a great option for outdoor celebrations. The bright, zesty lime pairs perfectly with the rich coconut, creating a refreshing treat that is sure to please guests of all ages.
This cake is simple enough for bakers of any skill level. With just a handful of ingredients, you can achieve a delightful balance of sweetness and tanginess. Ideal for birthdays or picnics, this cake is sure to steal the spotlight!
Ingredients
- 1 cup unsalted butter, softened
- 2 cups granulated sugar
- 4 large eggs
- 3 cups all-purpose flour
- 1 teaspoon baking powder
- 1/2 teaspoon salt
- 1 cup coconut milk
- 1/4 cup fresh lime juice
- 1 tablespoon lime zest
- 1 cup shredded coconut
- 1 cup powdered sugar (for glaze)
- 2 tablespoons lime juice (for glaze)
Instructions
- Preheat the oven to 350°F (175°C) and grease a bundt pan.
- In a large bowl, cream together the softened butter and granulated sugar until light and fluffy. Add the eggs one at a time, mixing well after each addition.
- In another bowl, whisk together the flour, baking powder, and salt. Gradually add this dry mixture to the wet ingredients, alternating with the coconut milk, until just combined.
- Stir in the lime juice, lime zest, and shredded coconut until evenly distributed.
- Pour the batter into the prepared bundt pan and smooth the top. Bake for 50-60 minutes or until a toothpick inserted into the center comes out clean.
- While the cake is baking, prepare the glaze by mixing the powdered sugar and lime juice until smooth.
- Once baked, let the cake cool for 10 minutes in the pan before transferring it to a wire rack. Drizzle the glaze over the cooled cake and let it set before serving.
Oreo Ice Cream Cake
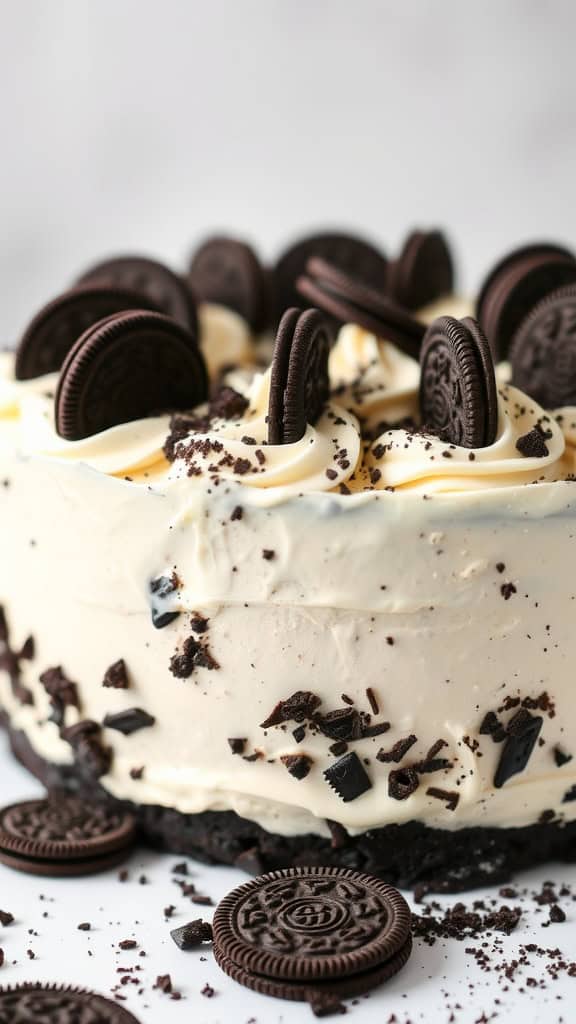
If you’re looking for a fun and delicious dessert to celebrate an outdoor birthday, an Oreo Ice Cream Cake is just the ticket! This cake combines creamy ice cream with crunchy Oreo cookies, making it a delightful treat that everyone will love. Plus, it’s surprisingly easy to whip up, perfect for those warm weather celebrations.
The layers of ice cream and cookie crumbles create a wonderful contrast in texture, and the rich chocolate flavor pairs beautifully with the smooth vanilla ice cream. It’s a dessert that not only looks festive but also holds up well in the heat, ensuring it stays delicious throughout the party.
Ingredients
- 1 package Oreo cookies, crushed
- 1/2 cup unsalted butter, melted
- 1 quart vanilla ice cream, softened
- 1 quart chocolate ice cream, softened
- 1 cup whipped cream
- Oreo cookies for garnish
Instructions
- Prepare the Crust: In a bowl, mix the crushed Oreo cookies with melted butter until well combined. Press this mixture into the bottom of a 9-inch springform pan to form a crust.
- Layer the Ice Cream: Spread the softened vanilla ice cream over the cookie crust, smoothing it with a spatula. Freeze for about 30 minutes until firm.
- Add the Chocolate Layer: Once the vanilla layer is set, spread the softened chocolate ice cream over it. Return the cake to the freezer for another 30 minutes.
- Finish with Whipped Cream: After the chocolate layer is firm, top the cake with whipped cream and garnish with additional Oreo cookies.
- Chill and Serve: Freeze the cake for at least 4 hours, or until completely solid. When ready to serve, let it sit at room temperature for a few minutes before slicing.
Chocolate Covered Strawberry Cake
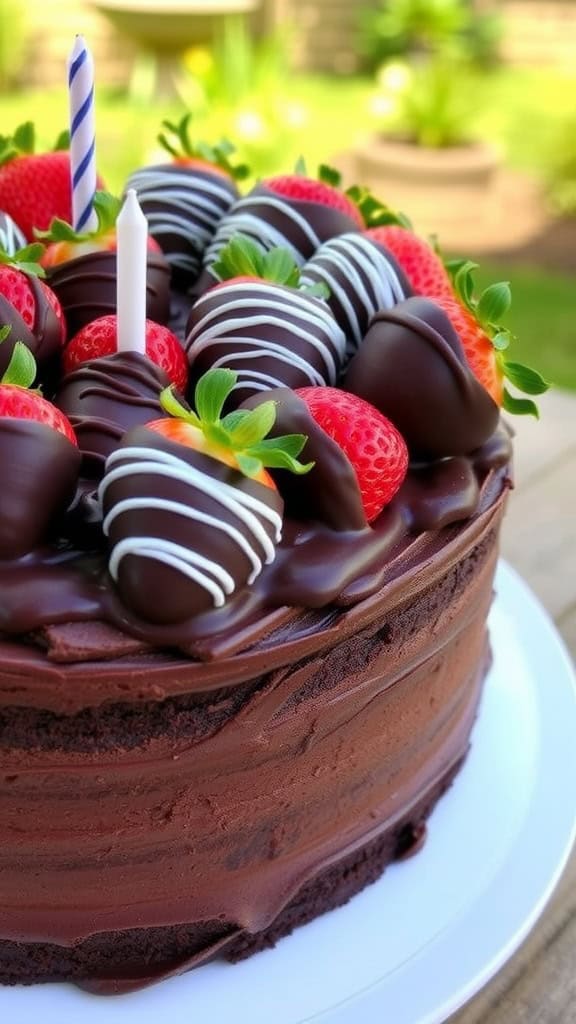
This Chocolate Covered Strawberry Cake is a delightful treat that brings together the rich flavors of chocolate and the freshness of strawberries. It’s not only visually appealing but also offers a perfect balance of sweetness and tartness, making it a hit for outdoor birthday celebrations.
The best part? This cake is quite simple to make, even for those who might not consider themselves bakers. With layers of moist chocolate cake, creamy frosting, and topped with chocolate-dipped strawberries, it’s a dessert that everyone will love.
Ingredients
- 1 ¾ cups all-purpose flour
- 1 ¾ cups granulated sugar
- ¾ cup unsweetened cocoa powder
- 1 ½ teaspoons baking powder
- 1 ½ teaspoons baking soda
- 1 teaspoon salt
- 2 large eggs
- 1 cup whole milk
- ½ cup vegetable oil
- 2 teaspoons vanilla extract
- 1 cup boiling water
- 1 ½ cups heavy whipping cream
- 1 ½ cups semi-sweet chocolate chips
- 12-15 fresh strawberries
- 1 tablespoon coconut oil (for dipping strawberries)
Instructions
- Preheat the oven to 350°F (175°C) and grease two 9-inch round cake pans.
- In a large bowl, mix flour, sugar, cocoa powder, baking powder, baking soda, and salt.
- Add eggs, milk, oil, and vanilla to the dry ingredients and mix until well combined. Gradually stir in boiling water until smooth.
- Pour the batter evenly into the prepared pans and bake for 30-35 minutes or until a toothpick comes out clean. Let the cakes cool completely.
- For the frosting, melt chocolate chips in a bowl over simmering water. In a separate bowl, whip heavy cream until soft peaks form, then fold in the melted chocolate until smooth.
- Once the cakes are cooled, place one layer on a serving plate and spread a layer of frosting on top. Add the second layer and frost the top and sides of the cake.
- For the chocolate-covered strawberries, melt the chocolate chips with coconut oil. Dip the strawberries in the chocolate, letting the excess drip off, and place them on parchment paper to harden.
- Once the strawberries are set, decorate the top of the cake with them. Enjoy your Chocolate Covered Strawberry Cake at your outdoor celebration!